Installing Java SE Development Kit 8
- In a Linux environment, unzip the Java SE Development Kit 8 under the command line; for example:
tar zxvf jdk-8u101-linux-x64.tar.gz
- In a Windows environment, click
jdk-8u101-windows-x64.exeto install Java SDK 8. - After extracting the zip, you must set the environment variables, described in the following section, so that Java is available in the system PATH.
Java SDK 8 Environment Variables
Reason for setting variables
The purpose of setting operating system environment variables is so that the Java SDK is available to run from anywhere in the system.
Linux
Variables in Linux
The JAVA_HOME and PATH environment variables are set in /etc/profile. You may need to create the variables, or modify them if they already exist.
To set the environmental variables in Linux, follow these steps:
As the root user, enter the following in the /etc/profile file. A PATH variable should already be created in this file, so be sure to define the JAVA_HOME and export before the PATH export. Replace
<some_path>with the correct path fragment for Java installations.export JAVA_HOME=<some_path>/jdk1.8.0_101 export PATH=$JAVA_HOME/bin:$PATH
Log out and log back in so that the system recognizes your changes.
Verifying the Environment Variables in Linux
To verify that environment variables have been set correctly, follow these steps:
- From the command line, enter:
echo $JAVA_HOME
Both of these commands should return the location where you installed these tools. - To verify your Java SDK installation, enter
java -versionfrom a command prompt. You should seejava version "1.8.0_101".
Windows
Variables in Windows
Set the JAVA_HOME and PATH environment variables in system properties.
To set the environmental variables in Windows, follow these steps:
- In Windows, select Control Panel, then select the Systems application. In the Systems window, select the Advanced tab.
- On the Advanced tab, select the Environment Variables button. To add a new system variable, select the New button.
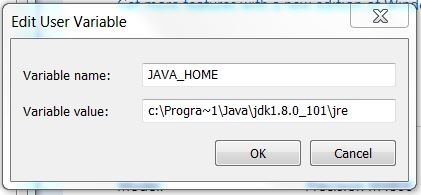
- In the Variable name text box, enter
JAVA_HOME. - In the Variable value text box, enter the location of your Java installation, (for example,
C:\ProgramFiles\Java\jdk1.8.0_101)|
- In the Variable name text box, enter
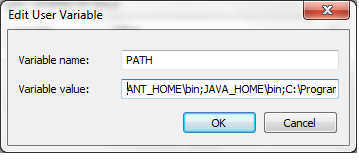
- Select the PATH system environment variable, and select the Edit button. This opens the Edit User Variable dialog box, displayed here as an example.
In the Variable value text box, prepend the following text in front of the text that already exists in the Variable Value field and click OK.
%JAVA_HOME%\bin;
Verifying the Environment Variables in Windows
To verify that the environment variables have been set correctly, follow these steps:
- From the command line, enter:
echo %JAVA_HOME%
The commands should return the location where you installed these tools. - To verify your Java SDK installation, enter
java -versionfrom a command prompt. You should seejava version "1.8.0_101".
Installing Apache Ant
- Unzip the Apache Ant distribution files using a command line unzip tool or a zip utility, such as WinZip. For example, in Linux, the following command can be used:
tar zxvf apache-ant-1.8.4-bin.tar.gz
- After extracting the zip, you must set the environment variables, described in the following section, so that Ant is available in the system PATH.
Apache Ant Environment Variables
Reason for setting variables
The purpose of setting operating system environment variables is so that the Ant build tool is available to run from anywhere in the system.
Linux
Variables in Linux
The ANT_HOME and PATH environment variables are set in /etc/profile. You may need to create the variables or modify them if they already exist.
To set the environmental variables in Linux, follow these steps:
- As the root user, enter the following in the /etc/profile file. A PATH variable should already be created in this file, so be sure to define the ANT_HOME export before the PATH export. Replace <some_path> with the correct path fragment for Ant installations.
export ANT_HOME=<some_path>/apache-ant-1.8.4
export PATH=$ANT_HOME/bin:$PATH - Log out and log back in so that the system recognizes your changes.
Verifying the Environment Variables in Linux
To verify that environment variables have been set correctly, follow these steps:
- From the command line, enter:
echo $ANT_HOME
the above commands should return the location where you installed these tools. - To verify your Ant installation, enter:
ant -versionfrom a command prompt. You should see:Apache Ant version 1.8.4 compiled on December 13 2006.
Windows
Variables in Windows
The ANT_HOME and PATH environment variables are set in system properties.
To set the environmental variables in Windows, follow these steps:
- In Windows, select Control Panel, then select the Systems application. In the Systems window, select the Advanced tab.
- On the Advanced tab, select the Environment Variables button. To add a new system variable, select the New button.
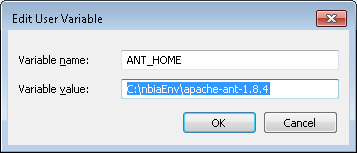
- In the Variable name text box, enter
ANT_HOME. - In the Variable value text box, enter the location of your Ant installation, (for example,
C:\ProgramFiles\apache-ant-1.8.4).
- In the Variable name text box, enter
- Select the PATH system environment variable, and select the Edit button. This opens the Edit User Variable dialog box, displayed here as an example.
- In the Variable value text box, prepend the following text in front of the text that already exists in the Variable Value field and click OK.
%ANT_HOME%\bin;
Verifying the Environment Variables in Windows
To verify that the environment variables have been set correctly, follow these steps:
- From the command line, enter:
echo %ANT_HOME%
the above commands should return the location where you installed these tools. - To verify your Ant installation, enter ant -version from a command prompt. You should see
Apache Ant(TM) version 1.8.4 compiled on May 22 2012.


