To add findings to a characterization, you can add data directly to Data and Conditions by creating columns and adding data manually or you can import UTF-8 .csv (comma-separated value) files. Information can include laboratory conditions, pH, or temperature. You can add as many files as you wish.
- Add data values to Data and Conditions.
- To import a file of data values:
Organize your data so that each column name is unique. The following table provides an example.
column_type:condition condition datum column_name:Experiment Formulation (other):Size by DLS value_type: score mean value_unit: nm constant_value:0 1 5 2 1 10 4 1 15 6 2 5 8 2 10 10 2 15 12 To add a value that is not currently in the system, such as a column name, insert "(other):" before the value.
The "value_type:", "value_unit:", and "constant_value:" rows are optional. In those rows, an empty cell is acceptable.
- Save the spreadsheet of data values to a UTF-8 csv file (not just csv).
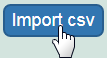
- Click Import csv and follow the prompts to add the data file to the Findings Info.
- The columns and data are added to Data and Conditions.
- To add the data values manually:
- Specify the number of columns and rows for the matrix, and click Update.

- Add the data values to the rows.
- Specify the number of columns and rows for the matrix, and click Update.
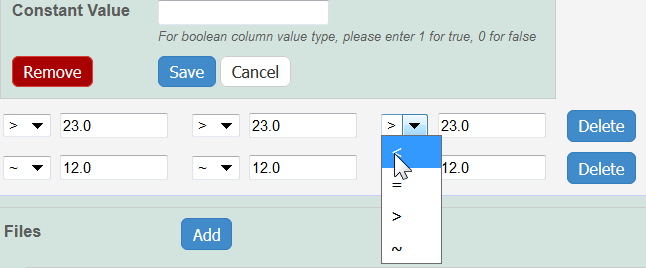
Whether you imported or added information manually, you can preface each data value with one of the following: Maintain the default, equal to (=), greater than (>), less than (<), or approximate (~).
- To import a file of data values:
- To define a column, click an underlined column heading.
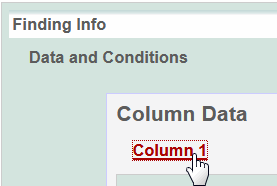
The Column Definition panel appears.
- Select a Column Type, Datum or Condition.
Select a Column Name or select other and add a new one.
Column Notes
You can add up to three cell viability Column Names, including cell viability, cell viability B, and cell viability C. You can further identify the column with the Column Value Type.For Column Type, Datum, the following characterization(s) display customized Column Name options.
Characterization Type Column Type and Column Name Option(s) Physico-Chemical - Molecular – Molecular Weight
- Purity – % purity for sample
- Relaxivity – R1, R2, T1, T2
- Size – PD1, Peak N, RMS size, Z Average
- Surface – charge, zeta potential
In Vitro Enzyme Induction – % of Control
In Vivo Click Other to name the column yourself. For Column Type, Condition, all characterizations provide the Column Name options in the left column of the following table. The Column Name auto-populates the Condition Property options in the right column.
Column Type, Condition Auto-populates Column Name Column Name Auto-populates
Condition PropertyN/A
media type, serum percentage
bandwidth, frequency, time, wavelength
N/A
lyophilized, time
time
N/A
N/A
lyophilized, time
ion concentration, ionic strength, molecular formula, osmolality, serum percentage, with serum
number of pulses, pulse duration
N/A
To further identify a column, select a Column Value Type.
Once the column information is saved, the Column Type is shown in parentheses after the Column Name, such as cell viability (mean).- Select a Column Value Unit, or select other and add one.
If you want the same value to fill all rows in a column, add a Constant Value.
For Column Value Type, boolean
For Column Value Type, Boolean, enter a Constant Value of 1 for true and 0 for false.Click Save, and the column(s) are updated.
If needed, click Set Column Order to change the order of the column headings in the matrix.
- Click Save in the Finding section.