Page History
Topics on this page describe how to use the NBIA Data Portal to search local and remote image databases for images.
| Tip |
|---|
You can print and export this user guide. |
Topics in this chapter include:
| Table of Contents |
|---|
Introduction to the NBIA Data Portal
NBIA Data Portal enables you to search for images in the local NBIA in vivo image repository. If available, you can also search remote imaging archives.
NBIA submissions are organized in the following hierarchy, which is important to remember in creating your search query and reviewing search results:
Collection > Patient (Subject) > Study > Series > Images |
|---|
In other words, a collection is the largest organizing concept within NBIA and it includes data about patients (also called subjects). As you continue to drill down to more granular concepts, patients contain studies, studies contain (image) series, and series contain individual images.
Browser Support
NBIA supports the latest versions of Google Chrome and Mozilla Firefox browsers.
Searching for Image Studies
You can search and download public data without logging in to the NBIA Data Portal. To access restricted data, however, you must log in first to see that data in your search results.
NBIA provides two ways to search for image studies:
When you first open NBIA Data Portal, the Summary tab displays filters for a simple search and pie charts.
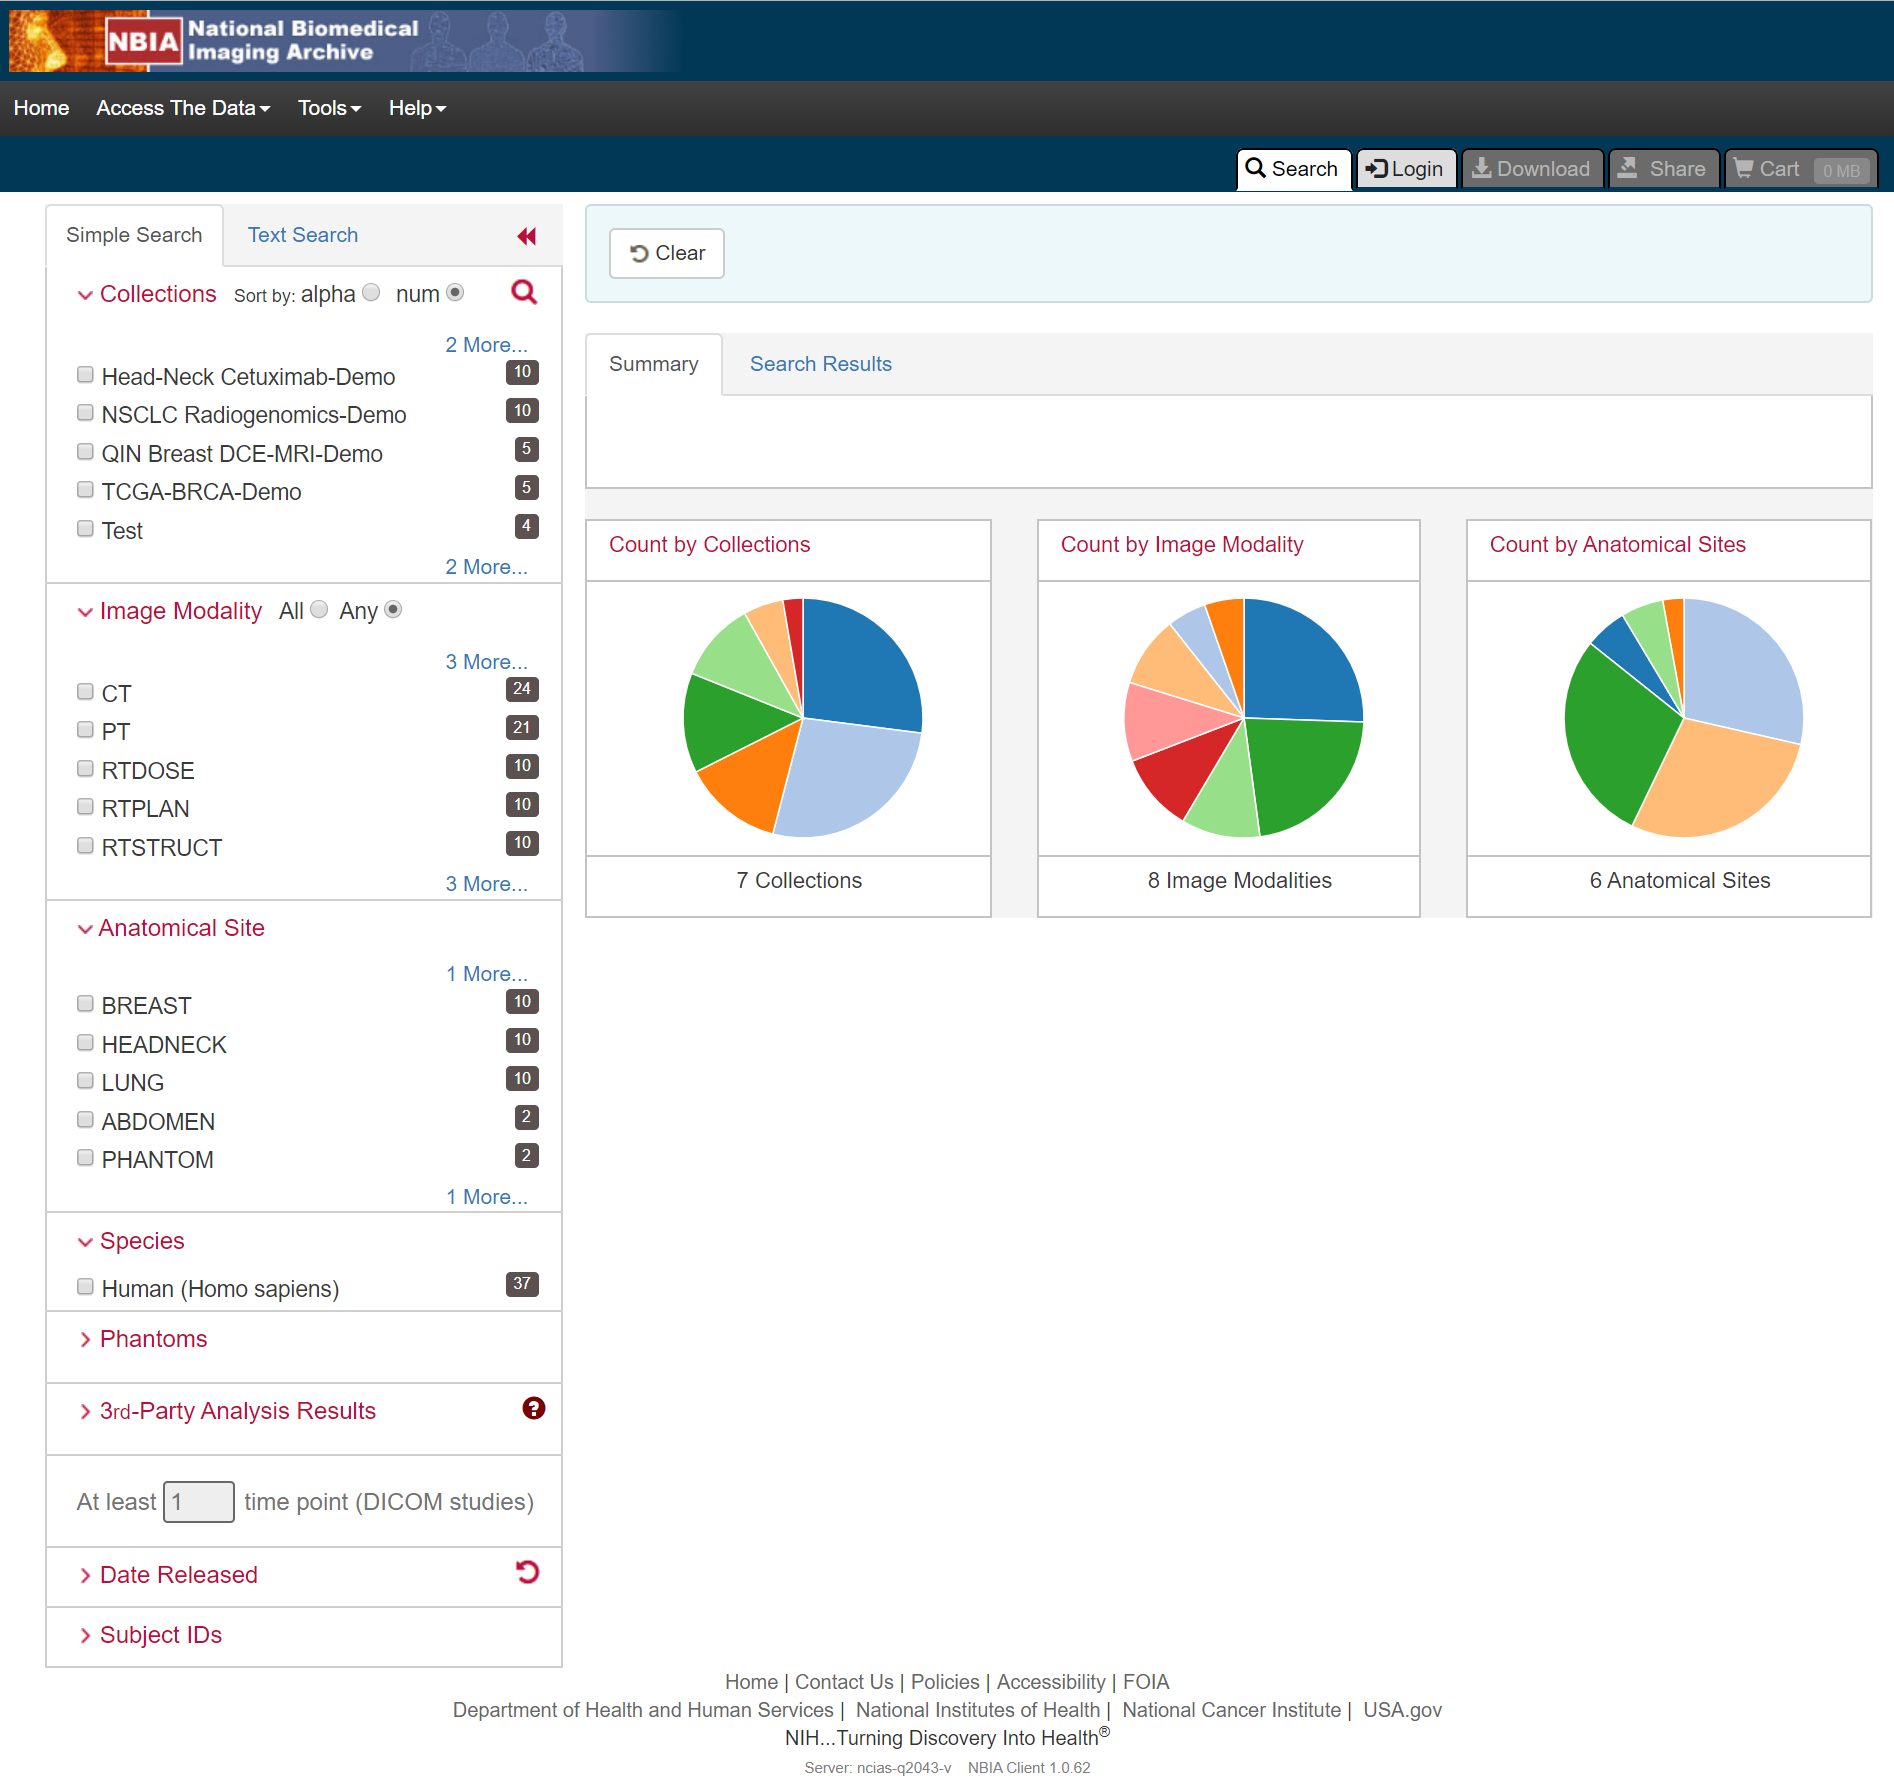
Click one or more boxes next to each search filter to select it. As you select search filters, they move to the top of the list. They also appear in Boolean query format above the pie charts. This query specifies the filters you have applied to your search. Click Clear if you want to remove all of your filters at once and start over. You can save your query as a URL for later use or to put in an email to a colleague. For more information about sharing, go to NBIA Data Portal User Guide-deleteNBIA Data Portal User Guide-delete.
You can filter (narrow) your search by Collections, Image Modality, Anatomical Site, Species, Phantoms, 3rd-Party Analysis Results, Date Released, and Subject IDs. You can also specify the minimum number of image studies you want to match each search filter. For Collections, if you know the name of the collection, click ![]() to enter it instead of finding and clicking the collection's box.
to enter it instead of finding and clicking the collection's box.
The Simple Search page shows a summary of image studies that match your search criteria. Your selections appear in the following ways:
- Boxes you selected are checked.
- Pie charts update to show the exact search results.
- Breadcrumb-style labels at the top of the page show the applied search filters (not all may display due to space constraints).
- Count of search results appears.

The pie charts show the count of image studies in your search results by Collection, Image Modality, and Anatomical Site. Click a pie slice or hover over it to see the name of the Collection, Image Modality, or Anatomical Site, and number of each, in your search results.

The Search Results tab shows the same results as the pie charts but in tabular form.

Text searches involve entering any text that might appear in any search filter.

Results are displayed in pie charts and a table, just as with the simple search.
Accessing Limited-Access Collections
You can search and download public data without logging in to the NBIA Data Portal. To access restricted data, however, you must log in first to see that data in your search results. Consult the TCIA Collections page to learn which collections have limited access.
- In the top menu bar, click
 .
.
The Login window appears.
- Enter your user name and password, then click Log In.
Performing a Simple Search
| Include Page | ||||
|---|---|---|---|---|
|
Performing a Text Search
| Include Page | ||||
|---|---|---|---|---|
|
Viewing Subject Details
The search results from your query are presented both on the Summary tab in pie charts and on the Search Results tab in a table. Each record in the table corresponds to one subject (patient) and displays the collection(s), study(ies), and image series associated with that subject.
From the Search Results tab, you can view subject details, view all image series associated with the subject, and add image series to your cart for download. You can also view the DICOM header for a selected image series. In the future, you will be able to view the image.
To view subject details
- Search for studies that match criteria that interest you.
The Summary tab refreshes to show your search results in pie chart form. - Click the Search Results tab.
The search results that match your criteria appear sorted by Subject ID.
You can now add all studies associated with a subject to your cart at the same time or drill down to an individual study and add it to your cart instead.
Click a Subject ID link.
A list of all studies associated with this subject appear. In this example, this subject is only associated with one study, and only one image series is associated with that study.
Tip The red asterisk indicates that the date, which is the date that this series was first available at TCIA, has been offset to protect private health information.
- Click the arrow to the left of the cart icon to view details about the selected study.
All of the image series associated with that study appear.
You can now
- Add an image series to your cart
- View the series description, modality, manufacturer, number of images, and series ID
- View thumbnails of the image series
- View an animation of the image series (this feature is not yet available)
- View DICOM data for this image series
Viewing Thumbnails of the Image Series
You can view thumbnails of all images in the selected series and then open selected images for further analysis in another image system.
To view thumbnails
- View the details for a subject.
- Select a study and view its details.
- In the row for an image series, click
 .
.
Thumbnails of all of the images in the selected image series appear.
- Click any image to download it to your computer.
Follow your browser's instructions to open or save the file.
Viewing DICOM Data
Digital Imaging and Communications in Medicine (DICOM) is a standard for handling, storing, printing, and transmitting information in medical imaging.
You can view the DICOM tags that form the header of the selected image series.
To view DICOM data
- View the details for a subject.
- Select a study and view its details.
- In the row for an image series, click
 .
.
The DICOM tags associated with the image series appear.
Downloading NBIA Images
You can download items you add during the current work session. Before you download items you must download and then install the NBIA Data Retriever.
You select items to download by first searching for them in NBIA and then adding them to your cart.
The following topics are in this section:
| Table of Content Zone | ||||||||||
|---|---|---|---|---|---|---|---|---|---|---|
| ||||||||||
Adding Data to the CartYour cart is a holding place for data you have selected to download. You can add all image series associated with a subject, all image series associated with a study, or one or more selected image series to your cart. To add all image series associated with a subject to the cart
To add all image series associated with a study to the cart
To add one or more image series to the cart
|


Exporting Data to a Spreadsheet
| Include Page | ||||
|---|---|---|---|---|
|
Sharing a Query
You can save your query for later use or share it with a colleague by email.
To share a query
- In the top menu bar, click
 and then select Share my query.
The Query URL box appears.
- Click Copy URL.
The URL copies into your Clipboard. Paste the URL into an email or a document.
Note Shared queries honor data permissions that may exist. Each person that runs the shared query will only see search results that he or she is allowed to see.
Sharing Data in Your Cart
Once you have added data to your cart, you can share it as a URL to a static set of data. When you or a colleague opens the URL in a browser window, NBIA opens to the cart page.
In the legacy NBIA data portal, this was called a shared list.
To share data in your cart
- Add data to your cart.
- In the top menu bar, click and then select Share My Cart.
The Retrieve Cart Data URL box appears.
- Click Copy URL.
The URL copies into your Clipboard. - Paste the URL into an email or a document.
| Info |
|---|
The shared cart honors data permissions that may exist. Each person that opens the shared cart will only see data that that person is allowed to see. |