Page History
...
- Log in as described in Logging In via the GUI. The Dashboard appears.
- Browse for the data destination, as described in Browsing for Data via the GUI. Navigate to and right-click the existing collection in which you want to create your new collection. Click Add Collection. (Another option is as follows: Click Register > Collection.) The Register Collection page appears.
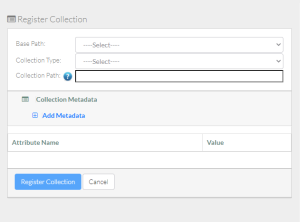
If you browsed to the data destination, that portion of the page has only the Collection Type and Collection Path fields, with a system-generated collection path already specified. If the Base Path field is available, select the base path specified by your group administrator. An information icon (
 ) appears next to the Base Path field and the system begins to populate values in the Collection Type field.
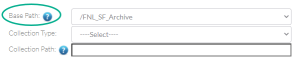
Consider examining the valid hierarchy for the selected base path. To do so, click the information icon next to the Base Path field. A Valid Hierarchy and Mandatory Metadata chart appears indicating the collection type or types allowed within each collection type. In the chart, a check mark indicates each collection in which you can register data files.
To close the Valid Hierarchy chart, click elsewhere on the page. For details, refer to Viewing the Valid Hierarchy and Metadata Information for an Archive.
- Specify the rest of the data destination:
If there is more than one collection type, select one for the new collection. For guidance on selecting a collection type, refer to your group administrator. For some collection types, the system displays a list of required and/or optional metadata attributes.
In the Collection Path field, specify the full path, including the base path and the name of the collection you intend to create. Avoid using invalid characters such as the space character, question mark (?), semicolon (;), backslash (\), or double quote ("). Consider the following example:
Path Example Base path /SAMPLE_Archive Collection path /SAMPLE_Archive/Sample_Collection_Name
- Consider hovering over the information icon () for each required attribute. A tooltip appears with information about that attribute.
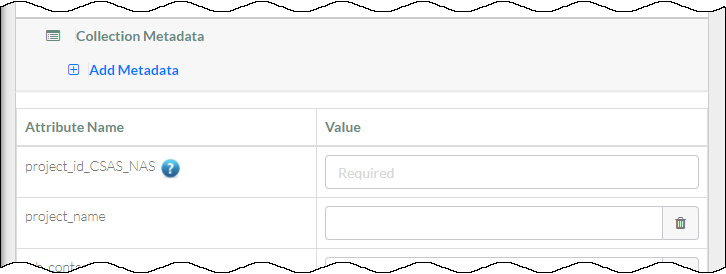
- Specify the collection metadata:
Include Page shared step - add metadata shared step - add metadata If you change your mind about adding an attribute, click the trash can icon next to that attribute. If you proceed to update the collection with a new attribute, the attribute name is permanent.
Include Page shared step - specify attribute values shared step - specify attribute values
Click Register Collection. The system checks whether the data you have entered is valid for the selected base path and collection type:
- If the data you have entered is not valid, the system displays an error message.
- If the data you have entered is valid, the system saves the new collection. The Collection page appears, displaying details about the new collection. For information, refer to Viewing Metadata via the GUI.
...