Page History
| Page info | ||||
|---|---|---|---|---|
|
| Tip | ||||||
|---|---|---|---|---|---|---|
| ||||||
|
This guide explains how to use the caBIG® Annotation and Image Markup (AIM) Template Manager for AIM Information Model Version 3.0. The intended audience for this guide is a biomedical researcher familiar with the AIM information model.
| Panel | ||||
|---|---|---|---|---|
Topics in this guide include:
|
| Info | ||
|---|---|---|
| ||
You can create a PDF of the guide. For instructions refer to the tip How do I print multiple pages? If you want to print a single page, refer to How do I print a page? |
Getting Started with the AIM Template Manager
Getting Started with the AIM Template Manager
The AIM Template Manager allows you to generate a set of well-defined The AIM Template Manager allows you to generate a set of well-defined questions and answer choices to facilitate collecting information for a particular purpose, such as a The Cancer Genome Atlas Glioblastoma (TCGA GBM) study. These questions and answers are contained in an AIM XML template file that you can import into an AIM-enabled application. Aided by the information in the XML file, users of the AIM-enabled application can then annotate medical images using a controlled vocabulary and standard template. This results in simple and constrained annotations that are reproducible and consistent. Finally, the AIM-enabled application captures answers and then exports them as an AIM XML document or AIM Digital Imaging and Communications in Medicine (DICOM) Structured Reporting (SR), which can be sent to the AIM Data Service or DICOM store storage Service Class Provider (SCP), respectively.
You use the AIM Template Manager to design templates based on a lexicon of standard and user-definable terms. You can then collect multiple templates into template groups. You complete the process by downloading a template group as an XML file to your local computer.
AIM templates are based on the AIM template XML schema, which in turn is based on the AIM 3.0 model.
Why Use the AIM Model?
Imaging reports contain both graphical drawings and medical knowledge in the form of annotations. These annotations are stored as unstructured text and separated from graphical drawings, which are typically in a proprietary format on an imaging system. Extracting this valuable medical information and combining them with drawings on another system is time-consuming and cumbersome to filter and search.
...
Working with Template Groups
| Tip | ||
|---|---|---|
| ||
The AIM Template Manager automatically saves your work after each selection you make. An animated image appears to indicate when a save is occurring. |
Adding a Template Group
A template group is a container that holds individual templates.
...
- Click the Template Groups tab.
- Below the left panel, click
 . The new template group window appears as shown below.
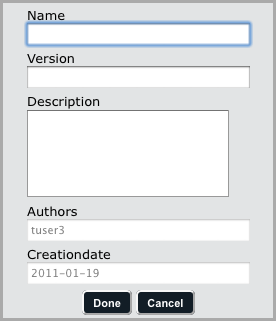
- Enter the name of the new group and optionally a version number and description in the boxes provided. The author and creation date fields are pre-populated. You can edit the author by completing this procedure and then editing the template group.
- Click Done. The new template group appears in the Group Name panel.
Deleting a Template Group
| Anchor | ||||
|---|---|---|---|---|
|
Deleting a template group does not delete the templates within it.
...
- Click the Template Groups tab.
- Select the template group you want to delete by clicking it.
- Below the left panel, Below the left panel, click
 . A message appears.
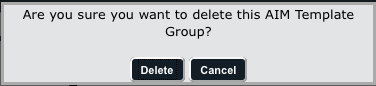
- Click Delete.
...
- Click the Template Groups tab.
- Select a template group from the Group Name panel.
- Below the left panel, click
 . The upload window appears, as shown below.

- Click Browse to navigate to a location on your home drive where the XML file is that you want to upload. The AIM Template Manager will only accept template group files that have been validated by the AIM Template XML schema. This file could have been downloaded from the AIM Template Manager or it could have been created manually using the AIM template XML schema.
- Click Upload. The template group appears in the Group Name panel.
...
When you design a template, it is helpful to keep the purpose in mind. A template structures how users will enter information into an imaging application. The following table may help make the connection between the AIM Template Manager and information entered into an imaging application.
AIM Template Manager Concept | Annotation Concept |
|---|---|
Component | Item being annotated; for example, Tumor Location |
Characteristic | Descriptive element of that item; for example, Site of Tumor Center |
Allowed Term | Word that may be used to describe the descriptive element; for example, Frontal lobe |
| Tip | ||
|---|---|---|
| ||
The AIM Template Manager automatically saves your work after each selection you make. An animated image appears to indicate when a save is occurring. |
Creating a Template
To create a template
- Click the Templates tab.
- Below the left panel, click . The new template window appears as shown below.
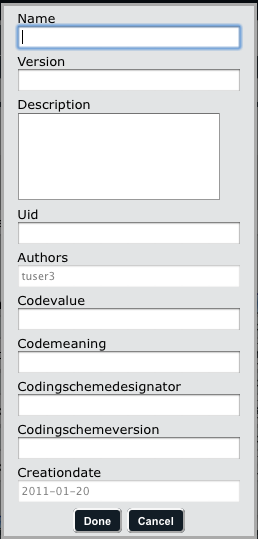
- Enter a name for the template and optionally any of the other fields. Note that you cannot change the author at this point but you can do so by editing the template later.
- Click Done.
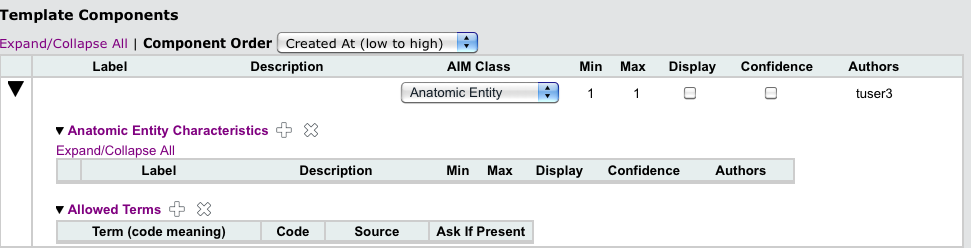
- Imaging:Add one or more components to the template. Components can be of any of the AIM classes, which include anatomic entity, imaging observation, inference, and calculation.
- Imaging:Add one or more characteristics to each template component you add, as applicable (Inference and Calculation components don't have associated characteristics).
Imaging:Specify the allowed termsfor each characteristic (for Anatomic Entity and Image Observation components) or component (for Inference and Calculation components).
Tip title Expanding and collapsing Below the Template Components panel, click
 to expand all of the template components to see their characteristics or click
  to collapse the characteristics and just see a list of components. Within the template component row, click the same buttons to expand or collapse individual elements of the component.
...
- Select the template to which you want to add a component from the Template Name panel.
- From the buttons in the Template Components panel, click
 . A new Template Components section of the panel appears.
Customize your template component by specifying the items in the table below.
title Saving your workField
Description
Label
Double-click this field to add a label. A label becomes a heading in the image annotation form that users complete once the template is imported into an imaging application. For example, "Lesion".
Description
Explanatory text about the component; for example, "Select the type of lesion".
AIM Class
Select an AIM class from the list. As the image below of the expanded list shows, AIM class options are Anatomic Entity, Imaging Observation, Inference, and Calculation.
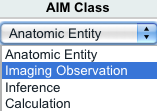
An Anatomic Entity is the place in the body where the finding is located; for example, lung.
An Imaging Observation is an observation made based on interpretation of an image or images, including visual features (e.g., an opacity, abnormal high signal intensity) morphologic or physiologic processes (e.g., pleural effusion, tracheal deviation), and diseases (e.g., adenocarcinoma, arthritis). (Source: radlex.orgMultiexcerpt include wikicontent:Exit Disclaimer to Include wikicontent:Exit Disclaimer to Include nopanel true MultiExcerptName ExitDisclaimer PageWithExcerpt wikicontent:Exit Disclaimer to Include )
Min
The minimum number of times the template will allow users this select this term when they annotate an image.
Max
The maximum number of times the template will allow users to select this term when they annotate an image.
Display
Select this box to display this component in the template.
Confidence
Specify the confidence interval for the value users will enter for this component. Expected values are 0 through 100.
Authors
The AIM Template Manager user who created this component.
Tip The AIM Template Manager automatically saves your work after each selection you make. An animated image appears to indicate when a save is occurring.
Add a Calculation Component to a Template
Calculation components require that you add not only the basic information about the component but also additional information about the calculation.
To add a Calculation component to a template
The AIM template requests the following information about a Calculation component.
Field | Description |
|---|---|
Description | Explanatory text about the component |
MathML |
An optional mathML representation of the calculation. |
Algorithm Name |
A name of the algorithm used. |
Algorithm Version |
Information describing a version of algorithm. |
Add a Characteristic to a Component
| Anchor | ||||
|---|---|---|---|---|
|
When you add an Anatomic Entity or Imaging Observation component to your template, you must may add one or more characteristics to it. While the component entry itself results in a heading once you import the template into an imaging application, the characteristics serve to describe the component. For example, the component might be "Lesion" while some of its characteristics might be "Enhancement Quality", "Proportion Enhancing", "Proportion nCET", and "Proportion Necrosis".
...
To add a characteristic to a component
- Imaging:Create a component of the Anatomic Entity or Imaging Observation AIM class.
Specify information describing the characteristic, as follows.
Field
Description
Label
Double-click this field to add a label. A label becomes a heading in the image annotation form that users complete once the template is imported into an imaging application.
Description
An optional description of the characteristic.
Min
The minimum number of times the template will allow users this select this term when they annotate an image.
Max
The maximum number of times the template will allow users to select this term when they annotate an image.
Display
Select this box to display this component in the template.
Confidence
Specify the confidence interval for the value users will enter for this characteristic. Expected values are 0 through 100.
Authors
The AIM Template Manager user who created this characteristic.
- To add additional characteristics, click
 to add another row.
 - To delete a characteristic, select the characteristic and then click
 .
.
- To add additional characteristics, click
...
When users of your AIM template answer template questions, you can offer a list of standardized terms for their answers. You can either manually add an allowed term or use one you have Imaging:added to a lexicon in the AIM Template Manager.
To specify a characteristic's allowed terms
Imaging:Add a characteristic to the component. Below the characteristic, one Allowed Terms entry row appears.
Tip To add additional allowed terms, click
to add another row. Similarly, to delete an allowed term associated with a characteristic, select it and then click - To select an allowed term from a Imaging:lexicon you have created, find it in the Search Lexicon Terms panel on the right by following these steps. Note that you must select a table heading of allowed terms before you proceed with the following steps.
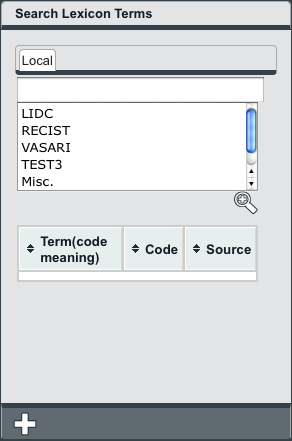
- Enter the term you want to search for. You can also enter only part of the term, such as "Tum" for "Tumor".
- Click at least one lexicon where you believe the term you are searching for is located. You can select more than one lexicon by clicking one, pressing and holding the Shift or Ctrl key, and then selecting the next one.
- Click
 . All lexicon entries containing the word you entered appear in the search results.
 - Select an Allowed Terms row where you want to add the allowed term.
Click the
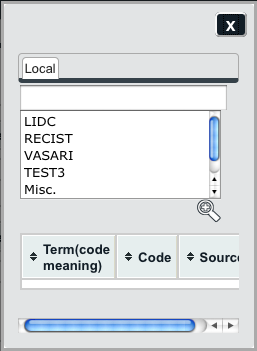
button below the Search Lexicon Terms panel. The allowed term appears in the Allowed Terms row you selected.Info title Showing and hiding panels If you cannot scroll any further to the right to see all of the fields of an allowed term, you can hide the Search Lexicon Terms panel. Likewise, you can show a hidden panel. Each panel in the AIM Template Manager has a small arrow in the middle of it, shown below, that you can click to show or hide it.
To add an allowed term manually, specify information about it into the relevant fields on the page, which are described below.
Field
Description
Term
The allowed term's name.
Code
Unique code that identifies the term.
Source
Where the term originated.
Ask if Present
If you select this box, the template will instruct the imaging application to ask for this information if the characteristic is present. This box is not available for the Inference and Calculation AIM classes.
Editing a Template
To edit a template
...
- Click the Templates tab.
- Select the template you want to delete by clicking it.
- Below the left panel, click . A message appears.

- Click Delete. The template is no longer in the Templates panel.
...
You must first create a lexicon, then add lexicon entries to it. Those lexicon entries become the allowed terms that you add to a template.
| Tip | ||
|---|---|---|
| ||
The AIM Template Manager automatically saves your work after each selection you make. An animated image appears to indicate when a save is occurring. |
Create a Lexicon
To create a lexicon
...
- Click the Lexicons tab.
- Select the lexicon you want to delete by clicking it.
- At the bottom of the Lexicon panel, click . A message appears.

- Click Delete. The lexicon is no longer in the Lexicon panel.
...
- Click the Lexicons tab.
- Select the lexicon that you want to contain your new lexicon entry.
- At the bottom of the Lexicon Terms panel, click . A new section for the new lexicon entry appears at the bottom of the list of lexicon terms.

Complete the fields to describe the lexicon entry. Note that you must double-click a field to make it editable, as shown below.

An explanation of the purpose of each field is shown in the table below.Field
Description
Code Meaning
The name of the term you want to use as the lexicon entry.
Code Value
The value assigned by the coding scheme designator
Coding Scheme Designator
The organization who created this coding scheme.
Coding Scheme Version
The version of the coding scheme you are using.
Description
A description of the term.
Lexicon Name
This field is already populated and is the lexicon you selected before beginning to add an entry.
Delete a Lexicon Entry
To delete a lexicon entry
- Click the Lexicons tab.
- Select the lexicon that contains the term you want to delete.
- Click the term you want to delete to select it.
- Click . A message appears.

- Click Delete. The lexicon entry no longer appears in the Lexicon Terms panel.
...
- Click the Lexicons tab.
- At the bottom of the Lexicon Terms panel, click
 . A search window appears.
- Enter the term you want to search for. You can also enter only part of the term, such as "Tum" for "Tumor".
- Click at least one lexicon where you believe the term you are searching for is located. You can select more than one lexicon.
- Click . All lexicon entries containing the word you entered appear in the search results.