Page History
| Scrollbar | ||
|---|---|---|
|
...
| Page info | ||||
|---|---|---|---|---|
|
| Panel | ||||||
|---|---|---|---|---|---|---|
| ||||||
|
| Tip | ||||
|---|---|---|---|---|
| :title}
{panel:title=Contents of this Page}
{toc:minLevel=2|maxLevel=2}
{panel}
{tip:title=Note: This illustration was presented using caArray version
| |||
| } Depending on the version you use, the screen layouts may be slightly different, however, the basic design and the steps are similar. {tip} |
Before
...
logging
...
in
...
to
...
the
...
caArray
...
application,
...
please
...
download
...
the
...
sample
...
array
...
design
...
file
...
...
,
...
and
...
the
...
sample
...
experiment
...
data
...
file
...
...
,
...
if
...
you
...
have
...
not
...
already
...
done
...
so.
...
You
...
may
...
unzip
...
the
...
design
...
file
...
to
...
get
...
Hu6800.cdf,
...
but
...
do
...
not
...
extract
...
the
...
sample
...
data
...
file
...
caArray_golub-00095_files.zip.
...
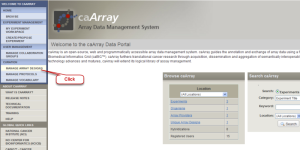
Step
...
1:
...
Design
...
File
...
Upload
...
Step
...
1.1.
...
Log
...
into
...
the
...
caArray
...
Application.
...
Click
...
the
...
"MANAGE
...
ARRAY
...
DESIGNS"
...
button
...
under
...
"CURATION"
...
on
...
the
...
left
...
side
...
of
...
the
...
Welcome
...
page.
...
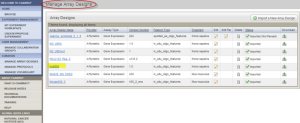
A
...
new
...
page,
...
"Manage
...
Array
...
Designs",
...
opens.
...
Before
...
uploading
...
the
...
design
...
file,
...
check
...
if
...
your
...
application
...
already
...
has
...
a
...
copy
...
of
...
the
...
design
...
file
...
by
...
the
...
same
...
name.
...
If
...
yes,
...
skip
...
the
...
design
...
file
...
upload
...
and
...
proceed
...
to
...
...
...
...
...
...
...
.
...
You
...
can
...
use
...
this
...
design
...
file
...
for
...
your
...
experiment.
...
If
...
not,
...
follow
...
Step
...
1.2
...
to
...
upload
...
a
...
new
...
design
...
file.
...
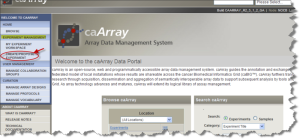
caArray
...
Data
...
Portal
...
Welcome
...
Page
Manage Array Designs Page
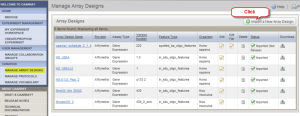
Steps 1.2
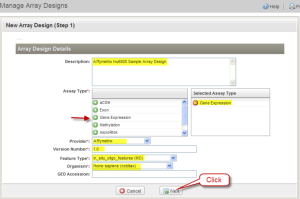
On the "Manage Array Designs" page, click the "Import a New Array Design" button. Another page, "New Array Design (Step 1)", opens. Fill out the "New Array Design" form with Description (Affymetrix Hu6800 Sample Arrya Design in the example); Selected Assay Type (Gene Expression is selected in the example); Provider (here Affymetrix); Version number (here 1.0); Feature Type (in_situ_oligo_features
...
(MO)
...
in
...
the
...
example);
...
and
...
Organism
...
(Homo
...
sapiens
...
(ncbitax)
...
in
...
the
...
example).
...
Then
...
click
...
"Next".
...
Manage
...
Array
...
Designs
...
Page
...
with
...
Import
...
a
...
New
...
Array
...
Design
...
Button
New Array Design (Step 1) Page with Form Completed
Step 1.3
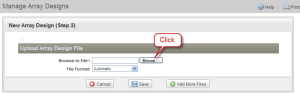
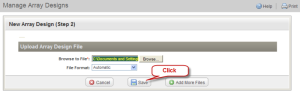
The page "New Array Design (Step 2)" opens. Click the "Browse" button. Browse to the location where the sample array design file (Hu6800.cdf) was unzipped. Then click "Save".
New Array Design (Step 2) Page with Browse Button
New Array Design (Step 2) Page with Save Button
Step 1.4
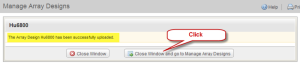
On clicking the "Save" button, window opens with a message to confirm the file has been uploaded. Click "Close window and go to Manage Array Designs". The "Manage Array Designs" re-opens, listing the newly uploaded file. (Please note that for large array design files, the importing process might take a while. An array design can only be used when it is fully imported.)
Window with Message Confirming Upload of Hu8800 File
Manage Array Designs Page Listing the Uploaded Hu8800 File
Step 2 Experiment Data File Upload for Creating an Experiment Automatically
Step 2.1
Click the "CREATE/PROPOSE EXPERIMENT" button under "EXPERIMENT MANAGEMENT" on the left side menu bar of the Welcome page. The "Overall Experiment Characteristics" window of the Experiment Details page opens.
Welcome Page with CREATE/PROPOSE EXPERIMENT Button Selected
Overall Experiment Characteristics Window with Completed Form
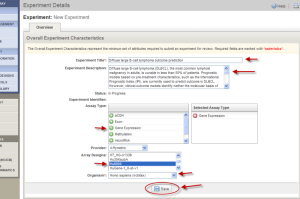
Step 2.2
Fill out the form with the Experiment Type (Diffuse large B-cell lymphoma outcome prediction in the example); Experiment Description; Selected Assay Type (here Gene Expression selected); Provider (here Affymetrix); Array Designs (here Hu8800 selected in the example); and Organisim (Homo Sapiens ncibtax in the example). You can use your own description or use the sample text below. Make sure the "Array Designs" field is selected with the right platform (here Hu8800, highlighted in blue). Click the "Save" button.
Sample Text:
Title: Diffuse large B-cell lymphoma outcome prediction
Description: Diffuse large B-cell lymphoma (DLBCL), the most common lymphoid malignancy in adults, is curable in less than 50% of patients. Prognostic models based on pre-treatment characteristics, such as the International Prognostic Index (IPI), are currently used to predict outcome in DLBCL. However, clinical outcome models identify neither the molecular basis of clinical heterogeneity, nor specific therapeutic targets. We analyzed the expression of 6,817 genes in diagnostic tumor specimens from DLBCL patients who received cyclophosphamide, adriamycin, vincristine and prednisone (CHOP)-based chemotherapy, and applied a supervised learning prediction method to identify cured versus fatal or refractory disease. The algorithm classified two categories of patients with very different five-year overall survival rates (70% versus 12%). The model also effectively delineated patients within specific IPI risk categories who were likely to be cured or to die of their disease. Genes implicated in DLBCL outcome included some that regulate responses to B-cell-receptor signaling, critical serine/threonine phosphorylation pathways and apoptosis. Our data indicate that supervised learning classification techniques can predict outcome in DLBCL and identify rational targets for intervention. **NOTE: Migrated from caArray 1.x, identifier='gov.nih.nci.ncicb.caarray:Experiment:1015897558868337:1'.
...
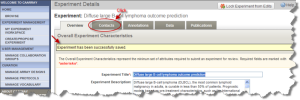
Step 2.3
...
The
...
Experiment
...
Details
...
page
...
opens.
...
Check
...
for
...
the
...
"Experiment
...
has
...
been
...
successfully
...
saved"
...
message.
...
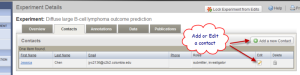
Click
...
the
...
"Contacts"
...
tab.
...
Fill
...
the
...
form
...
with
...
your
...
information.
...
You
...
can
...
also
...
edit
...
the
...
contact
...
information
...
from
...
the
...
screen
...
shown
...
in
...
Fig
...
2.4.
...
Experiment
...
Details
...
Page
...
with
...
Message
...
Confirming
...
the
...
Experiment
...
has
...
been
...
Saved
Experiment Details Page Showing Contact Information and Buttons to Add or Edit
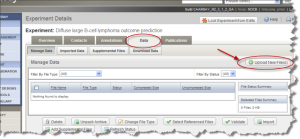
Step 2.4
Click the "Data" tab. Then Click the "Upload New File(s)"
...
button.
...
The
...
"Experiment
...
Data
...
Upload"
...
window
...
opens.
...
Experiment
...
Details
...
Page
...
Data
...
Tab
...
with
...
Upload
...
New
...
File(s)
...
Button
...
Selected
Experiment Data Upload Window with Browse and Upload Buttons
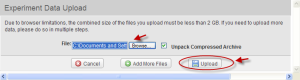
Step 2.5
In the Experiment Data Upload Window, browse to the location where the sample experiment Data file (caArray_golub-00095_files.zip)
...
was
...
saved
...
and
...
click
...
on
...
the
...
"Upload"
...
button.
...
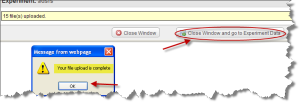
Step
...
2.6
...
Wait
...
until
...
the
...
message
...
"Your
...
file
...
upload
...
is
...
complete"
...
is
...
displayed.
...
Click
...
"OK".
...
Then
...
click
...
the
...
"Close
...
Window
...
and
...
go
...
to
...
Experiment
...
Data"
...
button.
...
Message
...
Showing
...
the
...
File
...
Upload
...
is
...
Complete
...
with
...
Close
...
Window
...
Button
...
Selected
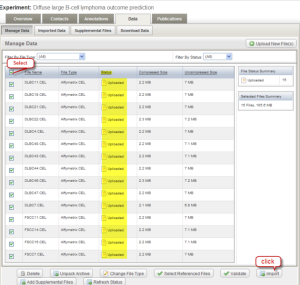
Step 2.7
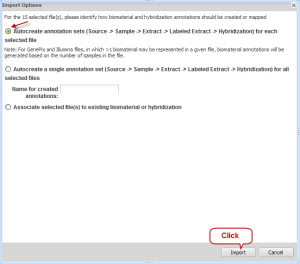
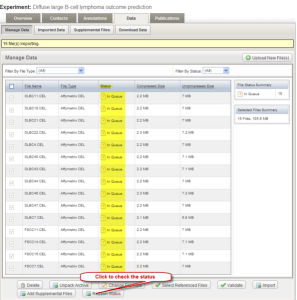
On the Data tab of the Experiment window, make sure the column "STATUS" displays the word "Uploaded" for each file. Select the check boxes for all experiment data sets and then click the "Import" button. A new window "Import Options" opens. Select the first option, "Autocreate annotation sets...";
...
then
...
click
...
the
...
"Import"
...
button.
...
Data
...
Tab
...
of
...
Experiment
...
Window
...
with
...
Status
...
Displaying
...
"Uploaded"
...
and
...
Files
...
Selected
...
for
...
Import
Import Options Window with First Option and Import Button Selected
Step 2.8
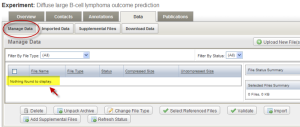
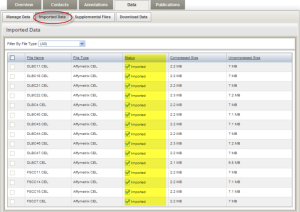
Depending on the speed of the machine and the size of the data, it may take a few minutes for the sample data to be imported. Check the status of the import by clicking the "Refresh Status" button. The initial status is shown as "In queue". When the import is complete, no data will be displayed under the "Manage Data" tab. Click the "Imported Data" tab to view imported data file. If you have completed all these steps, Congratulations! You have just successfully created an experiment and deposited your microarray experiment data into the caArray.
Data Tab of Experiment Window with Refresh Status Button
Manage Data Tab Showing No Data to Display
Imported Data Tab Showing the Imported Data File
Step 2.9
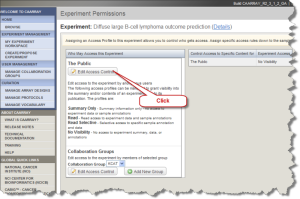
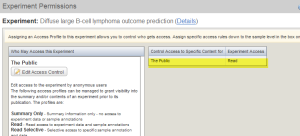
To make the experiment data public others can view your data, click the "My Experiment Workspace" button (Fig2.13). Locate the experiment of interest on the "My experiment Workspace" page. Click the "Permissions" icon. The "Experiment Permissions" page opens. Click on the "Edit Access Control" button in the left panel.
My Experiment Workspace Page with Permissions Button

Experiment Permissions Page with Edit Access Control Button Selected
Step 2.10
In the access control window, select "Read" from the drop down list. Then click the "Save" button. Your experiment is now set to be accessible by the pubic.
Access Control Window with Read Selected and Save Button

Experiment Permissions Window Showing the Public has Read Access
Step 3 Verification of Data Sharing on caGrid
For those Institutions that register their caArray instance on caGrid, the public data is available to other integrated tools that use the caGrid service. To verify whether your caArray data is shared on caGrid, go to CaArray071 and follow the instructions.
| Scrollbar | ||
|---|---|---|
|