Page History
...
- Click on the Acknowledge and Continue button on the login screen.

- You will be taken to the Sign In screen. Please note that your username and password for CTRP STRAP remain the same.
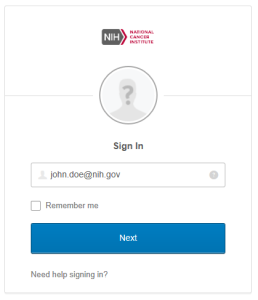
- Enter your email address. Then click the blue “Next” button. Note: If you are a NIH user, this will send you to iTrust. Follow that authentication to gain access to CTRP STRAP.
- For non-NIH users, you will see a pop-up balloon indicating that you have not logged in with Okta before. (“This is the first time you are connecting to bioappdev.okta.com from this browser”.) Enter your password (same as previously used with Auth0/DUO) and click the blue “Sign In” button.

The Okta “Set up multifactor authentication” window appears next. There are 3 choices, each with a ‘Setup’ button directly under the description of the method:● Okta Verify - "Use a push notification sent to the mobile app."
● SMS Authentication - "Enter a single-use code sent to your mobile phone."
● Voice Call Authentication - "Use a phone to authenticate by following instructions."
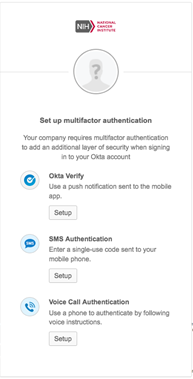
- Choose the method you would like to use by clicking the ‘Setup’ button directly under your choice.
- The following sections of this document define the steps needed for each of the different methods. Please see the section that correlates to your authentication choice. Note: You may choose more than one authentication method. For example, this provides you the opportunity to connect your account with your cell phone (Okta Verify app) and your office phone (Voice Call Authentication), even if they are two different numbers. Please see the section entitled “Two Factor Option: Multiple Methods”.
- Once you have completed the setup for your chosen authentication method, click on the ‘Finish’ button.
- Next, you will see a window asking you to choose a forgot password question. Please choose a question and enter your answer. This will only be used to verify your identity prior to starting the recover password process, if necessary.

- Once you have completed the forgot password entry, you will be logged in to the application.
- The next time you click on the Acknowledge and Continue button of CTRP STRAP, you will see the initial login screen again asking for your username. Once you enter your username and click “Next”, you will see a security image above the password textbox. This security image provides extra verification that you are accessing the correct page and account. This image is randomly selected when your account is activated but should be the same each time you enter your username. (If you ever see an unfamiliar image, do not enter your password. Please contact the CTRP Engineering Support mailbox, CTRP_Support@mail.nih.gov, for assistance.
...
Clicking on this choice brings up the “Setup Okta Verify” window. In this window, “Select your device type” by clicking the icon that matches the brand of mobile phone that you will be using. (If you would like to go back and choose a different authentication method, click on “Back to factor list” located in the bottom left-hand corner of the center window.)

When you click on the brand icon, the window will expand at the bottom to display instructions to “Install Okta Verify”.
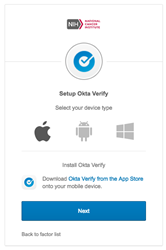
Okta Verify is a mobile app that needs to be downloaded to your cell phone. The window contains a link to your cell phone brand’s app store page for Okta Verify. This will allow you to easily identify Okta Verify in your app store to download on your cell phone.

Once the app is downloaded, click on the blue “Next” button on your computer and tap on the “Add Account” button in your cell phone app. (If asked, allow the app to access your cell phone camera and allow it to send push notifications).
The Okta app will open a camera screen, and your computer screen will display a QR code (square-shaped barcode).
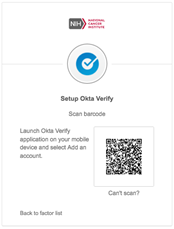
Point your cell phone towards your computer screen and align the cell phone camera display with the square of the QR code.
The Okta Verify app will scan the QR code and connect your cell phone to your Okta account. You will see a new entry in the connections list in your cell phone app.
On your computer, you will be directed back to the “Setup Multifactor Authentication” screen.
While initially you will be logged into your account following these steps, the next time you log into your account, you will be using a “push” to authenticate. Please take note of the following steps:
● When you enter your username and password, you will see a window for Okta Verify with a button to “Send Push”. Click on this button and a “push” pop-up alert will be sent to the app on your mobile phone asking you to approve the connection.
● Tap on the “Approve” button to authenticate.
● Following the authentication, the application will load.
● The next time you log in to the application, an Okta Verify window will appear asking whether to send a push to the phone number on record.
● Click to proceed with the push, then tap on “Approve” in the popup alert from the Okta Verify app.
Return to Step 8 in “First-Time Login Steps” to finish setup.
...