Page History
This guide is still in development.
| Page info | ||||
|---|---|---|---|---|
|
This guide explains how to use the caBIG® Annotation and Image Markup (AIM) Template Manager for AIM Information Model Version 3.0. The intended audience for this guide is a biomedical researcher familiar with the AIM information model.
...
- Click the Templates tab.
- Below the left panel, click
 . The new template window appears as shown below.
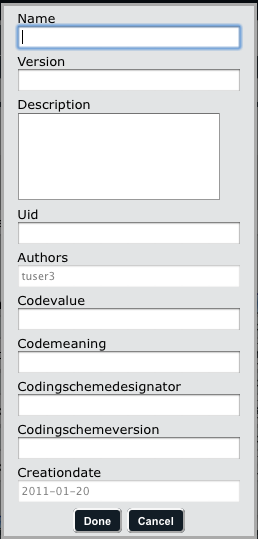
- Enter a name for the template and optionally any of the other fields. Note that you cannot change the author at this point but you can do so by editing the template later.
- Click Done.
- Imaging:Add one or more components to the template. Components can be of any of the AIM classes, which include anatomic entity, imaging observation, inference, and calculation.
- Imaging:Add one or more characteristics to each template component you add, as applicable (Inference and Calculation components don't have associated characteristics).
- Imaging:Specify the allowed terms for each characteristic (for Anatomic Entity and Image Observation components) or component (for Inference and Calculation components).
Tip title Expanding and collapsing Below the Template Components panel, click
 to expand all of the template components to see their characteristics or click
  to collapse the characteristics and just see a list of components. Within the template component row, click the same buttons to expand or collapse individual elements of the component.
...
To add a characteristic to a component
- Imaging:Create a component of the Anatomic Entity or Imaging Observation AIM class.
- Specify information describing the characteristic, as follows.
Field
Description
Label
Double-click this field to add a label. A label becomes a heading in the image annotation form that users complete once the template is imported into an imaging application.
Description
An optional description of the characteristic.
Min
The minimum number of times the template will allow users this select this term when they annotate an image.
Max
The maximum number of times the template will allow users to select this term when they annotate an image.
Display
Select this box to display this component in the template.
Confidence
Specify the confidence interval for the value users will enter for this characteristic. Expected values are 0 through 100.
Authors
The AIM Template Manager user who created this characteristic.
- To add additional characteristics, click
 to add another row.
 - To delete a characteristic, select the characteristic and then click
 .
.
- To add additional characteristics, click
...
When users of your AIM template answer template questions, you can offer a list of standardized terms for their answers. You can either manually add an allowed term or use one you have Imaging:added to a lexicon in the AIM Template Manager.
To specify a characteristic's allowed terms
- Imaging:Add a characteristic to the component. Below the characteristic, one Allowed Terms entry row appears.
Tip To add additional allowed terms, click
to add another row. Similarly, to delete an allowed term associated with a characteristic, select it and then click - To select an allowed term from a Imaging:lexicon you have created, find it in the Search Lexicon Terms panel on the right by following these steps. Note that you must select a table heading of allowed terms before you proceed with the following steps.
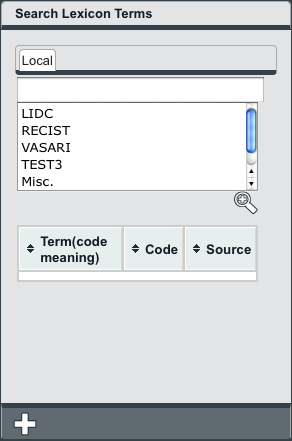
- Enter the term you want to search for. You can also enter only part of the term, such as "Tum" for "Tumor".
- Click at least one lexicon where you believe the term you are searching for is located. You can select more than one lexicon by clicking one, pressing and holding the Shift or Ctrl key, and then selecting the next one.
- Click
 . All lexicon entries containing the word you entered appear in the search results.
 - Select an Allowed Terms row where you want to add the allowed term.
- Click the
 button below the Search Lexicon Terms panel. The allowed term appears in the Allowed Terms row you selected.
 Info title Showing and hiding panels If you cannot scroll any further to the right to see all of the fields of an allowed term, you can hide the Search Lexicon Terms panel. Likewise, you can show a hidden panel. Each panel in the AIM Template Manager has a small arrow in the middle of it, shown below, that you can click to show or hide it.
- To add an allowed term manually, specify information about it into the relevant fields on the page, which are described below.
Field
Description
Term
The allowed term's name.
Code
Unique code that identifies the term.
Source
Where the term originated.
Ask if Present
If you select this box, the template will instruct the imaging application to ask for this information if the characteristic is present. This box is not available for the Inference and Calculation AIM classes.
...