Page History
| Scrollbar | ||
|---|---|---|
|
...
| Page info |
|---|
...
|
| Panel | ||||
|---|---|---|---|---|
| ||||
|
LexEVS 6.x provides two methods to export loaded ontologies to an OWL/RDF format. One is to use the LexEVS administration GUI; and the other is to use an export script on the command line.
Preliminary Considerations
- The OWL/RDF exporter is based on Jena 2.6.3.
...
- While
...
- it
...
- exports
...
- an
...
- OWL
...
- file,
...
- it
...
- also
...
- builds
...
- up
...
- a
...
- triple
...
- store.
...
- The
...
- triple
...
- store
...
- tables
...
- stored
...
- in
...
- the
...
- same
...
- same
...
- database
...
- that
...
- LexEVS
...
- uses.
...
- The
...
- LexEVS
...
- 6.0
...
- retrieval
...
- API
...
- has
...
- the
...
- limitation
...
- of
...
- retrieving
...
- the
...
- association
...
- that
...
- is
...
- from
...
- an
...
- entity
...
- to
...
- a
...
- data/value.
...
- Thus,
...
- the
...
- OWL/RDF
...
- exporter,
...
- based
...
- on
...
- LexEVS
...
- retrieval
...
- API,
...
- has
...
- the
...
- limitation
...
- of
...
- handling
...
- the
...
- owl:hasValue,
...
- owl:maxCardinality,
...
- owl:minCardinality,
...
- owl:cardinality
...
- constraints
...
- as
...
- well.
...
The
...
OWL/RDF
...
exporter
...
now
...
can
...
convert
...
OWL,
...
RDF,
...
OBO,
...
and
...
UML
...
formats
...
to
...
OWL/RDF.
...
If
...
the
...
terminology
...
format
...
is
...
not
...
on
...
this
...
list,
...
the
...
exported
...
OWL
...
ontology
...
may
...
be
...
incorrect.
Warning Note that OWL2 is not currently supported, nor is an export to the OWL2 format. Much of what is loaded to LexEVS is currently OWL2, and cannot be exported. See JIRA Item LEXEVS-3661
Running an OWL/RDF Export with the Administration GUI
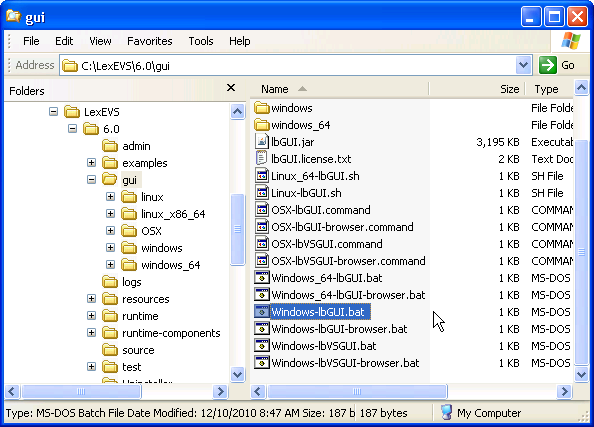
If you chose to install the LexEVS GUI when you installed LexEVS, you will have a 'gui' folder inside of your LexEVS home directory. Assuming you installed the GUI for all operating systems, you will have the following programs under the 'gui' folder:
- Linux_64-lbGUI.sh
...
- Linux-lbGUI.sh
...
- OSX-lbGUI.command
...
- Windows-lbGUI.bat
Step | Action |
|---|---|
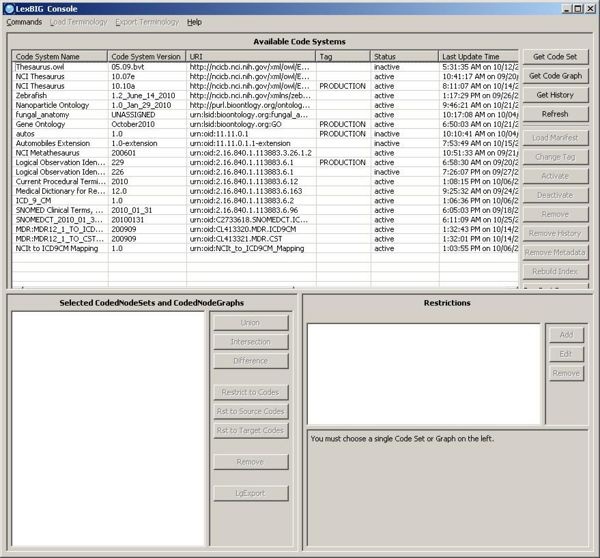
1. Launch the GUI by executing the appropriate executable for your platform. You will be presented with an application that looks like this. If the Available Code System table is empty, you will need to load at least one ontology. |
|
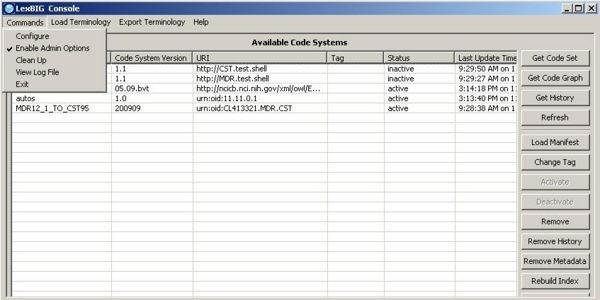
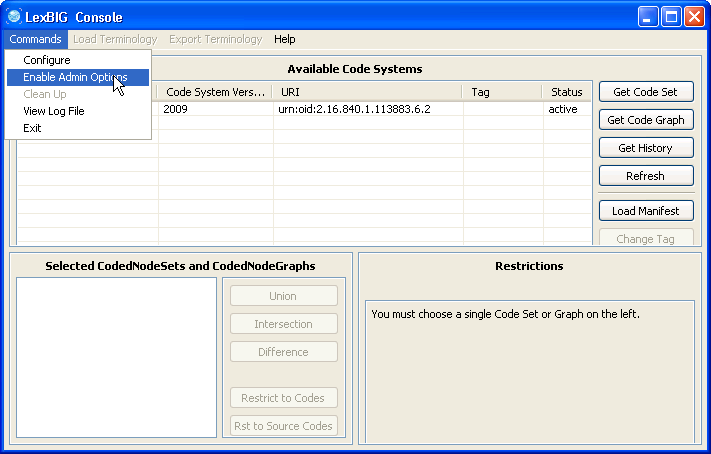
2. Selecting 'Enable Admin Options' provides administrative access to all commands. |
|
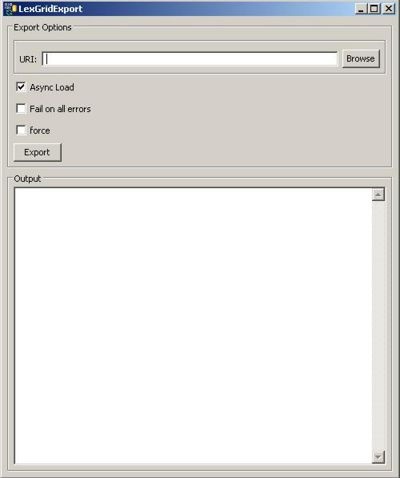
3. Select an active terminology (if the code system status is 'inactive', you can use the Activate button to activate it). Click on 'Export as OWL/RDF' button on the 'Export Terminology' menu, the exporter window will pop up. |
|
Running an OWL/RDF Export Script from the Command Line
After installing LexEVS, you will have an 'admin' folder inside of your LexEVS base installation. The OWL/RDF exporter shell script is in the following folder (for Linux or Windows):
| Code Block |
|---|
|| Step || Action || | 1. Launch the GUI by executing the appropriate executable for your platform. You will be presented with an application that looks like this. If the Available Code System table is empty, you will need to load at least one ontology. | !GUI_Launch.jpg|alt="Screenshot of available code systems."! | | 2. Selecting 'Enable Admin Options' provides administrative access to all commands. | !LexEVS_GUI_Command_Menu_Enabled.JPG|alt="Screenshot of enabled menu item for administrative functions."! | | 3. Select an active terminology (if the code system status is 'inactive', you can use the Activate button to activate it). Click on 'Export as OWL/RDF' button on the 'Export Terminology' menu, the exporter window will pop up. Fill in the parameters. See the export parameter descriptions in the Administration Guide. Click the 'Export' button, the exporter will generate the OWL file to the specified path. | !Standard_Exporter_Interface.JPG|alt="Screenshot of LexGrid Export."! h2. Running an OWL/RDF Export Script from the Command Line After installing LexEVS, you will have an 'admin' folder inside of your LexEVS base installation. The OWL/RDF exporter shell script is in the following folder (for Linux or Windows): {code} ExportOwlRdf.[sh|bat] {code} |
This
...
command
...
will
...
export
...
OWL/RDF
...
without
...
a
...
GUI.
...
For
...
detailed
...
information
...
please
...
refer
...
to
...
the
...
...
...
...
...
...
...
in
...
the
...
Administration
...
Guide
...
.
...
Examples:
| Code Block |
|---|
} ExportOwlRdf -out "file:///path/to/dir" -f ExportOwlRdf -out "file:///path/to/dir" -u "sample" -v "1.0" -f {code} h2. Administration GUI export |
Administration GUI export walk-through
...
example
...
This
...
walk
...
through
...
will
...
show
...
you
...
how
...
to
...
load
...
a
...
terminology
...
and
...
then
...
export
...
it
...
in
...
OWL/RDF
...
format.
Step | Action |
|---|---|
1. Launch the administration GUI. |
|
2. Enable the administration option. |
|
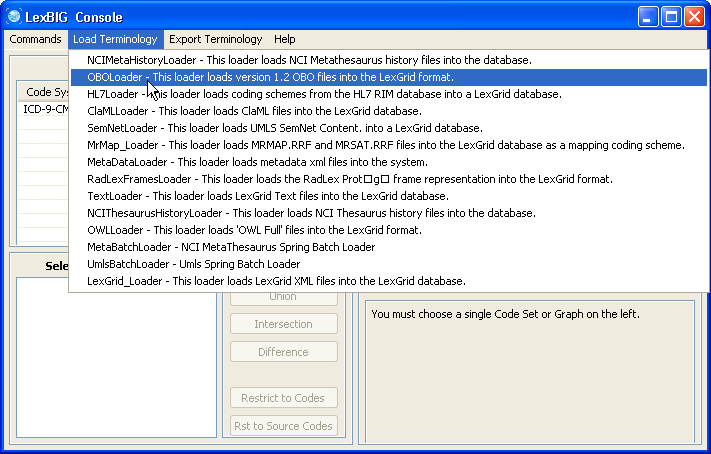
3. In this example, we use the cell.obo ontology as the example ontology, so we choose OBOloader. |
|
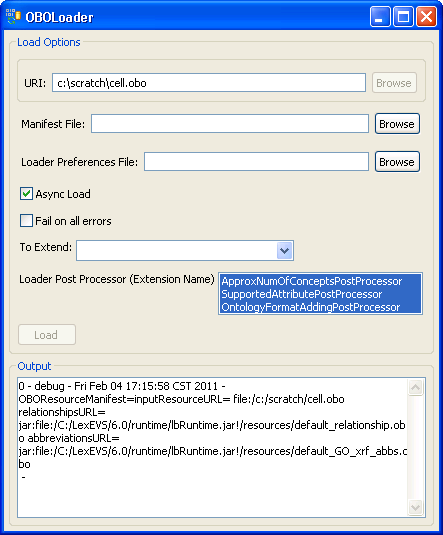
4. Provide cell.obo file's path. If you don't have a manifest file or preferences file then leave these fields blank. Click on the 'Load' button. After a few minutes, the loading process is done. You can find 'End State: complete' in the Output message box. Close this window, and return to the administration GUI, a 'cell' record should show up on the Available Code Systems list. |
|
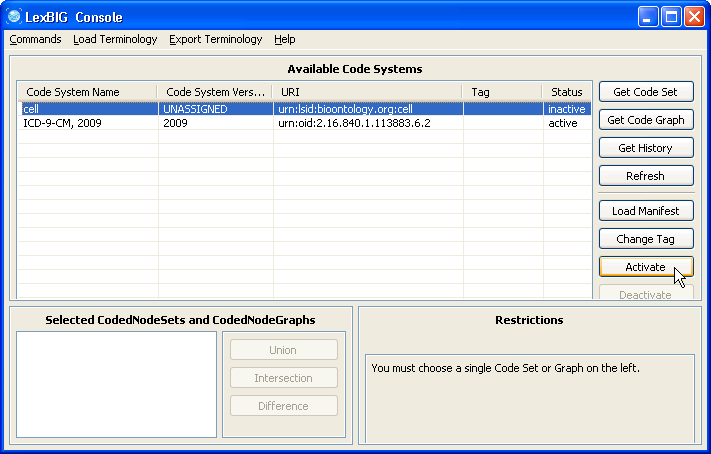
5. Select the cell ontology row and click the 'Activate' button. The status column of 'cell' should change to active. |
|
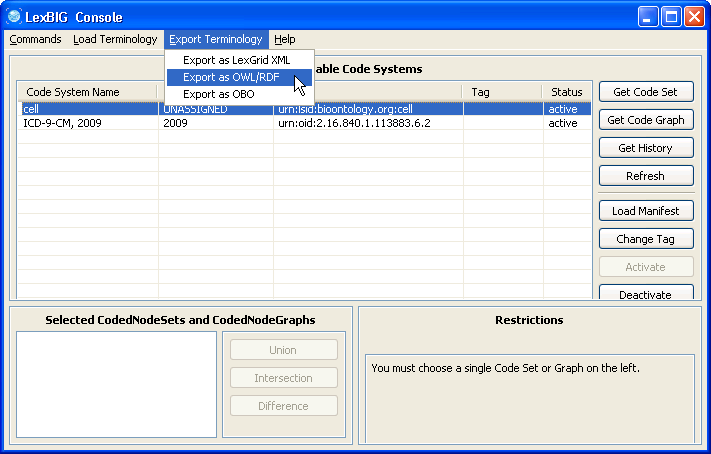
6. Make sure the cell ontology is still selected. Go to the 'Export Terminology' menu, click on 'Export as OWL/RDF' in the drop down menu. |
|
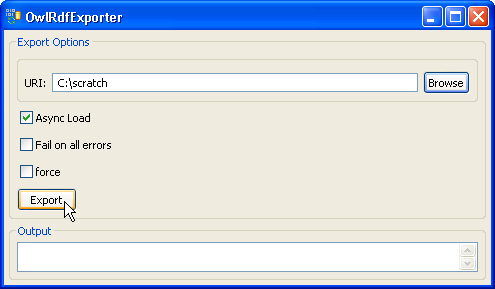
7. Provide a path in the 'URI' text box. The exported file name is automatically generated by the system, so we don't need to specify the file name. Click on the 'Export' button. |
|
8. A set of status messages will show up in the Output text box. When the 'End State: completed' statement pops up, the exporting process is complete. |
|
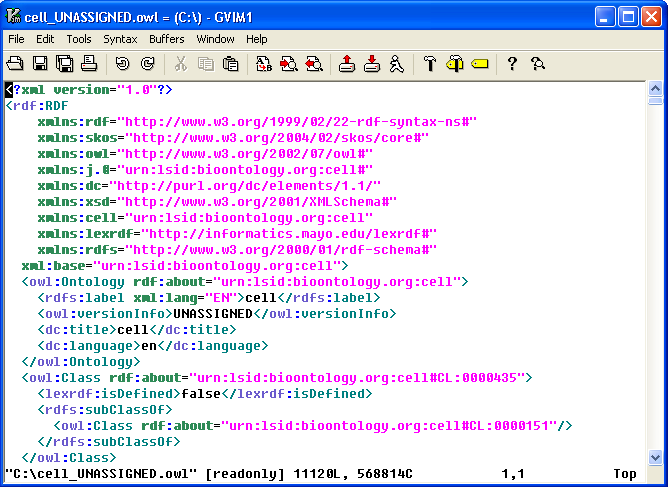
9. The convention of the exported file name is: <coding system name>_<version>.owl. In this example, cell ontology has no version information, so 'UNASSIGNED' is used as the version. The name of the OWL file in this case will be cell_UNASSIGNED.owl and it is in the C drive's root directory. |
|

Command Line Script Exporting Example
We still use the cell.obo as our example ontology and assume that it has been loaded already. It is straightforward to run a command like this instead of using the GUI:
| Code Block |
|---|
|| Step || Action || | 1. Launch the administration GUI. | !LexEVS_Launch_GUI_Admin.png|alt="Screenshot for launching the adminstrative GUI for LexEVS."! | | 2. Enable the administration option. | !LexEVS_GUI_Enable_Adimin.png|alt="Screenshot of LexEVS Guide and how to enable Administrative functions."! | | 3. In this example, we use the cell.obo ontology as the example ontology, so we choose OBOloader. | !LexEVS_GUI_OBO_Loader.png|alt="Screenshot of"! | | 4. Provide cell.obo file's path. If you don't have a manifest file or preferences file then leave these fields blank. Click on the 'Load' button. After a few minutes, the loading process is done. You can find 'End State: complete' in the Output message box. Close this window, and return to the administration GUI, a 'cell' record should show up on the Available Code Systems list. | !LexEVS_GUI_OBO_Loading.png|alt="Screen shot of OBO loader"! | | 5. Select the cell ontology row and click the 'Activate' button. The status column of 'cell' should change to active. | !LexEVS_GUI_OBO_Activate.png|alt="Screen shot of a an active terminology."! | | 6. Make sure the cell ontology is still selected. Go to the 'Export Terminology' menu, click on 'Export as OWL/RDF' in the drop down menu. | !LexEVS_GUI_OWL_Export_Select.png|alt="Screen shot of menu to use for Export Terminology."! | | 7. Provide a path in the 'URI' text box. The exported file name is automatically generated by the system, so we don't need to specify the file name. Click on the 'Export' button. | !LexEVS_GUI_OWL_Exporting.png|alt="Screen shot of the export dialog."! | | 8. A set of status messages will show up in the Output text box. When the 'End State: completed' statement pops up, the exporting process is complete. | !LexEVS_GUI_OWL_Exported.png|alt="Screen shot of the export dialog when the export process is complete."! | | 9. The convention of the exported file name is: <coding system name>_<version>.owl. In this example, cell ontology has no version information, so 'UNASSIGNED' is used as the version. The name of the OWL file in this case will be cell_UNASSIGNED.owl and it is in the C drive's root directory. You can check the exported OWL file with a text editor. Yours may not show highlighting for the XML syntax. | !LexEVS_GUI_OWL_Exported_File.png|alt="Screen shot of the exported OWL file being viewed in a text editor."! | h2. Command Line Script Exporting Example We still use the cell.obo as our example ontology and assume that it has been loaded already. It is straightforward to run a command like this instead of using the GUI: {code} ExportOwlRdf -out "file:///home/MyHome" -u "cell" -v "1.0" -f {code} |
A
...
set
...
of
...
statements
...
will
...
show
...
up,
...
like
...
the
...
following,
...
if
...
it
...
runs
...
successfully:
| Code Block |
|---|
} Output from command line execution... {code} |
A
...
file
...
named
...
"cell_UNASSIGNED.owl"
...
will
...
be
...
generated
...
and
...
saved
...
under
...
the
...
specified
...
path.
...
The
...
content
...
of
...
this
...
file
...
is
...
the
...
same
...
as
...
the
...
file
...
generated
...
by
...
the
...
administration
...
GUI.
...
| Scrollbar |
|---|
...
|
...
|
...