This section describes how to abstract and edit the scientific details of clinical trials.
About Scientific Data
- Trial descriptions
- Trial design, including design details, outcome measures, and eligibility criteria
- Diseases and conditions
- Data Table 4 anatomic sites
- Biomarkers (Markers)
- Interventions
- Arms for Interventional trials
- Groups and cohorts for Non-interventional trials
- Sub-groups
After a trial has been accepted, if you log in with an appropriate role, the Scientific Data menu contains an option for each of the above categories.
The trial summary remains displayed at the top of each page as you navigate through the Scientific Data section.
When you have completed abstracting all trial information on a given page, be sure to click the Save button at the bottom of each page before you proceed to another task.
Abstracting Trial Descriptions
- Brief title
- Brief summary
Additionally, they may include a detailed description.
How to Abstract Trial Descriptions
Search for the trial of interest. For instructions, refer to Searching for Trials in PA.
In the search results, click the NCI Trial Identifier link for that trial. The Trial Identification page appears.
On the Trial Identification page, check out the trial. For instructions, refer to Checking In and Checking Out Trials. (This checkout step is optional for Super Abstractors.)
On the Scientific Data menu, click Trial Description. The Trial Description page appears.

On Trial Description page, in the various fields, specify the appropriate information. The following table describes the fields. An asterisk (*) indicates a required field.
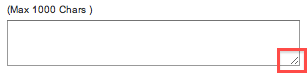
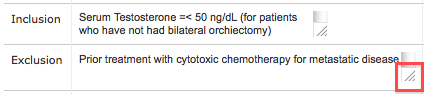
You can expand text fields and table cells to reveal all of their content
To increase the size of a text field or table cell, click and drag the lower right corner handle.
Trial Description
Instruction
Brief Title*
Enter a title that summarizes the purpose of the trial.
Brief Summary*
Enter a summary description of the trial.
Detailed Description
Optionally, enter all the information that accurately describes the trial in detail.
- Click Save.
Abstracting Interventional Trial Design
Abstracting Non-Interventional Trial Design
Abstracting Outcomes
Abstracting Eligibility Criteria
Abstracting Diseases and Conditions
You can search for and select disease and condition terminology from a stored list of active disease/conditions in the NCI Enterprise Vocabulary Service's (EVS) NCI Thesaurus (NCIt). You can find more information about the NCIt at http://ncit.nci.nih.gov/.
Trials can have multiple disease records. Each record displays the following information about the disease or condition:
Disease and condition data definitions
Column Name | Definition |
|---|---|
Preferred Name | Standard name. Word or phrase that NCIt uses by preference to refer to each disease/condition. |
Code | Unique identifier (code) assigned to each disease/condition. |
NCI Thesaurus Concept ID | A concept unique identifier within the NCI Enterprise Vocabulary Service's (EVS) NCI Thesaurus (NCIt). |
Display Name | The name that is used in the “reported” diseases domain. Some diseases are reported and therefore are included in the “reported” disease hierarchy. Others are too specific to report and are not included in the “reported” disease domain. The name of a “reported” disease in the domain can differ from the preferred name. |
Parent Preferred Name(s) | Preferred name of the disease/condition (super-concept). |
Include in XML? | “Yes” in the “Include in XML?” column indicates that the disease/condition information should be added to the XML document for submission to ClinicalTrials.gov. |
You can view, edit, delete, and add diseases/conditions to the trial.

Viewing Diseases and Condition Details
You can view the details of each disease/condition linked to a trial, super- and sub-concepts, and parent/child (vertical) hierarchical relationships.
How to View Disease/Condition Details
- Search for the trial of interest. In the search results, click the NCI Trial Identifier link for that trial.
- On the Scientific Data menu, click Disease/Condition. The Trial Disease/Condition appears.
In the View Details column for a given record, click the View icon.
The Disease/Condition Details Window appears.

The Disease/Condition Details window displays the following details:
Disease and condition data definitionsColumn Name
Definition
Preferred Name
Word or phrase that the NCIt uses by preference to refer to each disease/condition.
Code
NCIt unique identifier (code) assigned to each disease/condition.
NCI Thesaurus Concept ID
A concept unique identifier in the NCIt.
Display Name
The name that is used in the “reported” diseases domain. Some diseases are reported and therefore are included in the “reported” disease hierarchy. Others are too specific to report and are not included in the 'reported' disease domain.
The name of a “reported” disease in the domain can differ from the preferred name.
Other names
Synonyms of the preferred name.
Super-concepts
Concepts in the hierarchy above the disease/condition concept. Also known as “parents”. Each super-concept may have its own parent concept.
Sub-concepts
Concepts in the hierarchy below the disease/condition concept. Also known as “children”. Each sub-concept may have its own child concept.
- When you have finished viewing the details, click Close.
Adding Diseases and Conditions
Some disease/condition terms become obsolete over time. When you validate the trial, the system displays an error message if the abstraction contains an obsolete term. If this occurs, look up the disease/condition name and replace the obsolete term with the new one.
How to Add Diseases to a Trial
- Search for the trial of interest. In the search results, click the NCI Trial Identifier link for that trial.
- On the Scientific Data menu, click Disease/Condition. The Trial Disease/Condition page appears, with or without any disease or condition records displayed.
Click Add.
You may have to scroll to the bottom of the page to find the Add button.
The Disease dialog box appears, with the Find a Disease/Condition section.
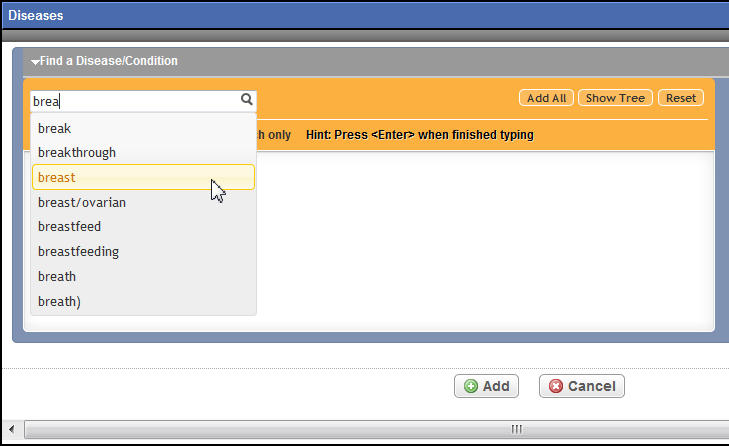
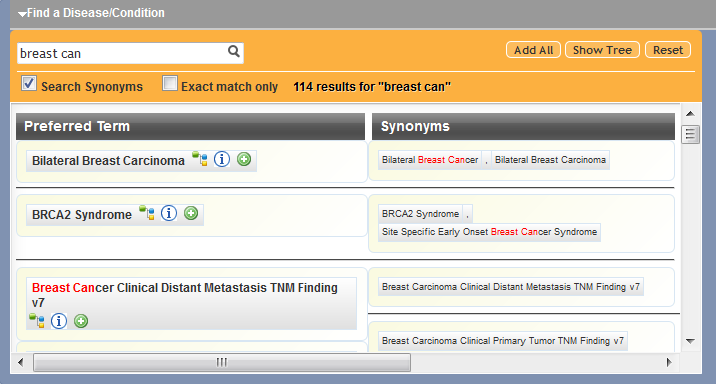
In the search field at the top left corner of the window, enter part or all of the disease/condition that you want to use as your search criterion. As you type, the system suggests the preferred term you want to search for.
- Optionally:
- To search for alternate (synonymous) terms, select the Search Synonyms check box. The system searches for your preferred term and for alternate terms as well.
- To limit your search to exact matches only, select the Exact match only check box. The system searches for terms that exactly match what you typed.

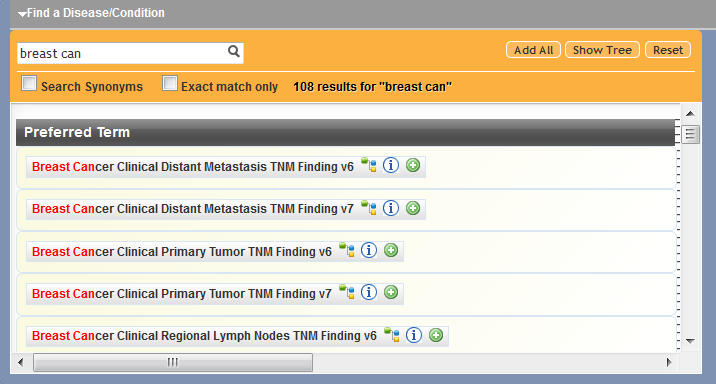
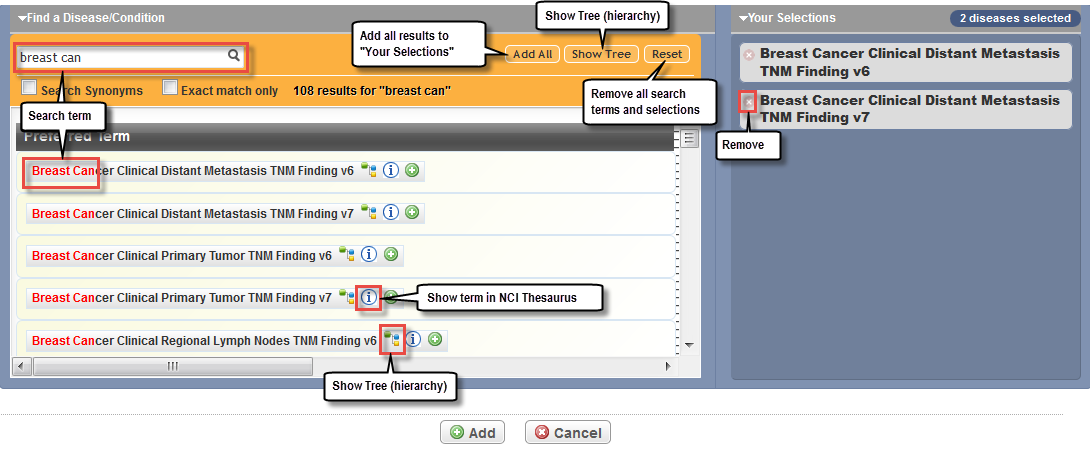
- Select a suggested terms(s) or continue typing. When you have finished typing, click the Search icon to the right of the search term, or press <Enter>. The system searches for the disease/condition, and returns a list of results as shown below. Your search term is highlighted in red. (Refer to the annotated search results window.) If you selected the Search Synonyms check box, alternate terms are displayed alongside their preferred counterparts.
- Scroll through the list of search results (if needed) to locate the disease/condition and stage to add to your selections.
Optionally, to view the location of a specific disease/condition in the CTRP Disease Hierarchy, click the Show Tree icon next to the term. The system highlights the term in red in the NCIt/CTRP Tree (disease hierarchy) box in relation to its parent/child/sibling terms. The same term is highlighted in each branch of the tree to which it belongs.
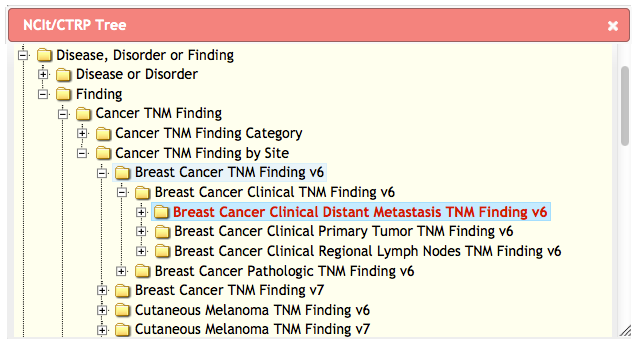
Depending on the location of your preferred term in the NCIt/CTRP Tree, it may take several seconds for the system to display it.
- Optionally, to view a specific disease/condition in the NCIt, click the Information icon next to the term.
To add diseases/conditions, click the desired disease/condition from the list of search results or from the CTRP Disease Hierarchy window. Or, to add all of the diseases/conditions, next to the Search field, click Add All.
The diseases/conditions you choose appear in the Your Selections box.You can not select Alternate Terms (synonyms).
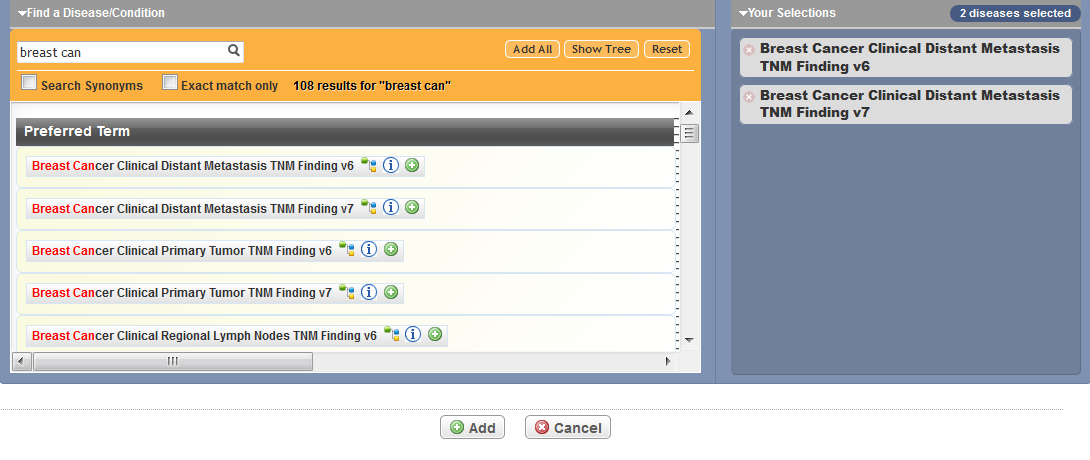
You can select as many diseases/conditions from your search results as necessary. Additionally, you can search for other terms.
- If you need to remove selections:
- To remove a term from the Your Selections box, click the Remove icon associated with the term.
- To remove all search terms and selections, click Reset.
- At the bottom of the window, click Add.
Editing Disease and Condition Indicators - Changing the XML Inclusion Indicator
You can change the Include in XML indicator for current records in a given trial.
How to Edit Disease/Condition Indicators
- Search for the trial of interest. In the search results, click the NCI Trial Identifier link for that trial.
- On the Scientific Data menu, click Disease/Condition. The Trial Disease/Condition page appears, with disease or condition records displayed.
- Click the Edit icon.
The Edit Disease/Condition page appears.

- To include or exclude the disease/condition in the XML document for submission to ClinicalTrials.gov, select or clear the Include in XML check box respectively.
- Click Save.
The edited record is displayed on the Disease/Condition page.
Deleting Diseases and Conditions
The system removes records from view when you delete diseases or conditions from a trial, but it does not delete them from the system. However, there is no way for you to recover a deleted record. If you delete a record accidentally, follow the instructions in Adding Diseases and Conditions to add it back.
How to Delete Diseases/Conditions from a Trial
- Search for the trial of interest. In the search results, click the NCI Trial Identifier link for that trial.
- On the Scientific Data menu, click Disease/Condition. The Trial Disease/Condition page appears.
- Do one of the following:
- In the Delete column for the appropriate record, select the Delete check box, and then click Delete.
- or - - To delete all records, click Select All, and then click Delete.
- In the Delete column for the appropriate record, select the Delete check box, and then click Delete.
Managing NCIt Disease/Condition Terms
You can import NCIt terms on demand if the term you require for abstraction does not exist in the CTRP database. Once imported, CTRP syncs the term with in the NCIt database automatically.
If a term does not exist (i.e., has not been published yet) in the NCIt, you can request the term directly from EVS. Once EVS curators have responded to your request, you can enter new term details when abstracting trials. Later EVS publishes the new term in the NCIt. Refer to Managing Disease and Intervention Terminologies.
How to Manage NCIt Disease/Condition Terminology
- At the bottom of the Disease/Condition page, click Manage NCIt Terms.
The Manage NCIt Terms menu contains options for managing disease terms.
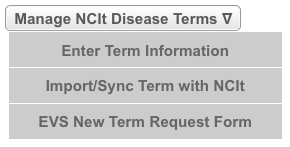
Follow the instructions in the following sections:
- Importing Disease/Condition Terms
- Synchronizing Disease/Condition Terms
- Requesting New Disease/Condition Terms
- Entering Disease/Condition Terms
Abstracting Data Table 4 Anatomic Sites
You can select and record anatomic site terms that identify the anatomic cancer site(s) on which a trial or study is focused. These records are included in a Data Table 4 report. A trial can have multiple anatomic sites.
Adding Data Table 4 Anatomic Sites
How to Add Data Table 4 Anatomic Sites
- Search for the trial of interest. In the search results, click the NCI Trial Identifier link for that trial.
- On the Scientific Data menu, click Data Table 4 Anatomic Site. The Data Table 4 Anatomic Site page appears, with or without any anatomic records displayed.

Data Table 4 Anatomic Site Page - To add a site, click Add.
The Add Data Table 4 Anatomic Site page appears.

- Select the anatomic site from the drop-down list.
- Click Save.
- If applicable, repeat the steps above to record additional sites.
Deleting Data Table 4 Anatomic Sites
How to Delete Data Table 4 Anatomic Sites
- Search for the trial of interest. In the search results, click the NCI Trial Identifier link for that trial.
- On the Scientific Data menu, click Data Table 4 Anatomic Site. The Data Table 4 Anatomic Site page appears.
- Do one of the following:
- To delete one or more sites, in the Delete column for the appropriate record(s), select the check box, and then click Delete.
- or - - To delete all records, click Select All, and then click Delete.
- To delete one or more sites, in the Delete column for the appropriate record(s), select the check box, and then click Delete.
Abstracting Biomarkers
The abstraction of biomarkers applies to Complete and Abbreviated trial categories. You can record biomarkers, their classification, and purpose. Biomarkers for a given study may be available from the study protocol documents. You can search caDSR for biomarkers. If you do not find the biomarker in the caDSR, you can create a placeholder entry for the biomarker named in the protocol.
Adding Biomarkers
A trial can have multiple biomarker records. You can add them individually, or copy the marker records as you create them to enter variations of attributes (e.g., multiple assay types) for the same marker.
How to Abstract Markers
- Search for the trial of interest. In the search results, click the NCI Trial Identifier link for that trial.
- On the Scientific Data menu, click Markers. The Markers page appears. It displays any markers that may have been recorded previously.

- Click Add.
The Add Marker page appears.

Search for and select the biomarker from the caDSR by following the instructions in Searching for Biomarkers in caDSR.
You can enter a biomarker name directly
If you cannot find the biomarker indicated in the protocol document in caDSR, click Cancel to return to the Markers page, and enter the biomarker name directly in the Name field.
Select the appropriate attributes. The following table describes the fields. An asterisk (*) indicates a required field.
You can select multiple attributes for Evaluation Type, Assay Type, Biomarker Purpose, and Specimen Type.
If you select Other as an attribute for Evaluation Type, Assay Type or Specimen Type, you must enter text in the Evaluation Type Other Text , Assay Type Other Text or Specimen Other Text fields respectively.
Trial Description
Instruction
Name*
Click caDSR and follow the instructions in Searching for Biomarkers in caDSR. If you cannot find the biomarker indicated in the protocol document in caDSR, enter the biomarker name directly in the Name field to create a placeholder value.
Evaluation Type* Select the type of evaluation. Valid values include:
- Level/Quantity
- Genetic Analysis
- Cell Functionality
- Subtyping
- Protein Activity
- Proteolytic Cleavage
- Phosphorylation
- Methylation
- Acetylation
- Activation Status
- Loss of Heterozygosity (LOH)
- Germline Variant
- Somatic Variant
- Chromosomal Amplification
- Chromosomal Deletion
- Other
- Evaluation Type Other Text (displayed and required if Evaluation Type = Other)
Special instructions for "Other" text
If you select "Other," copy and paste the exact name of the evaluation (as written in the protocol) into the Evaluation Type Other Text box.
Assay Type* (CDE ID 64731)
Select the test type(s), the test name(s), or method(s) used to assess a specific marker. Valid values include:
- PCR
- In Situ Hybridization
- Microarray
- ELISA
- Immunohistochemistry (IHC)
- Western Blot (Immunoblot)
- Flow Cytometry
- Sequencing
- Microscopy/Imaging
- ELISPOT
- Proliferation Assay
- Cytotoxicity Assay
- Mass Spectrometry
- TUNEL Assay
- Real-Time RT-PCR (qRT-PCR)
- HPLC
- RT-PCR
- Multiplex Immunoassay
- Real-Time PCR (quantitative PCR)
- Unspecified - Details are not provided, and do not exist in the protocol document
- Other - Other assay type
- Assay Type Other Text (displayed and required if Assay Purpose = Other)
Special instructions for "Other" text
If you select "Other," copy and paste the exact name of the assay/method (as written in the protocol) into the Assay Type Other Text box.
Biomarker Use* (CDE ID 2939411)
Select the value that describes the assay use. Valid values include:
- Integral. Tests that must be performed for the trial to proceed. Includes biomarkers evaluated for the purpose of eligibility/enrollment, stratification, and treatment assignment.
- Integrated. Tests that are hypothesis-driven or measured to support objectives.
Biomarker Purpose* (CDE ID 2939397)
Select the value(s) that describes the reason or intention of the assay in the clinical study. Valid values include:
- Eligibility Criterion. Biomarker measured to help determine if patients can participate in the research trial.
- Treatment Assignment. Biomarker measured to help determine what treatment will be administered (or how much is given).
- Stratification Factor. Biomarker measured to help classify patients into strata as part of the randomization process or for purposes of data analysis.
- Research. Biomarker measured to support a hypothesis or trial objective which cannot be considered response assessment.
- Response Assessment. Biomarker measured to help determine how well the treatment is working or to characterize the impact of treatment.
Specimen Type* (CDE ID 3111302)
Select the type(s) of sample. Valid values include:
- Serum. Clear portion of the blood that remains after the removal of the blood cells and the clotting proteins.
- Plasma. Fluid (noncellular) portion of the circulating blood, as distinguished from the serum that is the fluid portion of the blood obtained by removal of the fibrin clot and blood cells after coagulation.
- Blood (includes Peripheral Blood Monocytic Cells [PBMCs])
- Tissue
- Urine
- PBMCs (Peripheral Blood Monocytic Cells)
- CSF (Cerebrospinal Fluid)
- Bone Marrow
- Saliva
- Cryopreserved Cells
- Buccal Mucosa
- Feces
- Unspecified
- Other
- Specimen Type Other Text (displayed and required if Specimen Type = Other).
Special instructions for "Other" text
If you select "Other," copy and paste the exact name of the specimen (as written in the protocol) into the Assay Type Other Text box.
Record Status
This field is populated by the PA system. When you save the biomarker information, the system sets the marker status to one of the following:
Pending - Indicates that a request for a new permissible value has been submitted 1
- Active - Indicates that the marker was listed in caDSR
- The Pending status changes to Accepted once the Research Scientist enters corresponding Public ID in the Pending Markers Report. For information about updating the status of a marker, see Processing New Marker Requests. ↩
- Do one of the following to save the record:
- Scroll to the top or bottom of the page, and click Save.
- or -
- To create a new record for a different marker but with the same attribute selections, click Save & Retain Attributes. Then search for and select the biomarker from the caDSR, and save the record.
The Marker page displays the record(s) you created.
Searching for Biomarkers in caDSR
The search feature enables you to search for biomarkers listed in caDSR. You can search for biomarkers by the following criteria:
- Search Term. Search for biomarkers meanings that contain the search term
- Search Scope. Search for biomarkers that contain the search term in their preferred permissible values only, in their synonyms (alternate names) only, or in both (the default).
- Public ID. Search for biomarkers by their Public IDs only
If you provide the marker's Public ID, you must enter it exactly, in its entirety.
Additional search options include the following:
- Case-sensitivity. You can elect to make the search term case-sensitive or insensitive. Searches are case-insensitive by default.
- Highlighting search terms. Query text in search results is highlighted by default to make search terms easier to identify. You can turn on or off query text highlighting in the search results.
Most search results list primary terms followed by all possible synonyms in parenthesis in the following order:
- Exact matches for the Primary term
- Matches that contain the search term alone (i.e., the term is not part of a larger term)
- All other matches that contain the search term
The CTRP system synchronizes its data with the caDSR terminology database nightly. In rare instances--for example, if CTRP was unable to connect with caDSR--you will receive a notice that the synchronization failed. The systems synchronize automatically the following night.
How to Search for Markers in caDSR
- Follow Steps 1 and 2 in Adding Biomarkers.
- Next to the Name field, click caDSR
The Marker Search in caDSR window appears.

Enter all or part of the criteria for the search in the fields provided.
To restrict your search by case, next to Case-Sensitive Search, select Yes (the default is case-insensitive).
To highlight the term you searched for in the list of results, next to Highlight Query Text, select Yes.
Press the ENTER key on your keyboard, or click Search.
The results of your search are listed in a table with their permissible values 2 .
- In the row that contains the appropriate marker, click Select.
You are returned to the Add Marker page. The Marker Name field is populated with information from the marker you selected.
___
- The TSR document associated with a trial includes both the permissible value and alternates (synonyms). ↩
Adding Biomarkers from HUGO to the caDSR Database
If you did not find a given biomarker in caDSR, The Research Scientist must review the term to determine if a request must be sent to caDSR. If the marker is a gene, the Research Scientist should access HUGO (via the link in the request form). The HGNC-approved symbol should be requested as the primary term, followed by any appropriate synonym from the protocol in parenthesis. The HGNC ID number should also be included in the request after selecting the Found in Hugo? check box.
How to Request Markers from HUGO for Addition to the caDSR Database
- Follow Steps 1 and 2 in Adding Biomarkers.
- Next to the Name field, click caDSR
The Marker Search in caDSR window appears.

- Click Create Biomarker Request.
The Create Permissible Value Request window appears, with your email address in the Sender's Email address field.

- Select the Found in HUGO? check box, and then click the HUGO link.
The window displays a new field for the HUGO marker code, and the HGNC database is launched in a new browser window. - Search for the marker in the HGNC database, and then enter the HGNC ID number for the appropriate record into the Hugo Marker Code field. This field is displayed only when you select the Found in HUGO? check box.
- In the Text of marker as written in the protocol field, copy and paste, or enter, the information about the marker as it appears in the protocol.
- Click Send Email.
Your request is sent to the caDSR for processing. The value you requested is listed on the Pending Markers Report with the Pending status. You can return to the Pending Markers report later to enter the Public ID number once caDSR has sent notification to the Research Scientist that the new term was created. (See Processing New Biomarker Requests.)
Editing Biomarkers
You can change recorded marker information or delete marker records from a trial.
How to Edit Marker Records
- Search for the trial of interest. In the search results, click the NCI Trial Identifier link for that trial.
- On the Scientific Data menu, click Markers. The Markers page appears.

- To edit a marker, in the Edit column, click the Edit (pencil) icon.
The Edit Marker page appears.

- Follow the instructions for selecting and saving attributes in Adding Biomarkers to change the recorded information.
Deleting Biomarkers
You can delete one or more marker records from a trial.
How to Delete Marker Records
- Do one of the following to select the markers you want to delete:
- To delete a marker(s), select the check box in the Delete column for the appropriate marker record(s). You can select multiple records.
- or - - To delete all markers, click Select All.
The button changes to Deselect All.
- To delete a marker(s), select the check box in the Delete column for the appropriate marker record(s). You can select multiple records.
- Optionally, to clear all check boxes, click Deselect All.
- Click Delete, and then confirm that you want to delete the record.
Warning
There is no way to recover a deleted record. If you delete a record accidentally, follow the instructions in Adding Biomarkers to add it back.
Requesting New Permissible Values for Biomarkers
If the biomarker in the trial protocol is not listed in the caDSR, nor HUGO, the Research Scientist can request a new permissible biomarker value.
How to Request New Permissible Values for Biomarkers
- Follow Steps 1 and 2 in Adding Biomarkers.
- Next to the Name field, click caDSR
The Marker Search in caDSR window appears. Click Create Biomarker Request.
The Create Permissible Value Request window appears, with your email address in the Sender's Email address field.
- In the Marker Name field, enter the most appropriate biomarker name followed by the name as it appears in the protocol in parenthesis if the two are not identical.
- In the Text of marker as written in the protocol field, copy and paste, or type, the information about the marker as it appears in the protocol.
Click Send Email.
Your request is sent to the caDSR for processing. The value you requested is listed on the Pending Markers Report with the Pending status. You can return to the trial later to accept it once it has been processed. (See Processing New Biomarker Requests.)
Abstracting Interventions
You can search for, and select, interventions from a stored list of active intervention terms extracted from NCIt and link them to a trial. NCIt is an online database developed and maintained by the National Cancer Institute Enterprise Vocabulary Services. You can find more detailed information about NCIt at http://ncit.nci.nih.gov/.
Additionally, Protocol Abstraction provides a structure for describing drug, radiation, and surgical procedure details. It generates a description from values you provide for such parameters as dose, target site, frequency of administration, etc.
Obsolete terms
Some intervention terms become obsolete over time. When you validate the trial, the system displays an error message if the abstraction contains an obsolete term. If this occurs, look up the intervention name and replace the obsolete term with the new one.
Check out the trial before you begin abstraction
Before you begin abstracting or validating any trial, be sure you check it out first. Otherwise you will not be able to modify any trial data.
Trials can have multiple intervention records. Each record displays the following information about the intervention:
Intervention data definitions
Column Name | Definition |
|---|---|
Name | Standard name used to refer to each intervention. For drugs, this is the generic name. For investigational new drugs that do not yet have a generic name, this may be the chemical name, company code, or serial number. |
Other Names | Synonym or other name 3 |
Description | For drug interventions, a summary of the drug’s chemical nature and (potential) mechanism of action, and/or details such as dosage form, dosage, frequency, and duration. Tip You can generate descriptions for drug, radiation, and surgical procedure interventions using Protocol Abstraction’s structured approach. To do so, see Generating Drug, Radiation, and Procedure/Surgery Descriptions. |
Type | Mode of intervention, for example, drug or device. |
- Alternate names you record appear in the TSR and XML documents. ↩
Additionally, you can add, edit, reorder, and delete records.
Sorting intervention records
You can change the sort order (ascending/descending) of any column other than Edit and Delete by clicking the column name and selecting the up or down arrow that appears.

Adding Interventions
You can link interventions to a trial by searching for an intervention name from the current list of active records.
The terminology list is refreshed weekly.
How to Add Interventions
- Search for the trial of interest. In the search results, click the NCI Trial Identifier link for that trial.
- On the Scientific Data menu, click Interventions. The Interventions page appears, with or without any intervention records displayed.
Click Add. The Add intervention page appears.

- From the Intervention Type drop-down list, select the means of intervention for the trial. Valid intervention types are as follows.
- Drug
- Device (including sham)
- Biological/Vaccine
- Procedure/Surgery
- Radiation
- Behavioral (for example, Psychotherapy, Lifestyle Counseling)
- Genetic (including gene transfer, stem cell, and recombinant DNA)
- Dietary Supplement (for example, vitamins, minerals)
Other
- To search for the name of the intervention, click Look Up.
The Search Intervention window appears.

In the Intervention Name field, type part or all of the intervention name.
Tip
The system adds wildcards on both sides of the search string (the series of letters you type) for you implicitly. You can type wildcard symbols (% or *) between characters of the string as necessary.- To include synonyms in your search in addition to preferred names, select the Include Synonym check box.
- To limit your search to exact matches only, select the Exact Match Only check box.
- Click Search.
The system searches for the intervention from both preferred names and synonyms (if selected) in the database, and returns a list of results.

- Scroll through the list to locate the intervention, and click Select.
The selected intervention and any other names are displayed on the Add Intervention page.

Optionally, in the Intervention Description field, enter the name/description of the intervention.
- Click Save.
The record is added to the trial and displayed on the Interventions page.
Although not displayed on the Interventions page, the system records the ClinicalTrials.gov code for the intervention.
Generating Drug, Radiation, Procedure, and Surgery Descriptions
Protocol Abstraction provides a structure for abstracting detailed descriptions of drug, radiation, and procedure/surgery interventions.
How to Generate Drug, Radiation, and Procedure/Surgery Descriptions
- Search for the trial of interest. In the search results, click the NCI Trial Identifier link for that trial.
- On the Scientific Data menu, click Interventions. The Interventions page appears, with or without any intervention records displayed.
- Click Add. The Add intervention page appears.
From the Intervention Type field, select Drug, Radiation, or Procedure/Surgery as appropriate.
Tip
Do not type an intervention description at this point. The system automatically populates the Intervention Description from information you provide in the next steps.
- Follow the steps in Adding Interventions for instructions for searching for, and selecting, interventions.
The Interventions page expands to display a Drug Information, Radiation, or Procedure Information section, depending on your selection.


- In the Drug, Procedure, or Radiation Information section of the page, enter the values in the text fields provided.
- To provide values for the parameters that require harmonized terms (the gray fields), click Look Up.
The Search window appears .

Type your search criteria in the field(s) provided, and then click Search. If the information you are abstracting includes a range, for example, dose range, you can provide the lower limit without providing the upper limit. However, do not provide the upper limit of a range unless you also include a lower limit.
You must type at least one character in any of the search fields.
The Search window displays the result(s) of your search.

- In the search results list, locate the preferred item, and then click Select.
- Once you have provided information for all relevant fields, click Generate.
The information you provided is displayed in the Intervention Description field.

- Click Save.
Editing Interventions
You can edit trial descriptions. However, if you need to change the intervention type or name, you must delete the record and create a new one with the correct information. See Deleting Interventions.
How to Edit Intervention Records
- Search for the trial of interest. In the search results, click the NCI Trial Identifier link for that trial.
- On the Scientific Data menu, click Interventions. The Interventions page appears.

- In the Edit column for a given record, click the Edit (pencil) icon.
The Edit Intervention page appears.

- Edit or enter the intervention description, and then click Save.
If you edit a drug, radiology, or procedure intervention, the Edit Intervention page displays the original form for the record.

- To edit the intervention description and/or details of drugs, radiation, and procedures/surgeries, follow the instructions in Adding Interventions.
- Click Save.
Reordering Interventions
You can change the order in which the interventions are displayed in the interventions table and in the TSR/XML documents.
How to Re-Order Intervention Criteria
- Search for the trial of interest. In the search results, click the NCI Trial Identifier link for that trial.
- On the Scientific Data menu, click Interventions. The Interventions page appears, displaying all other interventions currently abstracted.
- In any column other than Edit or Delete, click and drag the record you want to move to a new location in the Interventions table. The record background changes color as you move the record.

Deleting Interventions
When you delete interventions from a trial, you delete them from view, and can not recover them. If you delete a record accidentally, follow the instructions in Adding Interventions to add it back.
How to Delete Interventions
- Search for the trial of interest. In the search results, click the NCI Trial Identifier link for that trial.
- On the Scientific Data menu, click Interventions. The Intervention page appears.
- In the Delete column, select the check box for each record you want to delete, then click Delete. To delete all records, click Select All, and then click Delete.
Managing Intervention Terms
You can import NCIt terms on demand if the term you require for abstraction does not exist in the CTRP database. Once imported, CTRP syncs the term with in the NCIt database automatically.
If a term does not exist (i.e., has not been published yet) in the NCIt, you can request the term directly from EVS. Once EVS curators have responded to your request, you can enter new term details when abstracting trials. Later EVS publishes the new term in the NCIt. Refer to Managing Disease and Intervention Terminologies.
How to Manage NCIt Intervention Terminology
- At the bottom of the Interventions page, click Manage NCIt Terms.
The Manage NCIt Terms menu contains options for managing intervention terms.

Follow the instructions in the following sections:
Abstracting Arms
In interventional studies, an arm is a group of study subjects associated with a given treatment assignment. Arm information is required for Complete trials, and is optional for Abbreviated trials.
When adding arms to a trial, you assign to them the interventions currently abstracted for the trial.
Check out the trial before you begin abstraction
Before you begin abstracting or validating any trial, be sure you check it out first. Otherwise you will not be able to modify any trial data.
The following rules apply to each trial:
There must be at least one arm/group that implies that the entire study subject population receives the same intervention.
The number of arms/groups added to the trial must coincide with the number indicated in the trial’s Design Details. See Abstracting Interventional Trial Design Details.
- Every arm must have at least one assigned intervention (except for the arm type "no intervention").
- Every intervention must be assigned to at least one arm.
- There must be only one arm with the same combination of description and associated intervention.
- Arm details for single-arm trials are not required.
Trials can have multiple arm records. Each record displays the following arm information:
Field | Definition |
|---|---|
Label | Short name used to identify the arm or comparison group. |
Type | Function of the arm. Valid types are as follows:
|
Description | Brief description of the arm or comparison group to distinguish it from other arms/groups in the trial. |
Assigned Interventions | Intervention(s) assigned to a given arm. 4 |
____
- Interventions imported from ClinicalTrials.gov may not match CTRP terminology. ↩

Adding Arms
You can add one or more arms to a trial according to the trial’s design details.
How to Add Arms
- Search for the trial of interest. In the search results, click the NCI Trial Identifier link for that trial.
- On the Scientific Data menu, click Arms. The Arms page appears, with or without any arm records displayed.
- Click Add. The Add Arm page appears. The interventions that have been abstracted previously are displayed on the right side of the page.

In the drop-down lists and text fields, select or enter the appropriate information. The following table describes the fields. An asterisk (*) indicates a required field.
Trial Description
Instruction
Label*
Type the descriptive name of the arm.
Type*
Select the appropriate arm function. Valid values are as follows:
- Experimental. An arm or group in which an experimental drug or regimen is being administered. Used when the trial specifies that one arm is a control arm and the other is experimental, or when the other arm is a placebo arm.
- Active Comparator. An arm or group in which active drugs are given. Includes arms that are mixing active drugs and placebos. Used when the term “control arm” is specified in the protocol and when another arm is designated as the experimental arm. There can be more than one active comparator arm.
- Placebo Comparator. An arm or group in which only a placebo is given.
- Sham Comparator. An arm or group in which only a mock therapy that is not a drug is administered
- No intervention. An observational arm or group
- Other. An arm or group which does not fall into any of the above categories.
Arm Description
Type a brief description of the arm.
You must provide an arm description or existing intervention description when abstracting multi-arm trials.
Assignment
For arm types other than No Intervention, select the check box in the column for the intervention assigned to the current arm.
You can expand text fields and table cells to reveal all of their content
To increase the size of a text field or table cell, click and drag the lower right corner handle.
- Repeat the steps above until all arms have been assigned an intervention and all interventions have been assigned to at least one arm.
- Click Save.
Editing Arms
You can edit arm records as necessary.
How to Edit Arm Records
- Search for the trial of interest. In the search results, click the NCI Trial Identifier link for that trial.
- On the Scientific Data menu, click Arms. The Arms page appears.
- In the Edit column for a given record, click the Edit icon.
The Edit Arm page appears.

- If there is more than one arm listed, select the Assignment check box for the one you want to edit. Modify the arm details according to instructions in Adding Arms .
You can expand text fields and table cells to reveal all of their content
To increase the size of a text field or table cell, click and drag the lower right corner handle.
- Click Save.
Deleting Arms
When you delete arms from a trial, you delete them from the system, and can not recover them.
How to Delete Arms
- Search for the trial of interest. In the search results, click the NCI Trial Identifier link for that trial.
- On the Scientific Data menu, click Arms. The Arms page appears.
In the Delete column for the appropriate record, click the Delete icon.
There is no way to recover a deleted record. If you delete a record accidentally, follow the instructions in Adding Arms to add it back.
Abstracting Groups and Cohorts
Group/cohort information pertains to Complete non-interventional trials only. In non-interventional studies, cohorts are groups of individuals, initially defined and composed, with common characteristics (e.g., condition, birth year), who are examined or traced over a given time period.
When adding groups to a trial, you assign to them the interventions currently abstracted for the trial.
Check out the trial before you begin abstraction
Before you begin abstracting or validating any trial, be sure you check it out first. Otherwise you will not be able to modify any trial data.
The following rules apply to each trial:
There must be at least one group/cohort that implies that the entire study subject population receives the same intervention.
The number of groups/cohorts added to the trial must coincide with the number indicated in the trial’s Design Details. See Abstracting Non-Interventional Trial Design Details .
- Every group/cohort must have at least one assigned intervention.
- Every intervention must be assigned to at least one group/cohort.
- A trial must have only one group with the same combination of description and associated intervention.
Trials can have multiple group/cohort records. Each record displays the following group information:
| Field | Definition |
|---|---|
Label | Short name used to identify the group |
Description | Explanation of the nature of the study group (e.g., those with a condition and those without a condition; those with an exposure and those without an exposure). |
Assigned Interventions | Intervention assigned to a given group |

Group Records
Adding Groups
You can add one or more groups to a trial according to the number specified in the trial’s design details. See Abstracting Non-Interventional Trial Design Details .
How to Add Groups
- Search for the trial of interest. In the search results, click the NCI Trial Identifier link for that trial.
- On the Scientific Data menu, click Groups/Cohorts. The Groups page appears, with or without any group records displayed.
- Click Add. The Add Group page appears. The interventions that have been abstracted previously are displayed on the right side of the page.

In the check boxes and text fields, select or enter the appropriate information. The following table describes the fields. An asterisk (*) indicates a required field.
You can expand text fields and table cells to reveal all of their content
To increase the size of a text field or table cell, click and drag the lower right corner handle.
Field
Instruction/Description
Label*
Enter the descriptive name of the group.
Description*
Enter a brief description of the group.
Assignment
Select the check box(s) in the column for the intervention(s) assigned to the current group.
- Repeat the steps above until all groups have been assigned an intervention and all interventions have been assigned to at least one group.
- Click Save.
Editing Groups
You can edit group records as necessary.
How to Edit Group Records
- Search for the trial of interest. In the search results, click the NCI Trial Identifier link for that trial.
- On the Scientific Data menu, click Groups/Cohorts. The Groups page appears.
- In the Edit column for a given record, click the Edit icon.
The Edit Group page appears.

- Make changes as necessary to the Label, Description, or Intervention Assignment according to instructions in Adding Groups.
You can expand text fields and table cells to reveal all of their content
To increase the size of a text field or table cell, click and drag the lower right corner handle.
- Click Save.
Deleting Groups
When you delete groups from a trial, you delete them from the system, and can not recover them. If you delete a record accidentally, follow the instructions in Adding Groups to add it back.
How to Delete Groups
- Search for the trial of interest. In the search results, click the NCI Trial Identifier link for that trial.
- On the Scientific Data menu, click Groups/Cohorts. The Groups page appears.
- In the Delete column, select the check box for the appropriate record(s), and then click Delete.
- To delete all groups, click Select All, and then click Delete.
Abstracting Sub-Groups
A sub-group represents stratification criteria that can be used to assign patients to study arms and assess study outcomes. Sub-group information is required for Complete trials only, and optional for Abbreviated trials.
Trials can have multiple sub-group records. Each record displays the following information about the disease or conditions:
Field | Definition |
|---|---|
Code | Characters, or phrase used to identify the sub-group |
Description | Stratification criteria |
Check out the trial before you begin abstraction
Before you begin abstracting or validating any trial, be sure you check it out first. Otherwise you will not be able to modify any trial data.

Sub-Groups Page
Adding Subgroups
You can add one or more sub-groups to a trial according to the trial’s design details.
How to Add Sub-groups
- Search for the trial of interest. In the search results, click the NCI Trial Identifier link for that trial.
- On the Scientific Data menu, click Sub-groups. The Sub-groups page appears, with or without any sub-group records displayed.
- Click Add. The Add/Edit Sub-group Information page appears.

- In the Code field, enter a unique sub-group identifier.
- In the Description field, enter a brief description of the sub-group.
- Click Save.
- Repeat the steps above until all sub-groups have been added.
Editing Subgroups
You can edit sub-group records as necessary.
How to Edit Sub-group Records
- Search for the trial of interest. In the search results, click the NCI Trial Identifier link for that trial.
- On the Scientific Data menu, click Sub-groups. The Sub-groups page appears.
- In the Edit column for a given record, click the Edit icon. The Add/Edit Sub-group Information page appears.
- Modify the sub-group details according to instructions in Adding Sub-Groups.
- Click Save.
Deleting Subgroups
When you delete groups from a trial, you delete them from the system, and can not recover them. If you delete a record accidentally, follow the instructions in Adding Sub-Groups to add it back.
How to Delete Sub-groups
- Search for the trial of interest. In the search results, click the NCI Trial Identifier link for that trial.
- On the Scientific Data menu, click Sub-groups. The Sub-group page appears.
- In the Delete column for the appropriate record, click the Delete icon.