Template:Menu LexEVS 6.0 Administration
If you choose to install the LexEVS GUI when you installed LexEVS, you will have a 'gui' folder inside of your LexEVS base installation. You should have the following programs in the 'gui' folder:
|
{{ |
}}
We provide two Windows shell script versions which allow a choice between the full-fledged interface for loading, managing, and end-use, or the interface for end-use only.
This shell script provides an example by which any shell script can pass an argument option "-d" into the java command launching the LexEVS GUI application, restricting the end user to browsing only, and allowing no loading or management of terminologies.
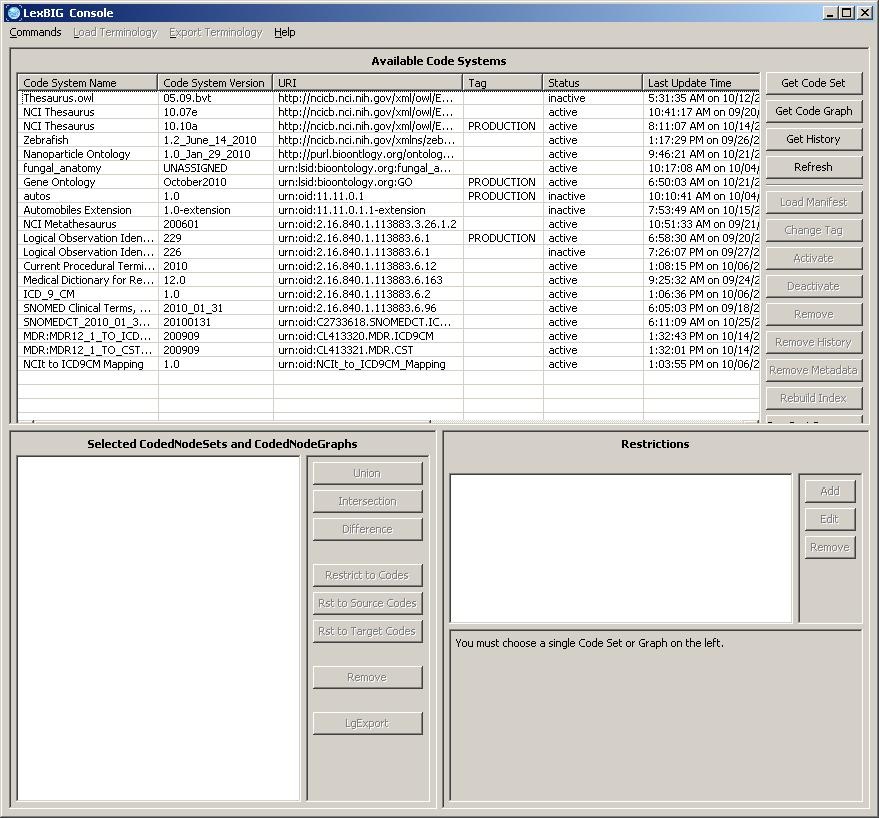
Launch the GUI by executing the appropriate script for your platform. You will be presented with an application that looks like this:

This application will let you perform most administrative functions that are available in the LexEVS API. To enable the administrative functions, first go to the 'Commands' menu, and then click on the 'Enable Admin Options' submenu. This will enable all of the commands that can make changes to the LexEVS environment.
This guide covers only the administrative commands. Refer to the LexEVS Programmer's Guide for instructions on using the rest of the LexEVS GUI.
Menu Item |
Menu Action |
|---|---|
Configure |
This menu option will bring up a dialog which will show you all of the options from the current |
Enable Admin Options |
This option enables or disables all of the GUI features which are considered administrative options. |
Clean Up |
This command will run the clean up orphaned resources tool. It will give you a listing of any resources that are orphaned in the LexEVS environment, and give you the option to remove them. |
View Log File |
This will show you the all of the logs messages that have occurred during the LexEVS GUI session. The log file viewer also has choices to let you customize the types of messages that are logged. |
Exit |
Close the application. |
The drop down menu labeled "Command" provides general administrative access.
Selecting 'Enable Admin Options' provides administrative access to all commands
style="width:800px;" border="0"
Loader type in Menu |
Menu Action |
|---|---|
Various Loaders (Standard version) |
This menu option launches terminology loader menus which have the same interface |
History Loaders |
This menu option launches history loader menus which have the same interface |
Text Loader |
This menu option launches a text loader menu with a unique interface |
MrMap Loader |
This menu option launches a an RRF Loader for the MRMAP, MRSAT file set loader menu with a unique interface |
Most loaders have the same interface and option set:
Change history can be loaded for selected source types:
Loader for text files formatted as LexGrid text
Loader class for MrMap and MrSat RRF files resulting in a mapping coding scheme or schemes depending on the content of these files. Some standard Loader Options are not available for the MrMap Loader since applying metadata or preferences to multiple mapping schemes would not be appropriate.
Export to selected formats from the LexGrid database
style="width:800px;" border="0"
Menu Item |
Menu Action |
|---|---|
Export as OBO |
This menu option will launch an exporter that exports the selected terminology into an OBO 1.2 format. |
Export as OWL/RDF |
This menu option will launch an exporter that exports the selected terminology into an OWL/RDF format. |
Export as LexGrid XML |
This menu option will launch an exporter that exports the selected terminology into the LexGrid XML format. |
These are located in the lower right area of the top half of the LexEVS GUI.
Button |
Button Action |
|---|---|
Load Manifest |
Brings up a dialog box to set up a manifest load. |
Change Tag |
Brings up a dialog that allows you to set (or remove) the tag on the selected terminology. |
Activate |
Activates the selected terminology. Only available if the terminology is currently deactivated. |
Deactivate |
Deactivates the selected terminology. Only available if the terminology is currently activated. |
Remove |
Deletes the selected terminology. |
Remove History |
Removes the NCI History data for the selected terminology. Only applicable to NCI Thesaurus terminologies. |
Remove Metadata |
Remove metadata load for a given coding scheme |
Rebuild Index |
Rebuilds the internal indexes for the selected terminology. If no terminology is selected, rebuilds the indexes for all terminologies. |
Run Postprocessor |
Run a post processor algorithm against the selected coding scheme |
Manifest files are XML files that resolve against a LexGrid Model compliant manifest schema. They contain coding scheme metadata changes only. Once the target coding scheme is selected (and highlighted as a result) all that is required is that the user provide a path to a valid manifest file.
User highlights the desired coding scheme and initiates the action by pressing a button:
Activate or deactivate a coding scheme. Coding Schemes which are not active cannot be queried or have some administrative actions performed upon them.
Deletes a given coding scheme and its indexes from the terminology service. If operating in single table mode removing a large terminology can be very time consuming.
Remove a coding scheme history instance from the terminology service.
Removes a coding scheme metadata supplement from the terminology service.
If a coding scheme is selected, it builds indexes for the given scheme. If not all coding schemes are reindexed. Reindexing a large set of sizable coding scheme could take some time.
Executes a Loader post process. Loader post processes can be used to modify
database content, do extra cleanup, or send notifications, for example.
NOTE: Post Process error/exception conditions will not effect Loader status.
Implementors can assume that database content has been loaded at the point of
this call, but the load is not yet in a completed state and Lucene indexing
has not been done.