You can print and export wiki pages
This guide explains how to use Annotation and Image Markup (AIM) on ClearCanvas Workstation. ClearCanvas  is an open-source imaging platform. This guide explains key procedures for creating and working with AIM annotation objects. The intended audience for this guide is a biomedical researcher familiar with the AIM information model.
Workflow Overview
AIM on ClearCanvas Workstation allows you to work with AIM templates that you created in AIM Template Builder. A typical workflow from template design to application use follows.
- Design what information is needed to be collected from an imaging study or clinical trial.
- Create a set of questions and possible answer choices to each question. You can design the questions so that the respondent skips a set of consecutive questions.
- Use AIM Template Builder (ATB) to create template(s).
- Export the template or template group from ATB.
- Import the template file to AIM on ClearCanvas Workstation.
- Specify where to store AIM template XML documents.
- Use the data you collect.
Logging in to AIM on ClearCanvas Workstation
- Double-click the AIM on ClearCanvas Workstation icon.
The Login dialog box appears.
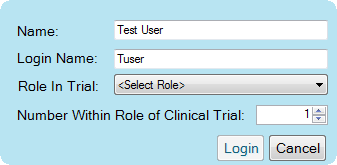
- Your administrator should already have created a login name for you. Enter your full name followed by that login name.
- Select the role you are playing in the clinical trial. Options are Performing, Referring, Requesting, Recording, Verifying, Assisting, Circulating, and Standby.
- Select your number within your role in the clinical trial.
- Click Login.
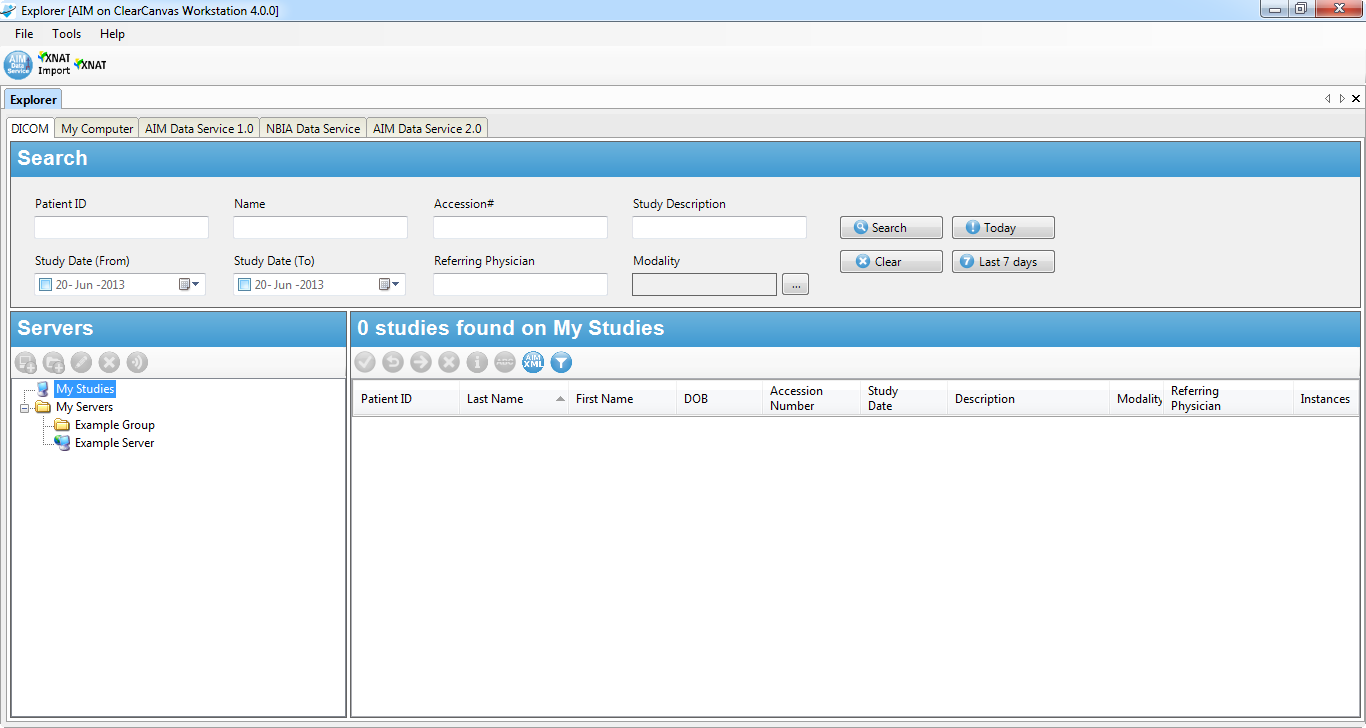
The Explorer window appears, showing the DICOM tab.
Configuring the AIM Data Service 2.0 Plugin
You can configure AIM on ClearCanvas Workstation to connect to the AIM Data Service. The AIM Data Service is any set of data services that can accommodate the AIM data model. There is no public AIM Data Service but you can download it from http://imaging.cci.emory.edu/wiki/pages/viewpage.action?pageId=1572968 and then install and maintain it yourself.
- Select Tools > Preferences > AIM > AIM Data Service 2.0.
The AIM Data Service 2.0 tab appears.
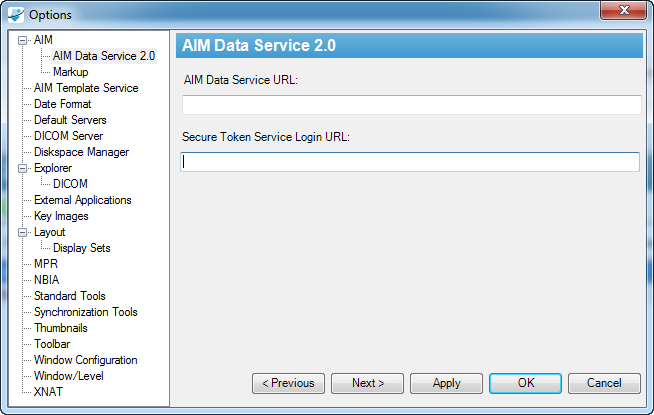
- Enter the URL of an active AIM Data Service. If you do not enter a URL, AIM on ClearCanvas Workstation will not send any AIM XML documents to the AIM Data Service 2.0, and will store those documents locally.
- Enter the Secure Token Service Login URL.
- Click OK.
Using the AIM Data Service 2.0 Plugin
- Click the Explorer tab.
- Click the AIM Data Service 2.0 tab.
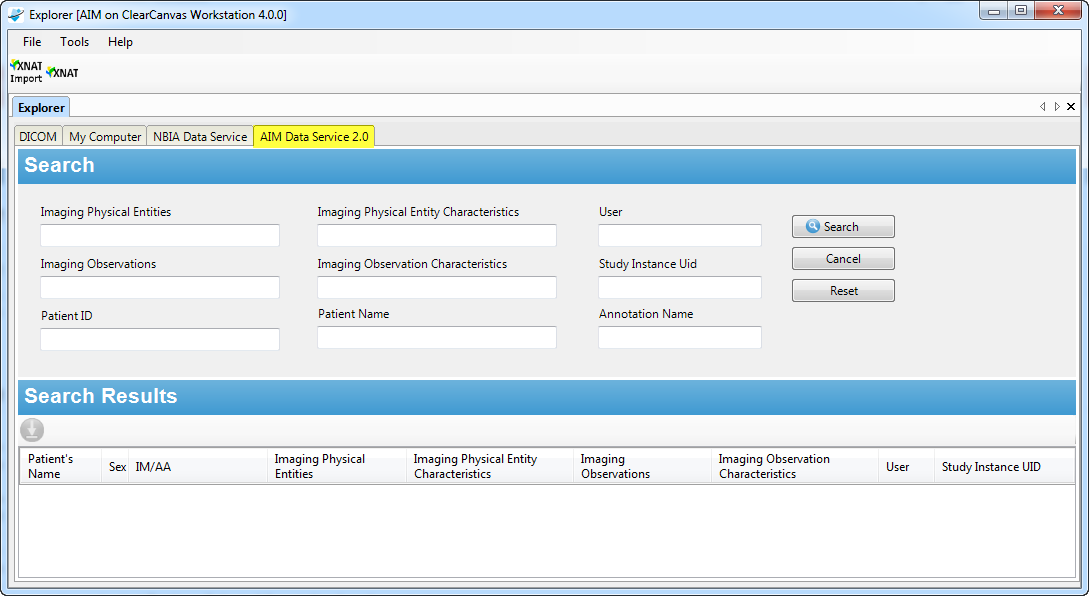
- Enter search criteria in the search fields to narrow your search, or leave them blank to retrieve a list of all annotations.
- Click Search.
The Log In dialog box appears.
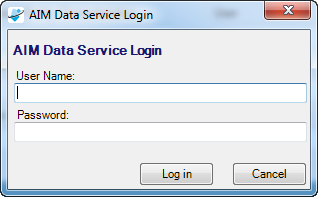
- Enter your user name and password for the AIM Data Service.
- Click Log in. The search results appear in the results pane at the bottom of the tab.
- Select an annotation from the list of results.
- To download and import the annotation into the workstation, do one of the following:
- Click the Retrieve Selected Annotation button, or
- Right-click a selected annotation and select Retrieve Selected Annotation from the context menu.
Creating DICOM Segmentations (new in 4.5)
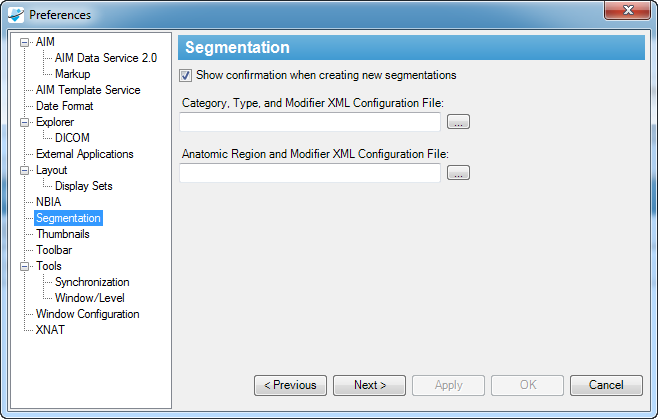
Two files, AnatomicRegionAndModifier.xml and SegmentationCategoryTypeModifier.xml are used to describe DICOM segmentations that you can create based on the DICOM standard. You may choose to create and import your own descriptions for anatomic regions and segmentation categories. In this case, you must follow XML schemas designed for an anatomic region (https://cbiit-download.nci.nih.gov/aim/releases/Segmentation/AnatomicRegionAndModifier.xsd) and the segmentation category (https://cbiit-download.nci.nih.gov/aim/releases/Segmentation/SegmentationCategoryTypeModifier.xsd).
- Select Tools > Preferences > Segmentation.
The Segmentation tab appears.
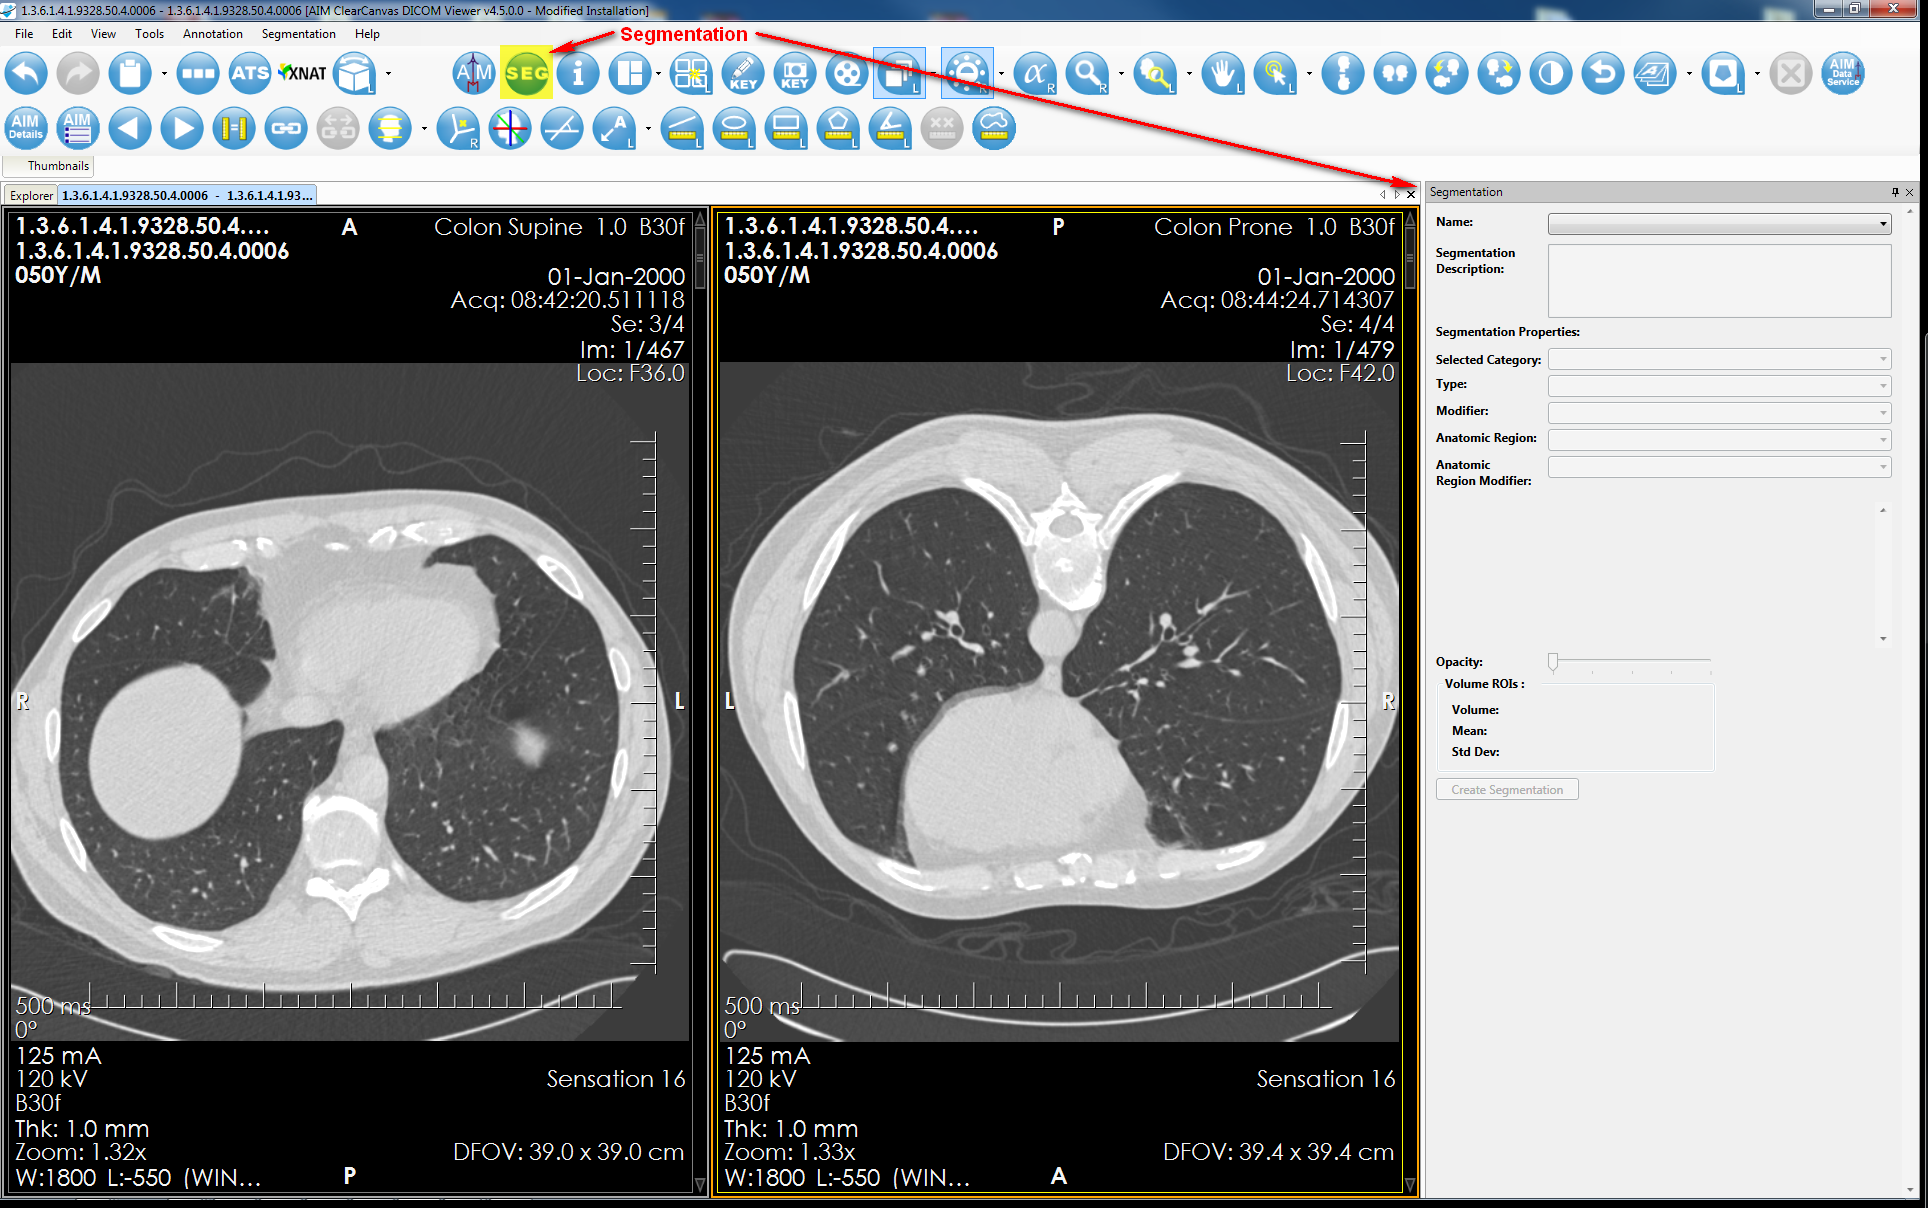
The DICOM segmentation tool also appears in the toolbar: .
.
Use the freehand tool to manually draw a segmentation object:
 .
.
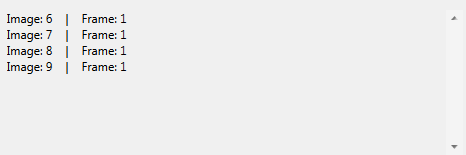
When you create a DICOM segmentation object, you draw many drawings on multiple images of the same thing. Assign the same name to each drawing to create a DICOM segmentation volume.When you create a segmentation on an image, the information about the image and frame number appears in the image list. This information describes a set of images that form a DICOM segmentation volume.
Select values in the Segmentation Properties section.

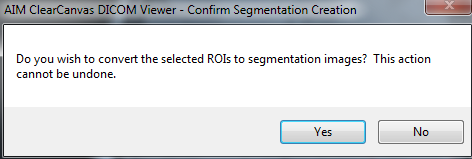
Click Create Segmentation.
When prompted, confirm that you want to create a DICOM segmentation. Note that once you create a segmentation, you cannot modify or delete it.
You can, however, adjust the opacity level using the opacity slider bar.

When you create more than one DICOM segmentation, each DICOM segmentation with the same name is grouped together. A name is automatically added to the Name box. You must provide values in the Segmentation Properties section for each DICOM segmentation before you can create a DICOM segmentation.
AIM on ClearCanvas Workstation automatically displays DICOM segmentations on images in studies with DICOM segmentation objects.
Downloading Images from XNAT
You can connect directly to the XNAT database from AIM on ClearCanvas Workstation and find imaging studies to download, then import those studies and work with them.
Automatic import
AIM on ClearCanvas workstation checks for imaging data you have downloaded in XNAT Central at the interval you select in the XNAT options and automatically imports it into the workstation. You can also manually check for downloads by clicking  at any time.
For more information about using XNAT, consult the XNAT technical documentation.
- In AIM on ClearCanvas Workstation, specify the folder where you want to place images you download.
- Select Tools > Preferences > Tools.
Click XNAT.
The XNAT options appear.
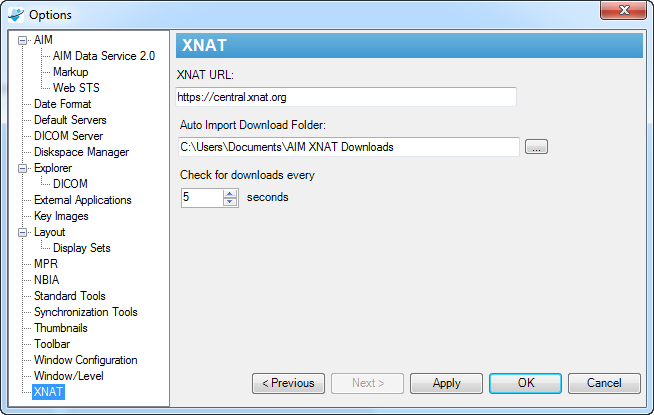
In the Auto Import Download Folder box, enter the path where you want to store downloaded images. Make a note of this folder path for later, when you will specify this same folder path within XNAT .
- Click OK.
- In the AIM on ClearCanvas toolbar, click
 .
.
XNAT CENTRAL appears.
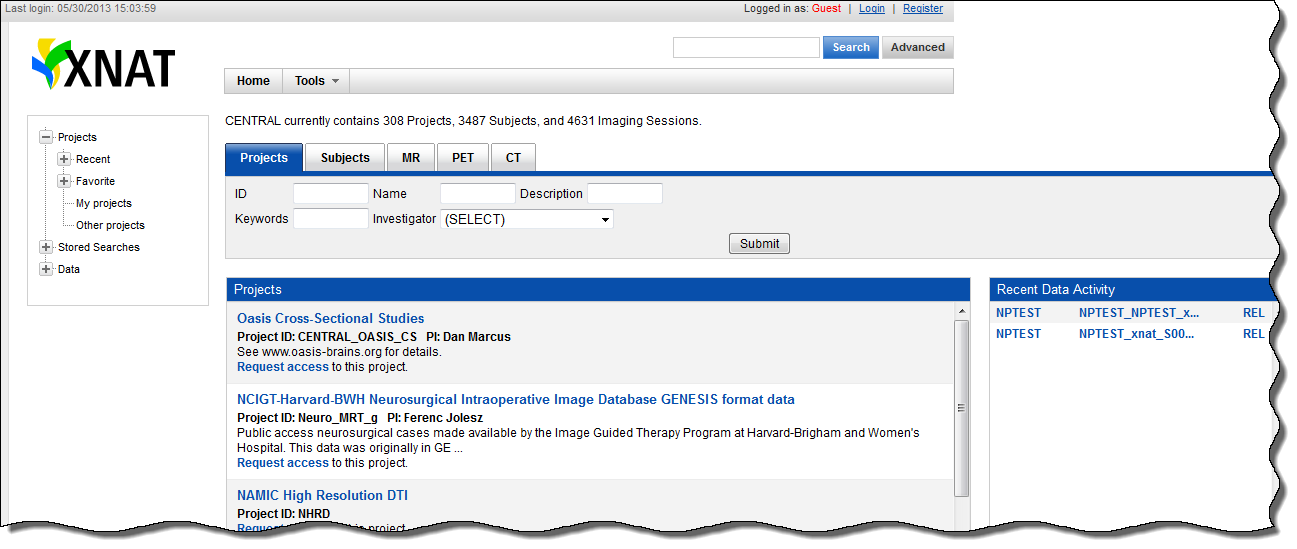
- Register for XNAT Central, if needed, and then log in using your XNAT Central name and password.
- Click a project name where the images are that you want to download.
The study's details and subject summary appears. Since you have logged in, you can see the Actions menu options.
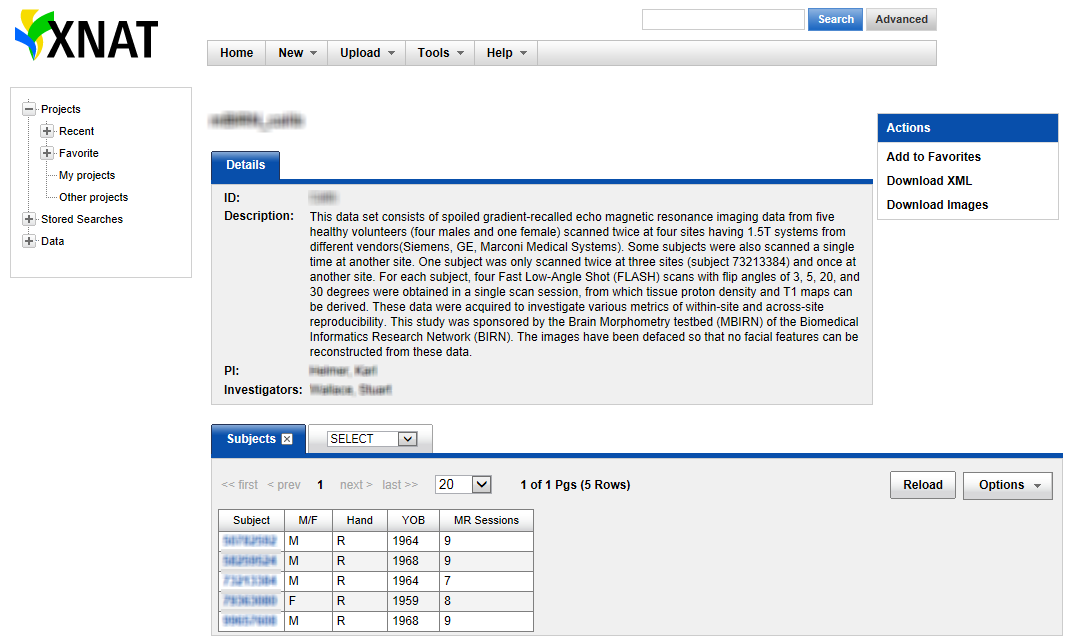
- Decide if you want to download a single experiment's images or all of the study's images. Downloading a single experiment's images generally takes less storage space and time than downloading all of a study's images.
- Download the images.
- To download a single experiment's images, do the following.
- Click a subject's link.
The experiments appear.
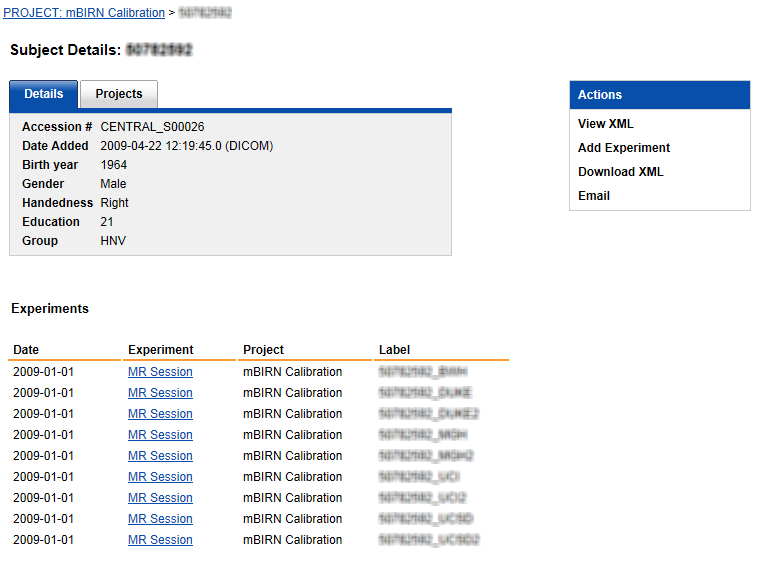
- Click an experiment's link.
The scans appear.
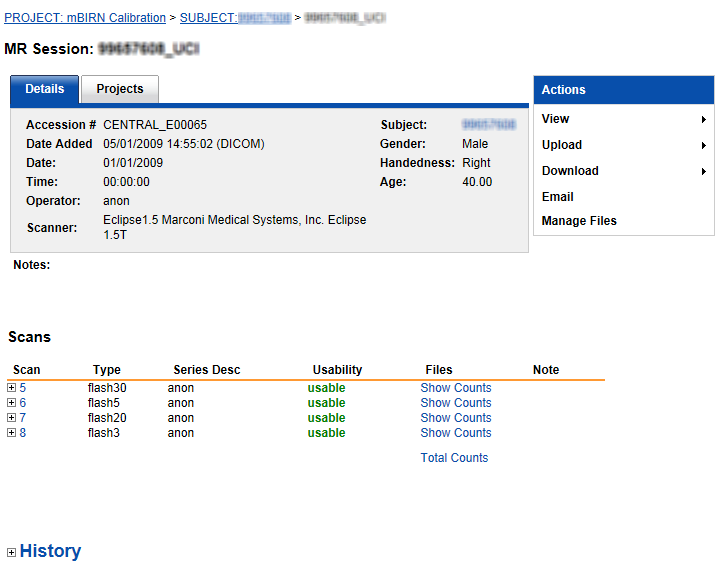
- Select Download > Download Images.
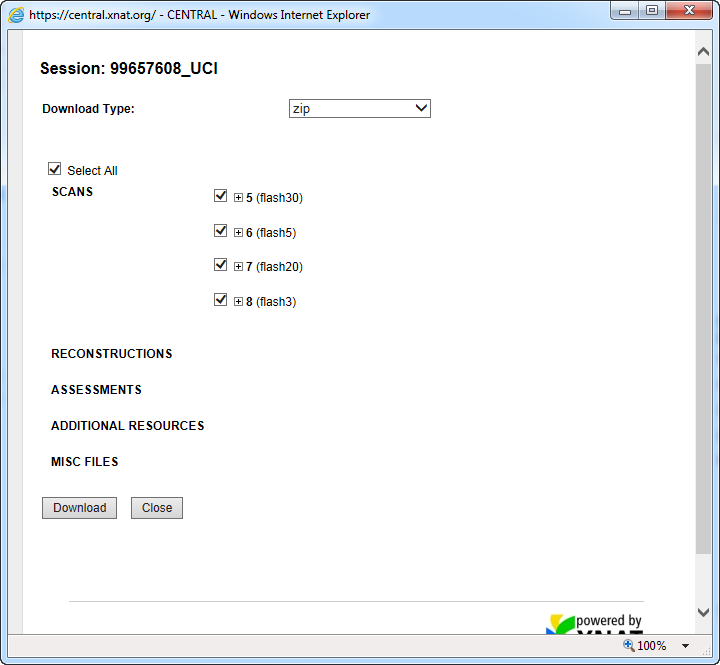
- Select the download file type and which scans you want to download. The more scans you select, the longer the download will take and the more time it will take to download them.
- Click Download.
- Click a subject's link.
- To download all of a study's images, do the following.
- Select Actions > Download Images.
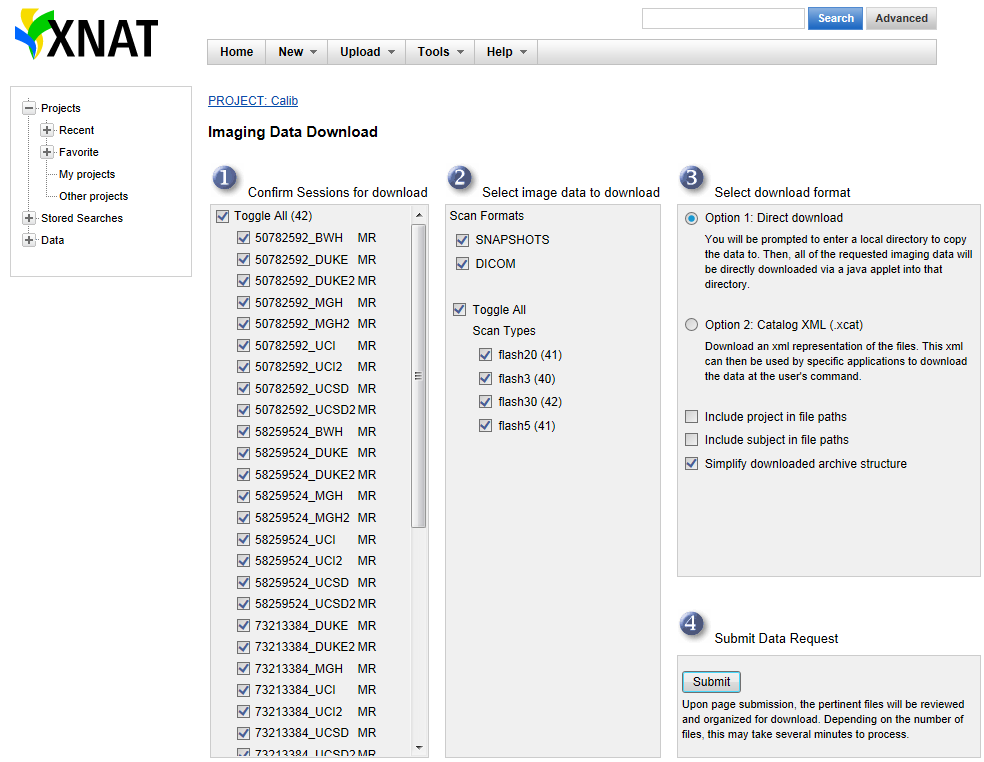
Confirm the sessions and image data you want to download, select the download format.
Click Submit.
- Select Actions > Download Images.
- When your browser prompts you to save the file from XNAT, select Save > Save As to specify the folder where the download should go. Make it the same path as that which you specified in step 1c in AIM on ClearCanvas Workstation.
- To download a single experiment's images, do the following.
- Check your destination folder for the images you downloaded. The downloaded file will be automatically uncompressed or unzipped and DICOM images in the zip file will be imported. The file will be deleted after importing DICOM files is done.
Specifying Preferences
You can specify AIM, Explorer, and Layout preferences. Some common options are described in the following sections.
Specifying AIM Preferences
- Select Tools > Preferences > AIM.
The Options dialog box appears.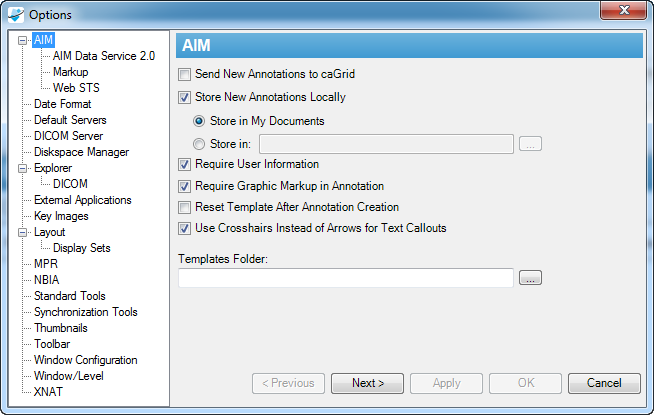
Specify any of the following AIM preferences.
Option Description Send New Annotations to caGrid If selected, the workstation will send new annotations to the assigned caGrid location. Also see Specifying AIM Data Service Preferences.
By default, the Send New Annotations to caGrid option is disabled. You must enable this option in order to have new AIM XML documents sent to the AIM Data Service. If you have neither set the AIM Data Service destination nor enabled the Send New Annotations to caGrid option, you cannot send your existing AIM XML documents to the AIM Data Service.
Store New Annotations Locally If selected, the workstation will store a copy of new annotations in the AIM XML format on the local computer. A user can assign where the AIM annotation documents can be stored on the local computer. Required User Information If selected, user credentials need to be entered before creating an AIM annotation document. Require Graphic Markup in Annotation If selected, a user must create at least one graphical drawing on an image before creating an AIM annotation document. Reset Template After Annotation Creation Use Crosshairs Instead of Arrows for Text Callouts Change the image used when you create text callouts. Templates Folder If entered, the directory will be used to search for AIM template XML documents. Click Apply.
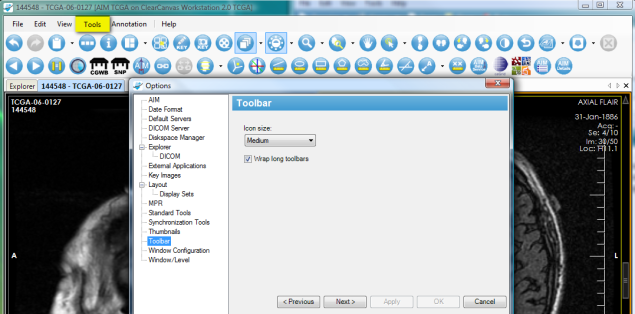
Specifying Toolbar Preferences
You can change the size of icons and choose to show all icons on one screen. To do so, select Tools > Preferences > Toolbar. The recommended icon size is medium and it is also recommended that you select the Wrap long toolbars option.
Using the AIM Toolbar
The following table describes four AIM tools that are available on the AIM on ClearCanvas Workstation.
Tool | Name | Description |
|---|---|---|
| AIM Template | Displays a template based form with a set of questions and choice(s) of answers for each question. A user can import a new AIM template to that location. Create new annotation objects by completely filling out this form and clicking the Create Annotation button. |
| AIM Object Locator | Depicts available AIM objects in the currently displayed study without searching through every image in the study or series. |
| AIM Annotation Details | Provides the ability to view specific areas of a selected graphic markup for an existing annotation. |
| Closed Polygon Markup | Allows creation of a free hand graphical markup. This tool can be used in addition to existing ClearCanvas tools in creating graphical markup. |


AIM Template Tool
To activate the AIM template tool in Figure 1, click the AIM template tool button (#1). If you put the pin down (#2), you can detach the AIM Template tab by putting the mouse pointer at the header (#3) and dragging it out, as illustrated in Figure 2.
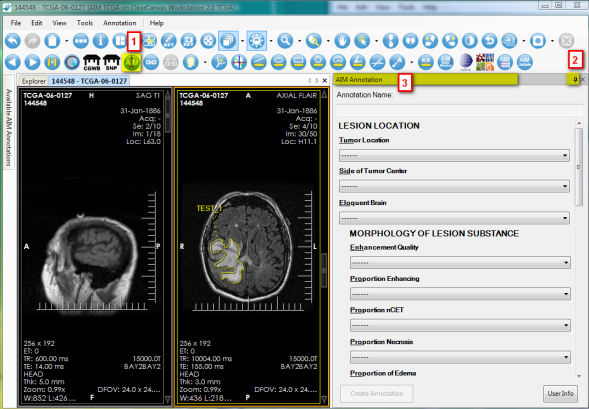
Figure 1. Activate AIM Template
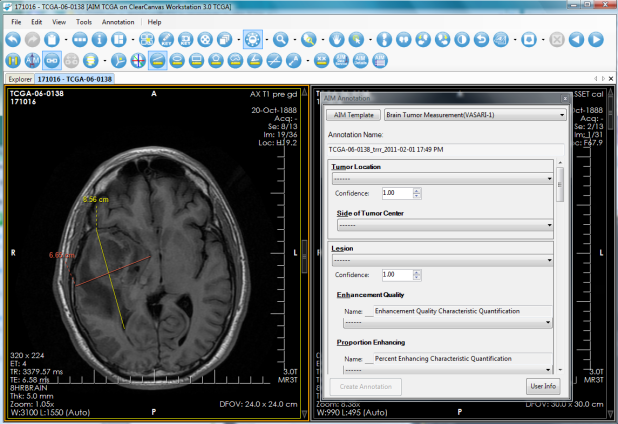
Figure 2. Detached AIM Template Tool
Important
When an AIM annotation is created, the following conditions are applied (based on AIM default settings described in Specifying AIM Preferences)
- A user must answer all questions presented in the AIM Annotation window.
- A graphical markup is required on an image if Require Graphic Markup in Annotation is selected before an AIM annotation can be saved to the AIM Data Service and/or stored locally.
- User information must be entered if Require User Information is selected.
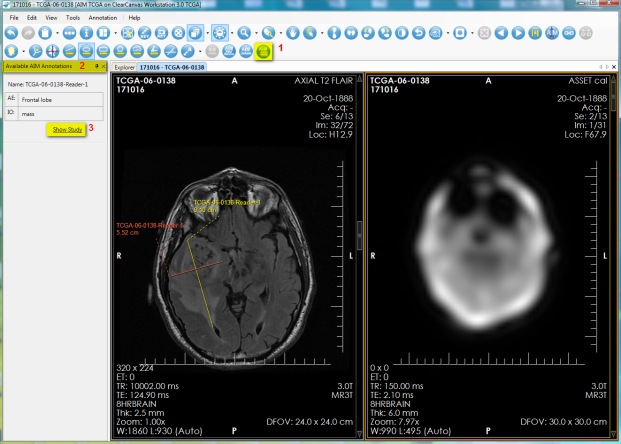
AIM Object Locator Tool
The AIM Object Locator tool, depicted in the following image, allows users to see existing AIM instances available in a study. A list of available AIM instances is displayed below the Available AIM Annotations section, which is #2 in the following image. To access this feature and see an AIM annotation, click Show Study, which is #3 in the following image.
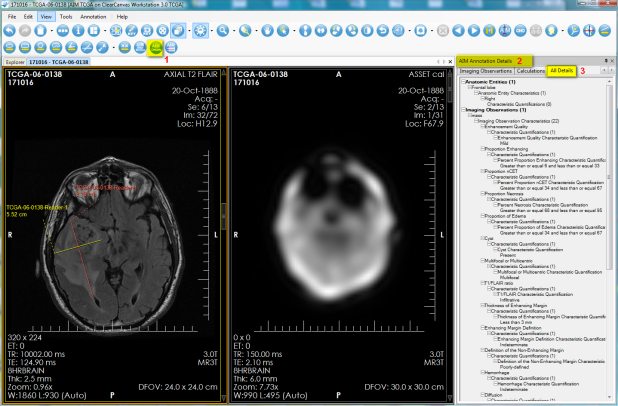
AIM Annotation Details Tool
The AIM annotation details, as illustrated by the following image, allow a user to examine detailed information captured in an AIM instance. To access this feature, you select an image containing an AIM instance and then click the AIM Details button, as shown in (#1). The AIM Annotation Details panel appears. This panel contains information tabs including Anatomic Entity, Imaging Observation, Calculations, and All Details. The All Details tab (shown in #3) allows a user to see information related to both Anatomic Entity and Imaging Observation and their characteristics.
Importing AIM Templates
Import an AIM template XML document by clicking the AIM Template button. Windows Explorer opens the folder you already specified, which is described in Specifying AIM Preferences.
Importing Legacy AIM Templates
You can import AIM templates that were created using the AIM XML schema version 2 and above into AIM on ClearCanvas Workstation and capture all of the data in the original template.
Unlike AIM Template Builder, which updates AIM templates to the current XML schema version, AIM on ClearCanvas Workstation does not convert all of the information in AIM templates created in pre-2.0 XML schema versions. You can open legacy AIM templates in AIM on ClearCanvas Workstation but it is possible that not all of your questions and answer choices will appear. Data is not lost but options controlling the display of questions and answer choices are not automatically converted upon import.
You can avoid this problem for legacy AIM templates by first opening the template in AIM Template Builder and reviewing the options set for each question and answer choice. Specifically, do the following
- Ensure that the Should Display option is set to Yes.
- Ensure that the number of Answer Choices is at least 1 for each question.
Once you are sure that all of your question and answer choices have the correct options, save and then export your AIM template, then import the template into AIM on ClearCanvas Workstation.
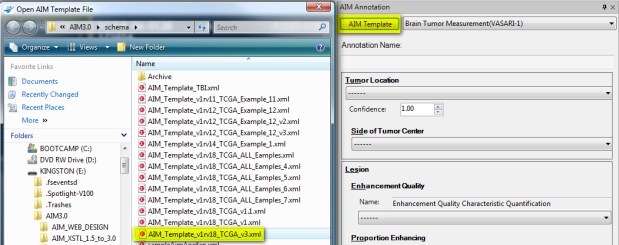
Figure 7. Importing an AIM Template
Locating Missing Answer Choices
You can locate missing answer choices from a question after you import an AIM template. Click on the question mark icon to find out which questions do not have an answer.
Enforcing Markup Requirements
Before you can add an annotation to an image, AIM on ClearCanvas Workstation verifies that the annotation you have drawn complies with the rules in the AIM template. AIM on ClearCanvas Workstation verifies new annotations according to the following rules:
| Template Condition | Verification Condition |
|---|---|
| Template has multipoint geometric shape | Line or angular markup has to be drawn on image |
| Template has polyline geometric shape | Rectangular or polygonal markup has to be drawn on image. |
| Template has circle or ellipse geometric shape | Elliptical markup has to be drawn on image. |
| Template has point geometric shape | Cross hair markup has to be drawn on image. |
In addition to verifying specific new annotations, AIM on ClearCanvas Workstation also checks that no additional marks are on the image that the template does not allow.
To begin enforcing markup requirements, do the following:
- Select Tools > Preferences > AIM.
The AIM tab appears. - Select Require Graphic Markup in Annotation.
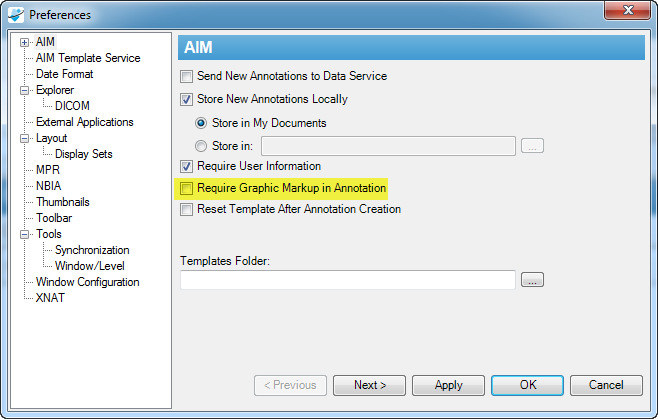
- Click OK.
User Information
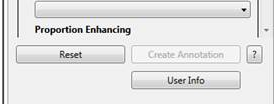
Author information as depicted in (Figure 8) can be changed. To use this feature, click the User Info button to activate the AIM User Information form. Enter appropriate information and click Save.
User information is saved
The user information will be saved on the workstation for future use. If you are sharing the workstation with another reader, you must change or at least verify that the information in the User Info section reflects your personal credentials.
The AIM Template Builder is a tool used to create an AIM template XML document.
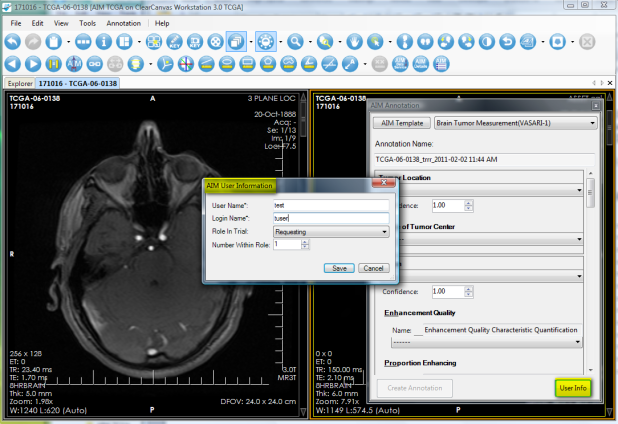
Figure 8. AIM User Information
Detailed Description of a Question
A detailed description of a question can be seen by placing the mouse pointer over the first three characters of each feature name, as shown in Figure 9.
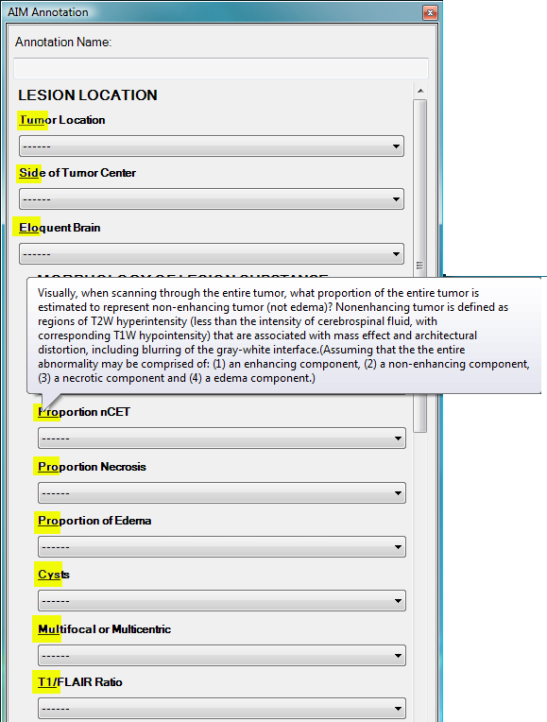
Figure 9. Detailed Description of a Question
Displaying Markups from Different Users
For a given image in an imaging study that has more than one reader interpreting and creating AIM annotations, the workstation can display every annotation while allowing you to turn off markups from a selected group of readers. Figure 12 depicts an image with three markups from three readers. The markup from reader named qwe-3 was turned off.
A right-mouse click on the image activates a pop-up menu with a Visible AIM Users option to turn readers' markups on or off.
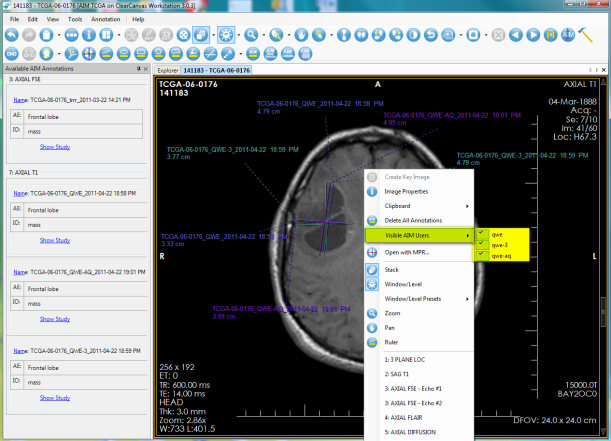
Figure 12. AIM Markup Display
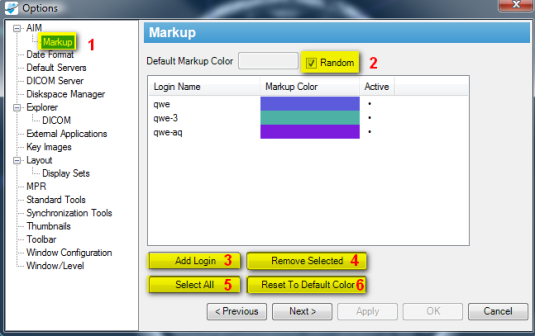
By default, the workstation also displays annotations created by different users in different colors. You can change which colors are used for which user's AIM annotations. To assign a color to a user, go to Tools > Preferences > AIM > Markup.
By default, the Random checkbox (#2) is selected, which assigns a random color to each user's markup drawings. By clearing the Random checkbox, a default color is used instead. Colors may be assigned to a single user's markup drawings by selecting the color next to the user's name in the list.
Click the Add Login button (#3) to add a new user to the list.
Selected users may be removed from the list by clicking the Remove Selected button (#4). Users removed from the list will have their annotations reset to the default color. Select all users in the list by clicking the Select All button (#5). Click the Reset To Default Color button (#6) to reset the color assigned to selected users to the default color.
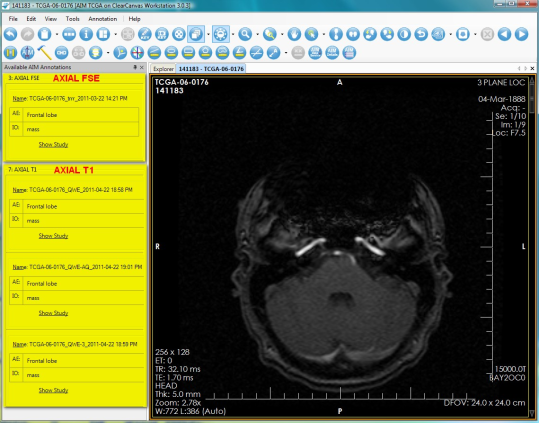
Viewing AIM Data for Each Image Series
You can see AIM annotations for an imaging study grouped by image series in the Available AIM Annotations section. The following screen shows two different image series. The first, Axial FSE, includes one AIM instance. The second, Axial T1, includes three AIM instances.
Using the National Biomedical Imaging Archive (NBIA) Data Service
The NBIA Data Service tab, shown below, provides the ability to connect and retrieve studies from NBIA directly within the workstation. Holding the Ctrl key allows you to click and select multiple studies. Right-clicking a search result activates a feature that allows you to retrieve selected studies.
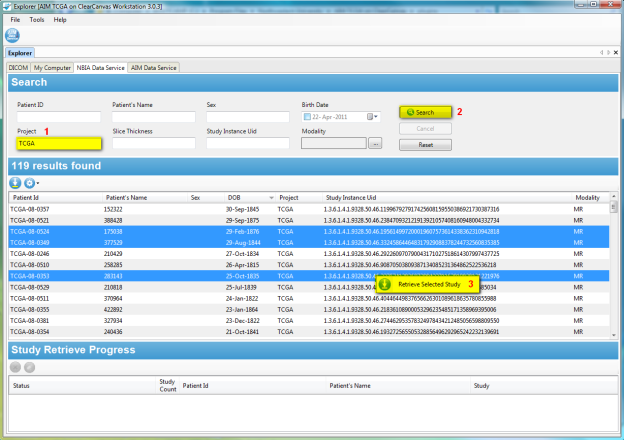
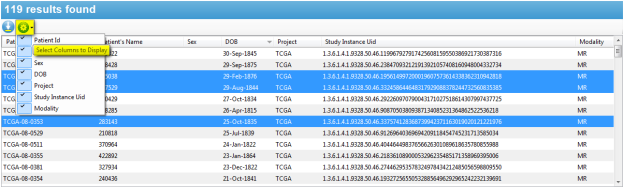
Users can enter search parameters, shown below, based on a single value or multiple values of Patient ID, Patient's Name, Sex, Birth Date, Project name at NCI, Slice Thickness, Study Instance UID, and Modality.

Columns in the NBIA Data Service page can be selected or deselected to display or hide an available result. The following image depicts that all available columns for the service have been selected.