You can print and export wiki pages
This guide explains how to use Annotation and Image Markup (AIM) to build templates that are compatible with the AIM information model. The intended audience for this guide is a biomedical researcher familiar with the AIM information model.
Getting Started with AIM Template Builder
You use the ATB to design templates based on lexicons of standard and user-definable terms. You add anatomic entities, imaging observations, inferences, calculations, and markups as components to a template. Adding tags to a template helps you make them easier to find. You combine multiple templates into template groups.
You can search for shared templates and template groups using the AIM Template Service and then modify them in the ATB.
AIM templates are based on the AIM template XML schema:
Version 2, Revision 13
When you open older AIM templates created using XML schema version 1, revisions 18, 19, and 23 in ATB 2.0, ATB 2.0 automatically converts them to the latest XML schema, which is version 2, revision 13.
AIM template XML schemas are based on the AIM 3.0 model and the AIM 4.0 model. XML schema version 2 collects more information than the AIM 3.0 model can store. Any information that the XML schema version 2 collects is saved to the AIM 4.0 model.
Why Use the AIM Model?
The AIM model begins to solve this problem by capturing the descriptive information of an image with user-generated graphical symbols placed on the image into a single common information source. AIM captures medical findings using standard vocabularies such as RadLex, SNOMED CT®, and DICOM, and user-defined terminology. Image information captured in the AIM model includes the anatomic entity and its characteristics, imaging observation and its characteristics, and inference.
What is in an AIM Template?
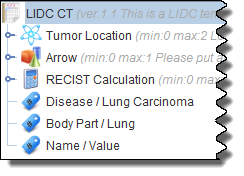
An AIM template has one or more components. Each component represents a study question that may have one or more answers. Template components can be any of the following: anatomic entity, imaging observation, inference, calculation, or geometric shape (markup).
Both anatomic entities and imaging observations are also described by their associated characteristics. Anatomic entity and imaging observation characteristics inherit the attributes of their respective component. Characteristics have annotator confidence that allows a user to enter a percentage that represents the level of user confidence in answering the question. A characteristic may also have a quantification value.
Configuring ATB for Publishing
- Click the Settings button (
 ).
).
The Options window appears.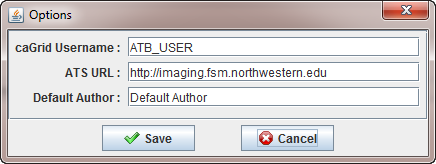
- Change the caGrid Userame value to the name you used when you registered for your caGrid account. You must have a caGrid account to publish templates to the ATS.
- Change the ATS URL value to the server where the AIM Template Service you will use is located. If you are not hosting your own AIM Template Service instance, the URL is http://imaging.fsm.northwestern.edu.
- Confirm or change the Default Author. The default author's name appears in the metadata of any object you create in ATB.
- Click Save.
Working with Template Groups
A template group is a container that holds individual templates.
Adding a Template Group
- Click the Template Groups tab.
- Below the left panel, click
.
The Group Members panel at the bottom of the application expands to include a new template group panel.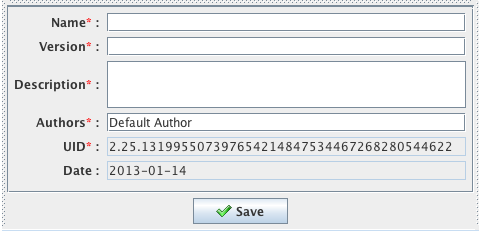
- Enter the name of the new group, its version number and description, and your name in the boxes provided. You can edit this information later if needed.
- Click Save.
The new template group appears in the Groups panel on the left side of the application.
Deleting a Template Group
- Click the Template Groups tab.
- Select the template group you want to delete by clicking it.
- Below the left panel, click
A message appears asking you to confirm the deletion. - Click Delete.
Editing a Template Group
- Click the Template Groups tab.
- Below the left panel, click
The selected template group's description appears. - Change the name of the group, version, description, and authors as needed.
- Optionally, add a tag to the group to make it easier to search for the template group in the future.
- Click Save.
The edited template group appears in the Groups panel.
Copying a Template Group
- Click the Template Groups tab.
- Select the template group you want to copy.
- At the bottom of the Groups panel, click
A copy of the template with the name of Current Template Name copy appears in the Groups panel. You can now customize the copied template group.
Searching for a Template Group
- Click the Template Groups tab.
- Below the left panel, click
The Template Groups Search page appears.
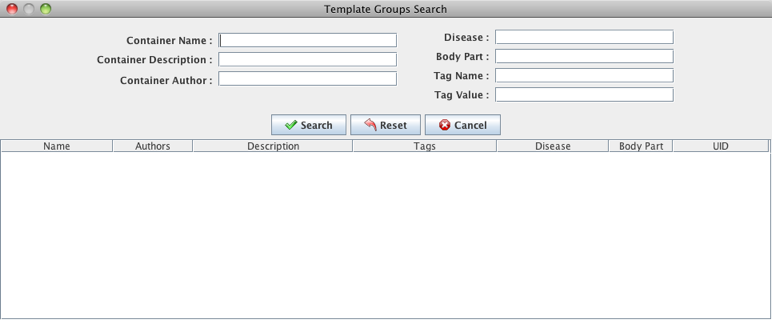
Narrow your search by entering information into the fields. If you do not enter any information into the fields, all template groups available in ATS appear, and it may take longer to see the results of your search. The following fields are available.
Field
Description
Container Name
Template group name
Container Description
Template group description
Container Author
Person who created the template group in the AIM-enabled application
Disease
Disease that is the topic of the templates in the template group
Body Part
Body part that is the topic of the templates in the template group
Tag Name A name associated with this template group Tag Value The value associated with the tag name for this template group - Click Search.
All template groups matching the search criteria you entered appear.
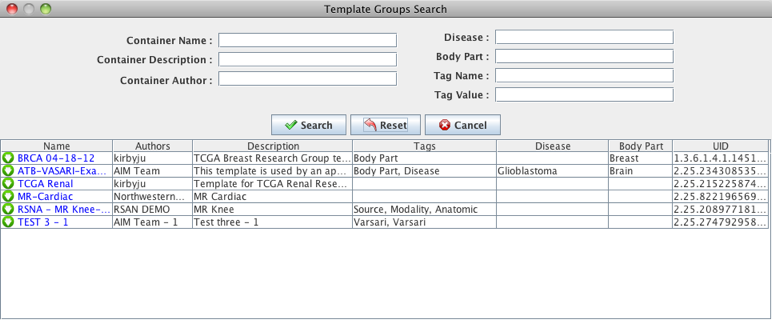
- Click the name link for a template group.
ATB imports the template.
Importing a Template Group
- Click the Template Groups tab.
- Below the left panel, click
- Click Import.
The Open dialog box appears. - Search for an XML file that contains template group information in it. The AIM Template Builder only accepts template group files that have been validated by the AIM Template XML schema. This file could have been exported from the AIM Template Builder or it could have been created manually using the AIM template XML schema.
A message appears that notifies you if the file was successfully imported. A template group that is successfully imported also appears in the Template Group list. If the import was unsuccessful, a message appears that indicates the reason why.
No need to import template groups downloaded from the AIM Template Service
After you search for a template group in the AIM Template Service, you can open it and begin using it. It has already been imported to the AIM Template Builder. The import feature described in this procedure supports the importing of template files that are in XML format.
Exporting a Template Group
- Click the Template Groups tab.
- Select the template group you want to export.
- Below the left panel, click
- Click Export.
The Save dialog box appears. - Select a location where you want to save the template group XML file.
Publishing a Template Group
- Click the Template Groups tab.
- Select a template group from the Groups panel.
- Below the left panel, click
- Click Publish.
A window opens, prompting you to log in to the AIM Template Service. - Enter your password or log in as a different user and then click Login. You must have a caGrid account to publish templates to the ATS.
The steps that follow are unique to your configuration of the AIM Template Service.
Adding a Tag to a Template Group
- Click the Template Groups tab.
- Select a template group.
- Below the left panel, click
The selected template group's description appears. - Click
- Double-click the Name column.
The Edit Tag Name dialog box appears.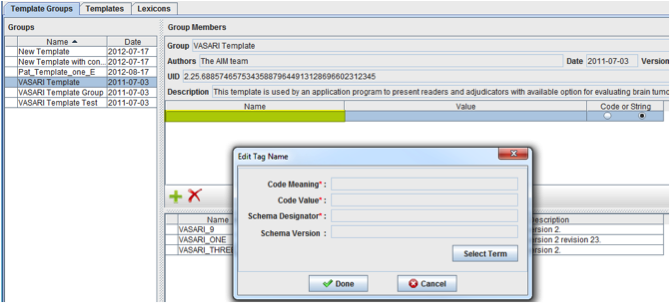
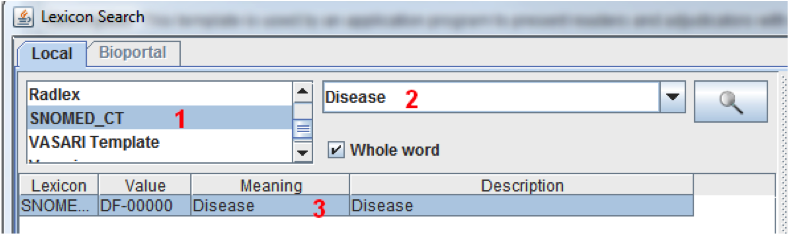
- Click Select Term.
The Lexicon Search dialog box appears. - Select a lexicon name and then search for an existing term. For example, in the following window, the selected lexicon is SNOMED_CT and the term is Disease.
- Click Save.
- Assign a code or string value to the term by clicking the Value column, entering the code or string value (for example, GBM), and then clicking Enter.
- Click Done.
You can see the tag when you open the template group.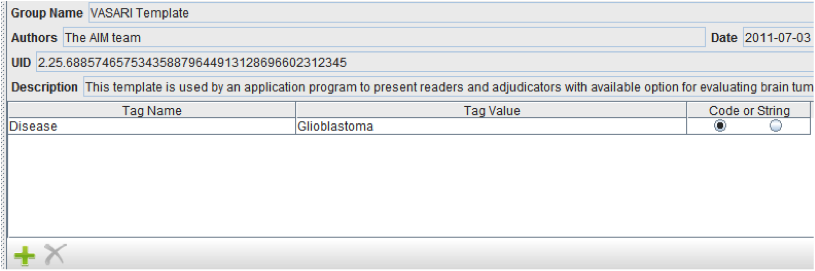
Deleting a Tag from a Template Group
- Click
- Select the tag you want to delete.
- Click
Working with Templates
AIM Template Builder Concept | Annotation Concept |
|---|---|
Component | Item being annotated; for example, Tumor Location. A component can be anatomic entity, imaging observation, inference, calculation, and markup or geometric shape. |
Characteristic | Descriptive element of that item; for example, Site of Tumor Center. Only anatomic entity and imaging observation can have characteristics associated with them. |
Answer Choice | Represents a possible answer choice. It is used to describe the descriptive element of a component or characteristic. For example, Frontal Lobe is an answer choice for anatomic entity. |
Creating a Template
- Click the Templates tab.
- Below the left panel, click
The new template window appears.
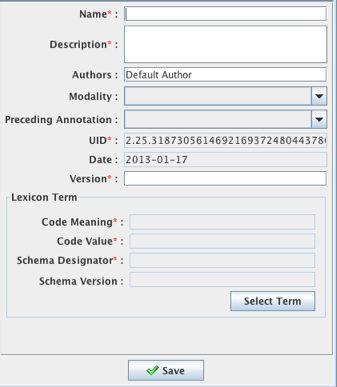
- Enter a name, description, and version for the template. The UID is also a required field but the AIM Template Builder supplies it automatically. Optionally, select values for Modality and Preceding Annotation.
- Click Save.
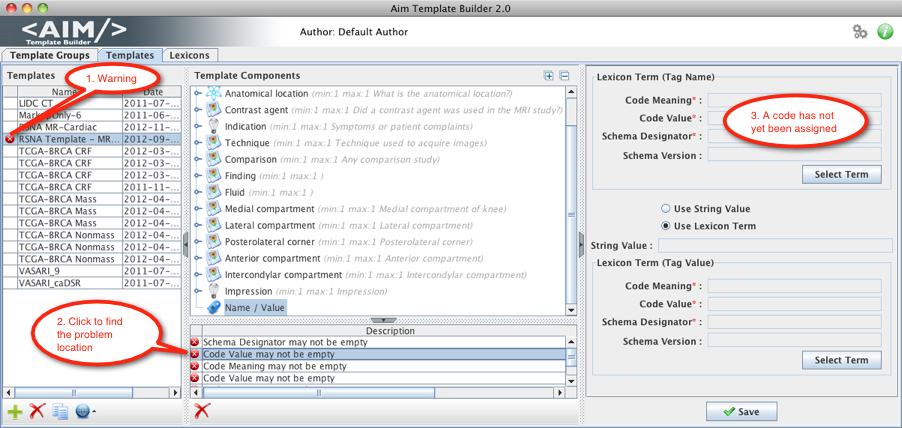
The new template appears in the Templates panel. You may see warnings depicted by red circles with white x's in the template. For example, if you have not yet assigned the required metadata, you are notified that it is missing. The Description section below the Template Components panel shows the list of warnings. Click the warning to move to the problem location and fix it.
- Add a tag (also called a code) to the template. Tags can either be string values or lexicon terms. A template must have a code assigned to it. The assigned code describes the purpose of the template.
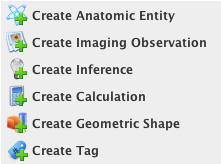
- Add one or more components to the template. Components can be anatomic entity, imaging observation, inference, calculation, and markup or geometric shape.
- Add one or more characteristics to each template component you add, as applicable (Inference and Calculation components do not have associated characteristics).
Specify the answer choices for each characteristic (for Anatomic Entity and Image Observation components) or component (for Inference and Calculation components).
Expanding and collapsing
You can expand or collapse template components by double-clicking them or by clicking the plus or minus buttons in the upper right of the Template Components panel. When you expand a template component, you see all of its characteristics. When you collapse it, you see only the template component name.
Adding a Template Component
- Click the Templates tab.
- In the Templates panel, select the template to which you want to add a component.
In the Template Components panel, right-click the template name. A window appears that shows the template components you can create.
You can also access these options in the toolbar below the Template Components panel.
Create a anatomic entity, imaging observation, inference, calculation, geometric shape, or tag.
Creating an Anatomic Entity
- Click the Templates tab.
- In the Templates panel, select the template to which you want to add an anatomic entity.
- In the Template Components panel, right-click the template name and select Create Anatomic Entity. You can also find this option in the toolbar (
A new panel appears on the right and the toolbar below the Template Components panel changes to provide options for anatomic entities. - In the panel on the right, provide the required information, as follows:
- Provide a Label for the anatomic entity. For example, "Where is the tumor located?"
- Provide Explanatory Text to better describe the label.
- Specify the minimum and maximum number of Answer Choices that the person answering the related question may select in the template.
- Select the button that describes your display preference for the anatomic entity in the template.
- Select the button that describes your display preference for Annotator Confidence.
- Specify whether or not a comment is required.
- Specify one or more names in the Default Authors field to show who created the entity.
- Optionally, provide a Group Label, which can show an affiliation between this entity and others in the same group.
- Click Save.
- Add one or more characteristics to the anatomic entity.
For example, to describe a screen that is ruptured, the AIM template captures an anatomic entity of spleen and an anatomic entity characteristic of ruptured.
Creating an Imaging Observation
- Click the Templates tab.
- In the Templates panel, select the template to which you want to add an imaging observation.
- In the Template Components panel, right-click the template name and select Create Imaging Observation. You can also find this option in the toolbar (
 ).
).
A new panel appears on the right and the toolbar below the Template Components panel changes to provide options for imaging observations. - In the panel on the right, provide the required information, as follows:
- Provide a Label for the imaging observation. For example, "Where is the mass located?"
- Provide Explanatory Text to better describe the label.
- Specify the minimum and maximum number of Answer Choices that the person answering the related question may select in the template.
- Select the button that describes your display preference for the imaging observation in the template.
- Select the button that describes your display preference for Annotator Confidence.
- Specify whether or not a comment is required.
- Specify one or more names in the Default Authors field to show who created the imaging observation.
- Optionally, provide a Group Label, which can show an affiliation between this imaging observation and others in the same group.
- Click Save.
- Add one or more characteristics to the imaging observation.
For example, to describe an image showing a cystic mass, the AIM template captures an imaging observation of mass and an imaging observation characteristic of cystic.
Creating an Inference
- Click the Templates tab.
- In the Templates panel, select the template to which you want to add an inference.
- In the Template Components panel, right-click the template name and select Create Inference. You can also find this option in the toolbar (
A new panel appears on the right and the toolbar below the Template Components panel changes to provide options for inferences. - In the panel on the right, provide the required information, as follows:
- Provide a Label for the inference.
- Provide Explanatory Text to better describe the label.
- Specify the minimum and maximum number of Answer Choices that the person answering the related question may select in the template.
- Select the button that describes your display preference for the inference in the template.
- Select the button that describes your display preference for Annotator Confidence.
- Specify whether or not a comment is required.
- Specify one or more names in the Default Authors field to show who created the inference.
- Optionally, provide a Group Label, which can show an affiliation between this inference and others in the same group.
- Click Save.
- Add one or more questions to the inference.
Creating a Calculation
- Click the Templates tab.
- In the Templates panel, select the template to which you want to add a calculation.
- In the Template Components panel, right-click the template name and select Create Calculation. You can also find this option in the toolbar (
The toolbar below the Template Components panel changes to provide options for calculations. - In the panel on the right, provide the required information, as follows:
- Provide a Label for the calculation.
- Provide Explanatory Text to better describe the label.
- Specify the minimum and maximum number of Answer Choices that the person answering the related question may select in the template.
- Select the button that describes your display preference for the inference in the template.
- Select the button that describes your display preference for Annotator Confidence.
- Specify whether or not a comment is required.
- Specify one or more names in the Default Authors field to show who created the calculation.
- Optionally, provide a Group Label, which can show an affiliation between this calculation and others in the same group.
- If this is the last question in the template, select No More Questions.
- If this is not the last question, select the question that should follow this one from the options in the Next Question to Ask box.
- Click Save.
- Right-click the calculation and select Create Calculation Type. You can also find this option in the toolbar (
The toolbar below the Template Components panel changes to provide options for calculation types, which are to Add Valid Terms, Create Algorithm Type, and Delete Calculation Type (
Creating an Algorithm Type
- Create a Calculation.
- Click
A new panel appears on the right for algorithm attributes.
Provide attributes for the algorithm type.
Field
Description
Description
Explanatory text about the component
Unique Identifier
Any string that uniquely identifies this algorithm
Algorithm Name
Algorithm name
Algorithm Version
Algorithm version
MathML
An optional mathML representation of the calculation
- Click Save.
Creating a Geometric Shape
- Click the Templates tab.
- In the Templates panel, select the template to which you want to add a geometric shape.
- In the Template Components panel, right-click the template name and select Create Geometric Shape. You can also find this option in the toolbar (
A new panel appears on the right and the toolbar below the Template Components panel changes to provide the option for geometric shapes. - In the panel on the right, provide the required information, as follows:
- Provide a Label for the calculation.
- Provide Explanatory Text to better describe the label.
- Specify the minimum and maximum number of Answer Choices that the person answering the related question may select in the template. Answer Choices inform the AIM template user how many markups the user has to create. For example, if there are two circles (min=max=2), the user should create two circles. If a multipoint is assigned with a value min=max=2, ATB interprets that this is a line (with two points, x1,y1 and x2,y2). Developers of an AIM-enabled workstation must know how to map AIM template markup to an appropriate graphical drawing tool on their workstation.
- Select the button that describes your display preference for the inference in the template.
- Select the button that describes your display preference for Annotator Confidence.
- Specify whether or not a comment is required.
- Specify one or more names in the Default Authors field to show who created the calculation.
- Optionally, provide a Group Label, which can show an affiliation between this calculation and others in the same group.
Select the Shape Type from the options of two-dimensional and three-dimensional shapes.
The geometric shapes available are as follows. ATB follows the DICOM standard.Shape
Description
2D Point (Arrow)
A single pixel denoted by a single (column,row) pair
2D Circle
A circle defined by two (column,row) pairs. The first point is the central pixel. The second point is a pixel on the perimeter of the circle.
2D Polyline (Closed Polygon)
A series of connected line segments with ordered vertices denoted by (column,row) pairs. If the first and last vertices are the same, it is a closed polygon.
2D Ellipse
An ellipse defined by four pixel (column,row) pairs. The first two points specify the endpoints of the major axis and the second two points specify the endpoints of the minor axis of an ellipse.
2D Multipoint (Connected Points)
Multiple pixels each denoted by a (column,row) pair
3D Polygon (Closed Coplanar Polygon) A series of connected line segments with ordered vertices denoted by (x,y,z) triplets, where the first and last vertices shall be the same forming a polygon; the points shall be coplanar.
3D Polyline (Connected Line Segments) A series of connected line segments with ordered vertices denoted by (x,y,z) triplets. The points need not be coplanar.
3D Multipoint (Series of Points) Multiple locations each denoted by an (x,y,z) triplet. The points need not be coplanar.
3D Point (Arrow) A single location denoted by a single (x,y,z) triplet. 3D Ellipse An ellipse defined by four (x,y,z) triplets. The first two triplets specify the endpoints of the major axis and the second two triplets specify the endpoints of the minor axis.
3D Ellipsoid A three-dimensional geometric surface whose plane sections are either ellipses or circles and contains three intersecting orthogonal axes, “a”, “b”, and “c”. The ellipsoid is defined by six (x,y,z) triplets, the first and second triplets specifying the endpoints of axis “a”, the third and fourth triplets specifying the endpoints of axis “b”, and the fifth and sixth triplets specifying the endpoints of axis “c”.
If this is the last question in the template, select No More Questions.
- If this is not the last question, select the question that should follow this one from the options in the Next Question to Ask box.
Click Save.
Adding Tags to a Template
- Click the Templates tab.
- Select a template.
The template components appear in the center panel. - In the Template Components panel, right-click the template name.
- From the menu that appears, select
 .
.
A new tag appears in the Template Components panel.
- Provide the tag name and value.
- To provide the tag name, click Select Term in the Lexicon Term (Tag Name) panel in the top right. A tag must contain at least three characters.
- To provide the tag value, enter your own or select a term from the lexicon. To enter your own value, click Use String Value and then enter a value in the String Value box.
- Click Save.
Managing Question and Answer Choices
Understanding Pre- and Post-Coordinated Terms
A pre-coordinated term has a single code associated with it. A term may consist of one or more words. A well-defined collection of words represents a concept or thing. For example, RadLex assigns the code RID1276 to the term left upper lobe bronchus.
A post-coordinated term has two or more codes that represent a collection of concatenated words. It concatenates preexisting terms to create a new concept. The concept is represented by a collection of concatenated codes ordered by when a word appears in the term. For example, left and lung are preexisting terms. Concatenated, they become left lung, to which the National Cancer Thesaurus assigns it two codes, C25229 and C12468.
Adding Answer Choices
Once you create an answer choice, you can add more answer choices under it hierarchically. This allows you to create new concepts, also called post-coordinated terms, from existing answer choices.
The number of answer choices you add must be equal or greater than the maximum number of answer choices you specify when you add a characteristic to a component.
- Right-click the component or characteristic and select Add Answer Choices or click
The Lexicon Search dialog box appears. - Select an answer choice from a lexicon you have created as follows.
- From the list on the far left of the page, select at least one lexicon where you believe the term you are searching for is located. Click and hold the Shift or Ctrl key to select multiple lexicons.
- In the list to the right, enter the term you want to search for. Options include the following:
- Click Whole word if you are entering the whole word and want to restrict your search to it.
- Enter only part of the term, such as "Tum" for "Tumor".
- Do not enter any terms to retrieve all terms in the selected lexicon(s).
- Click
- Select a term from the search results.
- Click
The answer choice appears in the Answer Choices list in the right panel, as shown below. Relevant steps in the selection of this answer choice are highlighted in red.

Slide panel borders
Adjust your view of the information in multiple panels by clicking and dragging the border between them.
Click Save.
The answer choice appears in the Template Components panel under the component or characteristic you originally selected.
Modifying Answer Choices
- Select an answer choice belonging to a template component.
The metadata associated with that answer choice appears in the right panel. - Below that metadata, click Select Term.
The Lexicon Search dialog box appears. The term you selected appears in the Lexicon Term panel on the right. - From the list on the far left of the page, select at least one lexicon where you believe the term you are searching for is located. Click and hold the Shift or Ctrl key to select multiple lexicons.
- In the list to the right, enter the term you want to search for. Options include the following:
- Click Whole word if you are entering the whole word and want to restrict your search to it.
- Enter only part of the term, such as "Tum" for "Tumor".
- Do not enter any terms to retrieve all terms in the selected lexicon(s).
- Click
 . All lexicon entries matching your search criteria appear in the search results.
 - Select a term in the search results.
The selected term replaces your original term in the Lexicon Term panel. - Click OK.
The Templates tab appears with the lexicon term in the right panel.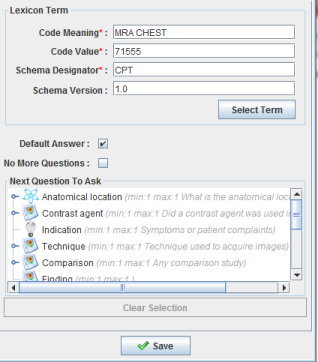
Click the Default Answer checkbox if you want this answer choice to be the default answer. If you choose this, the answer choice is preceded by a blue icon in the Template Components tree, as follows:

The number of default answers must be equal or greater than the minimum number of answer choices you specified when you added this characteristic to the template component.
- Select the No More Questions checkbox if you want the selection of this answer choice to indicate that this is the last question in the template.
- In the Next Question to Ask section, highlight the next question that the template should ask the user. This selection is not available if you have identified this as the last question in the template.
- Click Save.
Adding Valid Terms to an Answer Choice
- In the Template Components panel, right-click an answer choice and select Add Valid Terms or select
 in the toolbar.
The Lexicon Search page appears. - Select a valid term from a lexicon you have created as follows.
- From the list on the far left of the page, select at least one lexicon where you believe the term you are searching for is located. Click and hold the Shift or Ctrl key to select multiple lexicons.
- In the list to the right, enter the term you want to search for. Options include the following:
Click Whole word if you are entering the whole word and want to restrict your search to it.
Enter only part of the term, such as "Tum" for "Tumor".
Do not enter any terms to retrieve all terms in the selected lexicon(s). - Click . All lexicon entries matching your search criteria appear in the search results.
- Select a term in the search results.
Click
The valid term appears in the Answer Choices list in the right panel, as shown below. Relevant steps in the selection of this valid term are highlighted in red.Slide panel borders
Adjust your view of the information in multiple panels by clicking and dragging the border between them.Click Save.
The valid term appears in the Template Components panel under the answer choice you originally selected.
- Repeat this procedure until you have added all of the valid terms for the answer choice. You can also add valid terms to other valid terms.
Adding a Characteristic to a Template Component
Anatomic entity characteristics and imaging observation characteristics can be quantifiable or non-quantifiable. A quantifiable value can be scale, quantile (such as quartile, percentile, or n-tile), numerical like a decimal number in a UCUM (Unified Code for Units of Measurement) unit, and interval. Examples of non-quantifiable characteristics are present, absent, and not applicable.
- Add a template component of the Anatomic Entity or Imaging Observation.
- Right-click the component and select Create Anatomic Entity Characteristic (
 ) or Create Imaging Observation Characteristic (
 ).
). Specify information describing the characteristic, as follows.
Field
Description
Label
Required field. Double-click this field to add a label. A label becomes a heading in the image annotation form that users complete once the template is imported into an imaging application. For example, "Lesion".
Explanatory Text
Description of the component; for example, "Select the type of lesion".
Answer Choices Required field. The minimum and maximum number of times the users may select this term when they annotate an image.
The number of answer choices you add must be greater than or equal to the maximum number you specify here.
Should Display
Required field. Select this box to display this component in the template. In certain situations, information in a component is known and will not be changed.
If you choose not to display a question (a characteristic) in a template, you must specify a default answer if the minimum number of answer choices is one or greater.
Annotator Confidence Required field. Display or hide this value. Annotator confidence is a percentage that represents the level of user confidence in answering the question. Require Comment Select Yes or No to indicate whether users must provide a comment when answering this question. Authors
Describes the AIM Template Builder user who created this component.
Group Label
Describes any text that you want to associate with one or more template components and thereby group them together for display purposes.
- Click Save.
- Add an answer choice to the characteristic.
- Create a characteristic quantification.
Creating a Question
- Add a template component.
- Right-click the template component and select Create Question. You can also find this option in the toolbar (
A new panel appears on the right and the toolbar below the Template Components panel changes to provide options for question, which are to add or delete a question (
Provide information about the question.
Field
Description
Code Meaning
The lexicon term you want to use in the question
Code Value
The value of the lexicon term
Schema Designator
The organization that created the schema
Schema Version
The version of the schema you are using
In this version of ATB, a question is defined as a concept code. This means that you will have to select a concept code from a list of existing lexicons from your local ATB. If you don’t have a concept code defined, which you probably don’t have in your local ATB, you will have to create your private lexicon that consists of your set of questions.
Refer to the Questions and instructions lexicon for example questions to consider.Example
You may want to create the following question:
Where is a tumor located?
You may define the question as follows.- Create a lexicon called
My private questions.- Select the Lexicon tab.
- Click
- Enter the metadata as follows:
Name:My Private Lexicon
Schema Designator:MPL
Schema Version:1.0
Description:My private lexicon
Authors:NCI - Click Save.
- Click
- Enter the metadata as follows:
Code Meaning:Where is the tumor?
Description:Identify where the tumor is on the image or images.
Code Value:MPL-0001 - Click Save. You can now use this question concept code.
- Create a lexicon called
- Click Save.
- Add answer choices to the question. Answer choices are lexicon entries that you want to reference in a question in the template.
Skipping Questions in a Template
- Select the Templates tab.
- Select an answer choice belonging to a template component.
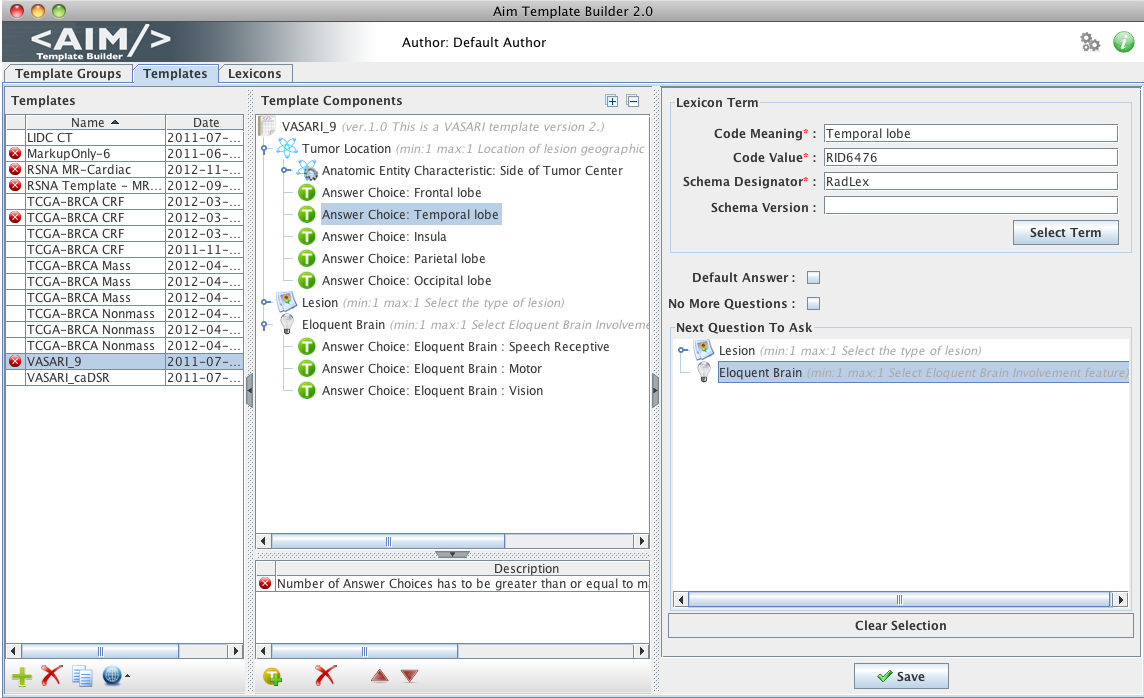
- In the Next Question to Ask section on the right, select the next question to ask from the list of template questions. This does not need to be a sequential question. Note that in the example above, the answer choice belongs to the Tumor Location component and Side of Tumor Center characteristic. The next question in the template is Lesion ("Select the type of lesion") but the selected next question to ask is Eloquent Brain ("Select Eloquent Brain involvement feature").
- Click Save.
Creating a Characteristic Quantification
- Add a template component of the Imaging Observation or Anatomic Entity type.
- Add a characteristic to a template component of the Imaging Observation or Anatomic Entity type.
- Add an answer choice to the characteristic.
- Right-click the answer choice and select Create Characteristic Quantification (
- In the panel on the right, enter a name for the characteristic and select Annotator Confidence, if that attribute applies to the template component.
- Click Save.
Create a characteristic quantification type. The options include Non Quantifiable, Scale, Numerical, Quantile, and Interval. Except for the Non Quantifiable type, which can always be added, you cannot create more than one type for a single answer choice.
Note
Delete any quantification from an answer choice by right-clicking it and selecting
Creating a Non Quantifiable
- Add a characteristic to the component.
- Add an answer choice.
- Right-click the answer choice and select Create Non Quantifiable (
- Search for the lexicon term you want to use to describe the non quantifiable.
- Click Select Term.
The Lexicon Search dialog box appears. - From the list in the center of the page, select at least one lexicon where you believe the term you are searching for is located.
- From the list that is furthest to the left on the page, enter the term you want to search for. You can also enter only part of the term, such as "Non" for "None", and then select RadLex from the lexicon list.
- Click
All lexicon entries containing the word you entered appear in the search results. - Select a term in the search results.
- Click OK.
The metadata for the lexicon term you selected populates the Code Meaning, Code Value, Schema Designator, and Schema Version fields.
- Click Select Term.
- Click Save.
Creating a Scale
- Add a characteristic to the component.
- Add an answer choice.
- Right-click the answer choice and select Create Scale (
- Add a description of the scale and additional comment, if needed.
- Click Save.
- Right-click the scale and select Create Ordinal Level (
- Provide a value for the ordinal level by typing in a number or using the arrow keys to reach the desired number.
- Optionally, describe the ordinal level.
- Click Save.
- Return to step 3 to create additional ordinal levels.
Creating a Numerical
- Add a characteristic to the component.
- Add an answer choice.
- Right-click the answer choice and select Create Numerical (
- Provide a value and UCUM string for the numerical (required).
- Select an operator from the list (optional).
- Click Save.
Creating a Quantile
- Add a characteristic to the component.
- Add an answer choice.
- Right-click the answer choice and select Create Quantile (
- Enter a value into the Bins field.
For example, if your range is 100, you could create 5 bins containing 20 units each. Your Bin number would be 5 in this case. - Click Save.
Creating an Interval
- Add a characteristic to the component.
- Add an answer choice.
- Right-click the answer choice and select Create Interval (
- Specify Min Value, Max Value, Min Operator, Max Operator, and UCUM Value for an interval.
- Click Save.
- Return to step 3 to create additional intervals.
Searching for a Template in the AIM Template Service
- Click the Templates tab.
- Below the left panel, click
The Template Search page appears.
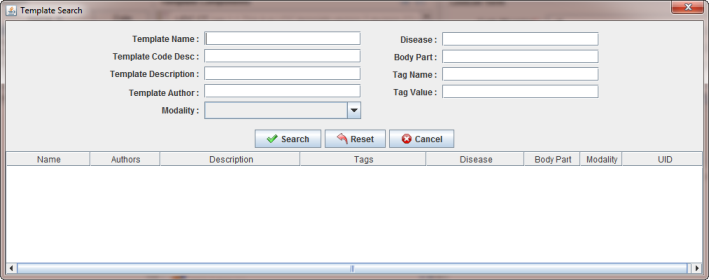
Narrow your search by entering information into the fields. If you do not enter any information into the fields, all template groups available in the AIM Template Service appear, and it may take longer to see the results of your search. The following fields are available.
Field
Description
Template Name
Template name
Template Code Desc
Template code description
Template Description
Template description
Template Author
Person who created the template in the AIM-enabled application
Modality Any of the various types of equipment or probes used to acquire images of the body, such as radiography, ultrasound and magnetic resonance imaging Disease
Disease that is the topic of the templates in the template group
Body Part
Body part that is the topic of the templates in the template group
Tag Name
A name associated with this template
Tag Value The value associated with the tag name for this template - Click Search.
All templates matching the search criteria you entered appear.
Importing a Template from the AIM Template Service
- Search for a template in ATS.
Click the Name link of the template you want to import.
The template you imported appears in the Templates panel as "Copy of Original Template Name".
Editing a Template
- Click the Templates tab.
- Select the template you want to edit. The template information appears in the right panel.
- Edit any of the information about the template that you want to change.
- Click Save.
Copying a Template
- Click the Template tab.
- Select the template you want to copy.
- At the bottom of the Templates panel, click
A copy of the template with the name of Current Template Name copy appears in the Templates panel. You can now customize the copied template.
Deleting a Template
- Click the Templates tab.
- Select the template you want to delete by clicking it.
- Below the left panel, click
A message appears prompting you to confirm the deletion. - Click Delete.
The template is no longer in the Templates panel.
Adding a Template to a Template Group
This procedure assumes that you have already created both templates and template groups.
- Click the Template Groups tab.
- Select the template group that you want to populate with one or more templates.
- In the Group Memberships panel on the right side of the screen, click the boxes next to the templates you want to add to the selected template group.
- Below the Group Memberships panel, click
The templates appear in the Group Members panel.
Removing a Template from a Template Group
- If you are not already on the Template Groups tab, click it to select it.
- In the Group Memberships panel on the right side of the screen, click the box next to the template you want to remove from the template group.
- Click
The page refreshes and the Group Members panel no longer shows the template in the template group.
Building a Lexicon
You must first create a lexicon, then add lexicon entries to it. Those lexicon entries become the allowed terms that you add to a template.
The ATB contains preselected terms from RadLex, caDSR (cancer Data Standards Registry and Repository) designed for a particular imaging study such as LIDC (Lung Image Database Consortium), and VASARI (Visually Accessible Rembrandt Images) vocabularies.
Creating a Lexicon
- Click the Lexicons tab.
- In the toolbar at the bottom of the page, select
A panel for information about the new lexicon appears.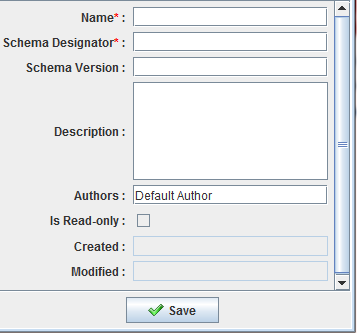
- Enter information about the lexicon. Lexicon name and Schema Designator are required and the rest of the fields are optional. You can change the Authors from what appears by default, which is the user who is currently logged in. If the Is Read-Only checkbox is selected, this is a lexicon built in to ATB 2.0 and you cannot modify it.
- Click Save. The lexicon appears in the Lexicon panel.
Creating a Lexicon File Outside of ATB 2.0
- Create a CSV file with a tab separator. When creating a new line, press Enter.
- Make the first line the file header, with subsequent lines containing the actual data you are importing.
- Structure the header in the following way:
| Column 1 | Column 2 | Column 3 | Column 4 | Column 5 |
|---|---|---|---|---|
| Code Meaning | Code Value | Coding Scheme Designator | Description | Parent |
An explanation of the header columns follows.
| Header Column Name | Description |
|---|---|
| Code Meaning | A brief description of the code |
| Code Value | Code |
| Coding Scheme Designator | A source such as RadLex, DCM, STR, etc. |
| Description | A full description of the code |
| Parent | "Code Value" of the parent of a child term |
Deleting a Lexicon
- Click the Lexicons tab.
- Select the lexicon you want to delete by clicking it.
- At the bottom of the Lexicon panel, click
A confirmation message appears. - Click Delete. The lexicon is no longer in the Lexicon panel.
Creating a Lexicon Entry
- Click the Lexicons tab.
- Select the lexicon that you want to contain your new lexicon entry.
- Right-click the lexicon and select Create Lexicon Entry, or click
A panel for the new lexicon entry appears.
Complete the fields to describe the lexicon entry.
An explanation of the purpose of each field is shown in the table below.Field
Description
Code Meaning
The name of the term you want to use as the lexicon entry
Description
A description of the term
Code Value
The value assigned by the coding scheme designator
- Click Save.
Deleting a Lexicon Entry
- Click the Lexicons tab.
- Select the lexicon that contains the term you want to delete.
- Click the term you want to delete to select it.
- Click
A confirmation message appears. - Click Delete. The lexicon entry no longer appears in the Lexicon Terms panel.
Searching for a Term
- Click the Lexicons tab.
- At the bottom of the Lexicons panel, click the Search Terminology button (
The Lexicon Search window appears.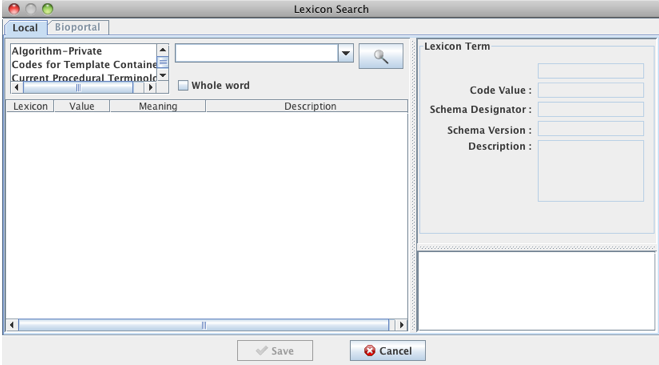
- From the list on the far left of the page, select at least one lexicon where you believe the term you are searching for is located. Click and hold the Shift or Ctrl key to select multiple lexicons.
- In the list to the right, enter the term you want to search for. Options include the following:
- Click Whole word if you are entering the whole word and want to restrict your search to it.
- Enter only part of the term, such as "Tum" for "Tumor".
- Do not enter any terms to retrieve all terms in the selected lexicon(s).
- Click
- All lexicon entries matching your search criteria options appear in the search results.
- Click to select a term from the search results.
- Click Save.
The term appears in the Lexicon Terms panel of the Lexicons tab.