You must identify each organization, including each organizational contact, uniquely.
Information on Tab Labels
The Organization Details page displays all details about the organization provided to date. The tab labels in the Assign Organizational Roles section at the bottom of the page display the number of each role already associated with the organization that you are curating (if applicable). The letter "P" beside the role name on each of the tabbed pages indicates that at least one role is pending curation.
How to Manage Organizational Contacts
- Navigate to the record of interest.
- In the Action column for a given organization, click Curate.
In the Assign Organization Roles section toward the bottom of the Organization Details page, click the Org Contact (Organizational Contact) tab.
You can sort the records
Click the column heading once to sort the records in ascending order. An arrow head indicates whether the sort order is descending or ascending. Click the column heading again to reverse the sort order.
The Org Contact page displays the research roles currently assigned to the organization (if applicable).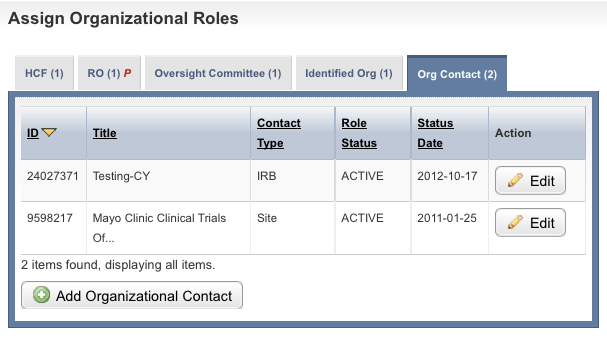
Assign Organizational Roles - Organizational Contacts TabFollow one of the options in the table below to continue assigning roles:
Options for assigning roles to an organizationIf there are...
And...
Do this
No organizational contact records displayed
You want to add a role
Proceed to the next step.
One or more organizational contact records displayed
The information for them is correct
Proceed with other aspects of the organization curation.
One or more organizational contact records displayed
The information for them is incorrect
In the Action column for the record you want to modify, click Edit, and proceed to the table below.
- To add a role, click Add Organizational Contact.
The Create Organizational Contact page appears.
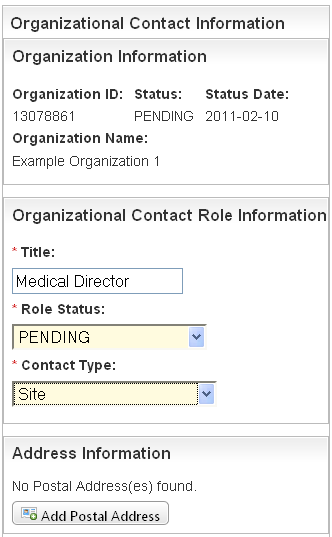
Create Organizational Contact Page – Upper Sections Select or enter the appropriate information in the text fields and drop-down lists. Fields are described in the following table. Items with an asterisk are required fields.
Field Label
Description/Instructions
Title*
Type the title of the contact role.
Role Status*
If the associated contact has not been curated (i.e., it is pending), select Pending. Otherwise, select Active.
Contact Type*
Select the appropriate contact type. Valid values are as follows:
- IRB
- Responsible Party
- Site
- In the Address Information section, click Add Postal Address, and follow the instructions in Entering Address Information.
- Click Save.
The information appears in the Address Information section on the Create Organizational Contact page.

Create Organizational Contact – Address Information Section - Do one of the following to continue:
- To change the information in the address section, click Edit.
- or - - To delete the address information, click Remove.
- or - - To add another address, click Add Postal Address.
- To change the information in the address section, click Edit.
Complete the remaining Contact Information fields.
Remember to click Add after you complete each of the contact information fields.
- Click Save, then click Return to Organization Details