What is OKTA?
Okta is the multifactor authentication service provider for NCIs CTRP and Precision Medicine applications. Multifactor authentication is used to provide additional security beyond just entering a username and password: authentication is accomplished by either responding to an alert on a cell phone, pressing a key in answer to a recorded phone call, or entering a code received via text message or phone call.
Even if you already use Okta for other programs, you will still need to set up Okta for your new account the first time you log in. Every user has an Okta profile that facilitates the authentication of the user into their accounts on the applications. Previously, the login process for NIH internal users displayed only the iTrust login screens, without the option to login using the Okta profile username and password.
Important Note:
To prevent any problems during the login process, make sure that the browser popup blocker is disabled. A popup blocker may preventing the application from opening the login page.
See the following for instructions on disabling popup blockers for various browsers:
| Browser | Guide |
|---|---|
| Chrome | How to change popup blocker settings in Chrome |
| Firefox | How to change popup blocker settings in Firefox |
| Safari | How to change popup blocker settings in Safari |
For additional support contact your IT Support department or one of the NCI's various application support teams below:
| Application | Support Email address |
|---|---|
| STRAP | ctrp_support@nih.gov |
| CTRP | ctrp_support@nih.gov |
| DLAP | dlap_support@mail.nih.gov |
| CSMS | csms-support@nih.gov |
| Adult Matchbox | matchbox-support@nih.gov |
| Pediatric Matchbox: | ped-match-support@nih.gov |
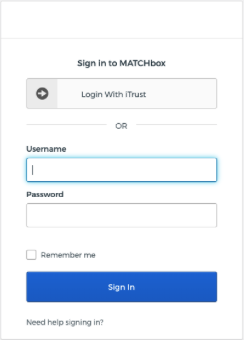
First-Time Login Steps - NIH Users
To access a new account with Okta authentication:
- Navigate to the URL for the desired application. Accept any acknowledgements if prompted, for most applications it is a blue button that reads “Acknowledge and Continue”.
- Click Login With iTrust.
- Use your PIV card or enter your NIH USERNAME and NIH PASSWORD on the iTrust login page to login to the application.
First-Time Login Steps - Non-NIH Users
To access a new account with Okta authentication:
- Navigate to the URL for the desired application. Accept any acknowledgements if prompted, for most applications it is a blue button that reads “Acknowledge and Continue”.
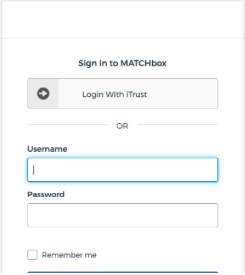
- This will go to the page for the authorization provider, Okta. Please click on the link Need help signing in? located just below the blue ‘Next’ button.
- Please click on the link Reset OKTA Password.
- Enter your email address, then click on the blue Reset via Email button.
- You will receive an email from Okta with a link to change your password. Please click on the link and follow the steps. The screen will instruct you regarding password requirements.
- Once you have set your password, you will finish at the Okta dashboard. Please click on the drop-down arrow next to your name (located in the blue navigation bar at the top of the screen next to the person icon), then click on Sign out link.
- Click on the button on the application’s Login page again, enter your username, and click Next. You may also click the Remember me button if you choose. This will store and pre-populate you username the next time you log in. Click Next.
- Most users will see a popup balloon indicating a first time login using Okta. Enter your new password.
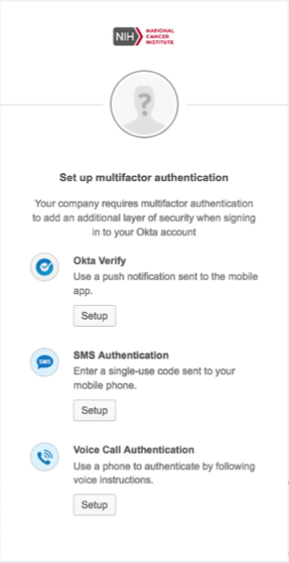
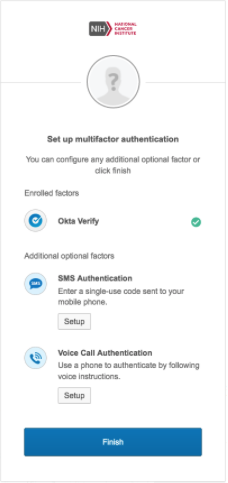
- Okta Set up multifactor authentication window. There are 3 choices, each with a Setup button directly under the description of the method:
- Okta Verify - “Use a push notification sent to the mobile app.”
- SMS Authentication - “Enter a single-use code sent to your mobile phone.”
- Voice Call Authentication - “Use a phone to authenticate by following voice instructions.”
- Choose the method you would like to use by clicking the Setup button directly under your choice.
- The following sections of this document define the steps needed for each of the different methods. Please see the section that correlates to your authentication choice and return to this point in the document. ** Note: You may choose more than one of the above authentication options. Please see the section entitled “Two Factor Option: Multiple Methods”.
- Once you have completed the setup for your chosen authentication method(s), click on the Finish button.
- The next time you login, you will also see a security image above the username textbox once you have entered your username. It is randomly selected when your account is activated but should be the same every time you enter your username. (If you see an unfamiliar image, do not enter your password. Please contact our support desk for help.)

Two Factor Option: Okta Verify
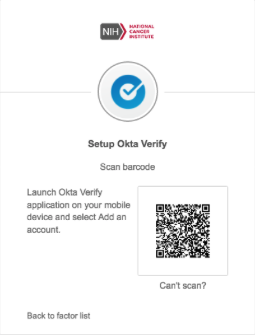
- Clicking on this choice brings up the Setup Okta Verify window. In this window, Select your device type by clicking the brand icon for your mobile phone. The window will expand at the bottom to display instructions to Install Okta Verify.
- Okta Verify is a mobile app that needs to be downloaded to your cell phone. The window contains a link to your cell phone brand’s app store page for Okta Verify. This will allow you to easily identify Okta Verify in your app store so that you can download it to your cell phone.
- When you have downloaded the app, click on the blue Next button on your computer and tap on the Add Account button in your cell phone app. (If asked, allow the app to access your cell phone camera and allow it to send push notifications).
- The Okta app will open a camera screen, and your computer screen will display a QR code (square-shaped barcode).
- Point your cell phone towards your computer screen and align the cell phone camera display with the square of the QR code.
- The Okta Verify app will scan the QR code and connect your cell phone to your Okta account. You will see a new entry in the connections list in your cell phone app.
- On your computer, you will be directed back to the Setup Multifactor Authentication screen.
- While initially you will be logged into your account from these steps, the next time you log into your account, you will be using a “push” to authenticate. Please take note of the following steps, then return to Step 10 in First-Time Login Steps:
- When you enter your username and password, you will see a window for Okta Verify with a button to Send Push. Click on this button and a “push” pop-up alert will be sent to the app on your mobile phone asking you to approve the connection.
- Tap on the Approve button to authenticate.
- Following the authentication, the application will load.
- The next time you log in to the application, an Okta Verify window will appear asking whether to send a push to the phone number on record.
- Click to proceed with the push, then tap on Approve in the popup alert from the Okta Verify app.

Two-Factor Option: SMS Authentication
- Clicking on this choice brings up a window that allows the user to set up their account to Receive a code via SMS to authenticate.
- Use the dropdown picklist to choose the country of your location (United States is selected by default). The choice of country automatically populates the appropriate country code prefix for the Phone number text box.
- Enter the phone number of the mobile phone that you would like to use and then click on the blue Send code button. (If you would like to go back and choose a different authentication method, click on the text Back to factor list located in the bottom left-hand corner of the center window.)
- Then, a text message with a code will be sent to the phone number listed, and you will see a text box on the screen.
- Enter the code in the textbox and submit it. The application will load.
- The next time you log in to the application, an SMS Authentication window will appear asking to approve the sending of a text message to the number entered (most of the number will be masked, with the exception of the last 4 digits).
- Check your cell phone for the text message, then enter the code received on your phone into the textbox on the screen. Return to Step 10 in First-Time Login Steps.

Two Factor Option: Voice Call Authentication
- Clicking on this choice brings up a window that allows the user to set up their account to Follow phone call instructions to authenticate.
- Use the dropdown picklist to choose the country of your location (United States is selected by default). The choice of country automatically populates the appropriate country code prefix for the Phone number text box.
- Enter the phone number of the mobile phone that you would like to use, and fill in your extension in the Extension textbox if applicable.
- Next, click on the blue Call button. (If you would like to go back and choose a different authentication method, click on the text Back to factor list located in the bottom left-hand corner of the center window.)
- Then, a phone call will be initiated to the phone number with a recorded message. Follow the instructions on the message, then hang up.
- Following the authentication, the application will load.
- The next time you log in to the application, a Voice Call window will appear asking to approve a phone call to the number entered (most of the number will be masked, with the exception of the last 4 digits).
- Click to approve the phone call, then answer the phone call and follow the instructions. Return to Step 10 in First-Time Login Steps.

Two-Factor Option: Multiple Methods
It is possible to set up more than one of the authentication options. While only one method is needed for each login, and each type authentication may only be associated with one phone number, this configuration allows some flexibility for users who want the option of using two different phone numbers.
Here are some examples of how this might be used:
- Okta Verify Authentication (cell phone), Voice Call Authentication (office phone).
User sets up Okta Verify authentication to send pushes to their cell phone and sets up Voice Call Authentication to their office phone number. If the user does not have cell service in their office, they can use their office phone to authenticate, and they can authenticate via Okta Verify push on their cell phone if they are away from their office.
- SMS Authentication (personal cell phone), Okta Verify Authentication (work cell phone).
User sets up Okta Verify Authentication to send pushes their company-issued cell phone and sets up SMS Authentication to their personal cell phone. The user does not wish to install an app on their personal cell phone, but would like to have a backup method of authentication in case of any changes to their work cell phone number.
- Okta Verify Authentication (cell phone), SMS Authentication (cell phone), Voice Call Authentication (office phone).
User wishes to have several options for authentication, especially since their day-to-day schedule is extremely varied. This allows the user to choose the method that best suits their situation at login time.
- Determine the configuration that best fits your situation and decide which of the authentication methods that you want to use and which phone number you want to use with each.
- Follow the earlier instructions in this document for the first login. When you get to the point of choosing an authentication method, select the first method on your list. Follow the instructions in this document for that method and connect it to your chosen phone number and complete the verification.
- Before logging in completely, click on the text Back to factor list in the lower left-hand corner of the window that indicates going back to the selection screen.
- Choose the next authentication method on your list and follow the instructions for that method.
- If you would like to choose a third method, click on the lower left-hand corner again to go back to the selection screen. When you have completed all of the setup configurations, you may log in to the application.
- Return to Step 8 in First-Time Login Steps. Note that if you have set up all 3 methods, you will not be routed back the Setup multifactor authentication window; instead you will need to set up your security question and then you will be logged in to the application.
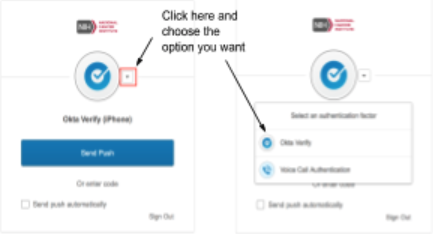
Note: The next time you log in to the application, one of the authentication methods will be selected by default, but you may choose another method if you have set it up. Click on the down-arrow icon next to the Okta symbol in the window and choose a different authentication method from the picklist.
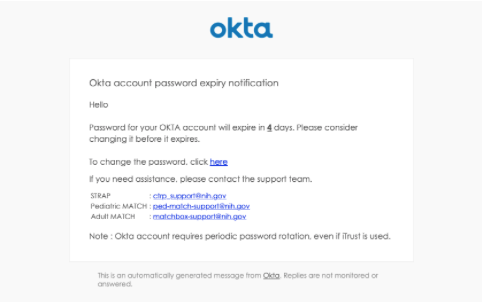
Okta Password Expiration
As with most user profile passwords, Okta passwords require periodic updating to maintain compliance with security policy. NIH Users also need to update their Okta password as per the update schedule, even if they choose to only use iTrust to login to the applications.
Users will receive an email alerting them when it is time to update their Okta password.
Reset Okta Password
IF:
- You receive a notice informing you that your Okta password is expiring (All users), or
- You forget your Okta password and want to use it to login (All users)
THEN:
- You will need to reset your Okta password
To reset your Okta password use one of the following methods:
- Shortcut to the password reset page at: https://bioappdev.okta.com/signin/forgot-password
- Go to the application’s Login Page and reset your password using the instructions in this document titled “First Time Login Steps: Non-NIH Users”.
Reset iTrust Password
To change the iTrust password:
- If you have forgotten your NIH ITRUST PASSWORD, you may reset it using a link from the application. From the Login URL, click on the blue button, then click on the ‘Need help signing in?’ link underneath the username text box
- Next, click on the ‘Reset iTrust Password’ link. This will take you to the NIH password reset module.
NOTE: When you reset your password using this link from the MATCHbox or STRAP application, it will be reset for all NIH logins.
2 Comments
Whitley, Stephanie (NIH/NCI) [C]
Please fix this formatting issue:
Adult Matchbox: matchbox-support@nih.gov
Pediatric Matchbox: ped-match-support@nih.gov
STRAP: ctrp_support@nih.gov
Freund, Jeremy (NIH/NCI) [C]
Updated, added these to tables