This section describes upgrading from NBIA 7.0 GA to 7.1 GA. You can perform an upgrade to NBIA 7.1 GA using the command-line installation. A GUI upgrade is not an option for this release.
Upgrading NBIA from 7.0 to 7.1 GA
Before You Begin
- Important! Back up the existing database. You must create a reliable copy of your entire NBIA database---the DDL and DML.
- Important! Back up the
tomcat.homedirectory. To do this, make a copy of theNBIA.homefolder along with any artifacts from the initial installation, such as the property files, already mentioned. - Important! You cannot upgrade from NBIA with MySQL to a new NBIA that uses Oracle. You must install a fresh NBIA with Oracle and migrate the data manually. This section assumes you are upgrading from MySQL (to NBIA 7.1 GA with MySQL). Contact Application Support if you require help with migration.
If you are performing a new installation, go directly to Installing the NBIA Application.
Things to check before the upgrade
The directions in this section presume that you have a valid and functioning NBIA 7.0. Please see the section above if you want to upgrade previous versions of NBIA. NBIA 7.1 GA. is running on an upgraded infrastructure, so please upgrade the infrastructure first. That includes the operating system for Linux system, Java SDK, Apache Ant, and the database as described at the beginning of in this document.
The upgrade to a given version of NBIA may add new constraints to the data model. This is typically done in order to stop erroneous submissions from happening. If such submissions have already occurred, there may already be duplicate or corrupt data in the database. The upgrade will fail in such a case, and the corrupt data needs to be cleaned out before the upgrade can be successful.
Things to check before the upgrade
If you are using an existing Tomcat installation make sure there are no files or directories in the webapps directory. NBIA should be installed with no other applications on a Tomcat server.
Overview of Properties Files
When you installed the previous version of NBIA, you configured install.properties. To complete the upgrade to the desired NBIA version, you may need to use values in the previous install.properties file to configure values in install.properties for the NBIA command-line installer.
Existing database?
To make the upgraded NBIA automatically connect with an existing database after the installation, the property database.re-create needs to be set to false for a MySQL database or the property database.drop-schema needs to be set to false for an Oracle database.
To perform an upgrade to NBIA 7.1 GA using the command line, follow these steps.
- Download the installation zip file described in Downloading NBIA 7.1 GA Files to a directory of your choice. Unzip the files into a fresh directory. This documentation refers to this location as the
<installer_directory>.
Example:<.installer_directory> = C:\NBIA_7_1_installer Edit the default properties in the <
installer_directory>/install.propertiesfile. To do so, open both properties files, the one you configured originally, and the one at NBIA 7.1 GA<installer_directory>.Duplicate attributes
Where there are duplicate attributes, the values must be the same in both files.
In the NBIA 7.1 GA install.properties file, make sure to set the exclude database to be "true":
exclude.database=true. If the database type is MySQL, setdatabase.re-create=false. The 7.1 GA installer configures the Tomcat application server and installs NBIA applications. For the database upgrade, it must be done in a separate process. See the database upgrade tip below for details.Copy each entry you modified in the NBIA 7.1 GA install.properties file and paste it in the corresponding location in the install.properties file for NBIA 7.1 GA, replacing the default text, as appropriate. There are new properties for 7.1 GA that did not exist in 7.0. Consult NBIA 7.1 GA Properties of this guide for more background on the meaning of the properties. Be sure to use the correct database properties.
Record these property values.
Default values
If you chose not to use the default ports on the Tomcat application server, make sure the ports in the install.properties file match what you chose to use in Tomcat. Be sure to verify that other applications are not using the ports in this file.
From the command line, navigate to < installer_directory >/ (Example:cd C:\NBIA_7_1_installer), and type ant. This initiates the upgrade process, which should take 7 to 15 minutes depending on your system's speed, power, and memory.
The installer configures pre-installed Tomcat application server, installs the NBIA 7.1 GA portal, CTP server, and NBIA REST service for the NBIA application.Update the database schema.
Database upgrade
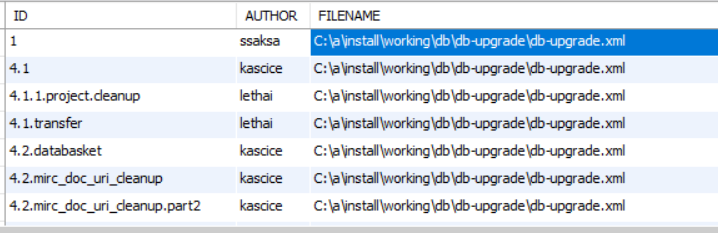
The database upgrade needs to be performed after the NBIA installation completes. Once an initial installation of NBIA is complete each database upgrade must be made from the same directory due to the way Liquibase determines the uniqueness of each change element. This directory can be determined by inspecting databasechangelog in the database. In the following example, all database upgrades should occur from the C:\a\install\working\db\db-upgrade\db-upgrade.xml directory.
- In <installer_directory>/install.properties, comment out exclude.database=true, that is, put # in front of exclude.database=true.
- From the command line, navigate to <installer_directory> (Example: cd C:\NBIA_6_5_installer), and type ant build:db:update
The installer upgrades your existing NBIA database on your MySQL server.
- In <installer_directory>/install.properties, comment out exclude.database=true, that is, put # in front of exclude.database=true.
- To verify that NBIA upgraded successfully, start up the Tomcat server and open your web browser to [ http://tomcat.server.hostname>:<tomcat.server.port>/ncia ]
(example: [ http://hostname.com:8080/ncia ]) and enter nciadevtest as the user and changeme as the password.
Upgrading the Solr Index
Upgrade Version?
This procedure should only be done when upgrading from Version 6.5 GA. Do no perform it if upgrading from 7.X or later
For this release the Solr Index needs to be upgraded to enable the Fielded Search feature. During this process, the text search feature will not be available.
To upgrade the index on a single instance:
- Shut server down.
- Delete the existing Solr index directory in SOLR_HOME .
- Start server.
Indexing will begin immediately. Don’t shut sever down in the meantime. - The progress can be monitored in
catalina.out.
The log will give the progress, i.e. “Updated patient-1.3.6.1.4.1.9328.50.12.0128 Solr Update request made, this is the 4057 patient updated out of 6067.” - When indexing is finished, restart Tomcat to refresh the caches.
To upgrade the index with minimal impact to current operations:
- Create a new instance of NBIA on a separate machine that shares the same database and image file storage as with the production instance of NBIA.
- Make sure that the new instance does not share the same SOLR_HOME as the production instance and is a new installation.
Start server.
Indexing will begin immediately. Don’t shut sever down in the meantime.- The progress can be monitored in
catalina.out.
The log will give the progress, i.e. “Updated patient-1.3.6.1.4.1.9328.50.12.0128 Solr Update request made, this is the 4057 patient updated out of 6067.” - Shut down the server.
- Shut down the production server.
- Copy the index from the new servers SOLR_HOME to the production server's SOLR_HOME.
- Start the production server.