This chapter describes how to submit images to NBIA.
Topics in this chapter include:
Image Submission Overview
When you submit an image to NBIA using FileSender, the process follows the path illustrated in the following flowchart:

In summary, the process involves the following steps. These steps are described in detail in the succeeding sections of this user's guide.
- Before submitting data, a collection should be created in the User Authorization Tool (UAT). Roles such as “READ” and “MANAGE_VISIBILITY_STATUS” can be assigned to users for a given collection in the UAT.
- Install the FileSender and the CTP (Clinical Trial Processor) client. The CTP is configured for the client (sender) and the server (receiver). This tool anonymizes the data as well as assigns collection information which is required for storage, search and security provisioning of the data.
- Unzip the file and open both tools on your local machine.
- In FileSender, locate the image(s) to be submitted.
- Update the anonymization script.
- FileSender sends the image(s) to the RSNA Clinical Trial Processor (CTP) client, which anonymizes the data to comply with patient privacy policies.
- The CTP client forwards the image(s) over the internet to the CTP server, which stores the file(s) in the database.
- The CTP server transfers the image(s) to your NBIA database repository.
The submission process can be monitored using the CTP client (to see how many images were sent), CTP server (to see how many images were received) and the View Submission Reports tool within NBIA to ensure the images were successfully added to the database and file system. The View Submission Reports tool requires the “VIEW_SUBMISSION_REPORT” role in the UAT.
Once receipt of the images is confirmed, users with the “MANAGE_VISIBILITY_STATUS” role can use the QC Tool to review images, make them visible to users with read access to the collection, set them as invisible or mark them for deletion. In order for images to be deleted by a user with the “NCIA.SUPER_CURATOR” role must approve the images that are marked for deletion using the Approve Deletion tool within NBIA. Images that have been approved for deletion will be auto-deleted that night during off-peak hours to save system resources. This two-step process is designed to minimize accidental deletions.
See also Alternative Image Configuration/Submission Methods.
You can find the latest documentation for CTP on the Medical Imaging Research Center  site.
site.
Installation of the CTP Client/Server
To submit images, you must have the CTP client both installed and running on your machine. The installation of the CTP Client/Server is embedded into the NBIA application installation process.
For example, the installation path for the CTP in Windows is:
C:\apps\nbia\CTP-clientC:\apps\nbia\CTP-client\FileSenderC:\apps\nbia\CTP-server
Configuring the CTP Client
As noted above, to submit images, you must have the FileSender and the CTP client both installed and running on your machine. For information regarding your specific installation issues, contact NCI Application Support.
To configure the CTP client, perform the following steps:
- To start your local CTP client, execute the
ctp.bat (ctp.shin Linux) in the CTP-Client/CTP folder. In Windows, the file path is:C:\apps\nbia\CTP-client\CTP\ctp.bat. Open a browser and type in the CTP client URL for your local installation. You can find the port number by looking in the
config.xmlfile in the CTP folder. The third line of the standard file is"<Server port="24080" />". If changes are made to this number, the localhost port needed to access the CTP admin page changes in tandem.Example URL for CTP client:
http://localhost:24080/Tip
You may want to refer to the helpful information about this part of the CTP setup on the NCI wiki . Note that CTP only supports 32-bit Java.
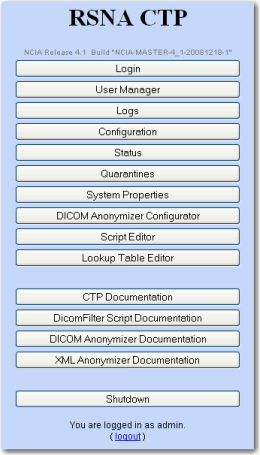
The CTP Client Console opens in your browser. The following image on the left shows the main menu when you are not logged in. The following image on the right shows the main menu when you are logged in.
Not logged in
Logged in
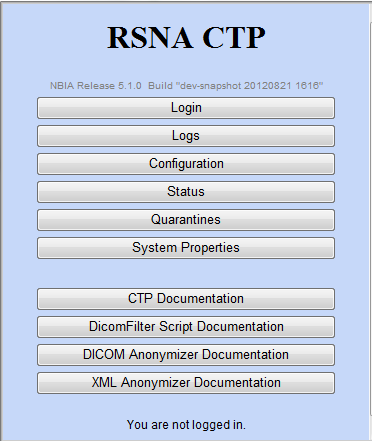
Not logged in?
You do not need to be logged in to the CTP client to review some of the pages. See the first figure. You do need to be logged in to configure the anonymizer.
- Click the Configuration button. The Configuration page appears.
- Verify the URL in the bottom section of the page, HTTP Export. This should point to the import service of the CTP server to which the images will be exported from the CTP client. You cannot change the text on this page; it must be changed in the
config.xmlfile referred to in step 2. - Once the file(s) are received in the CTP client, they are anonymized there. To configure the anonymization parameters, you must be logged in. Request the login credentials from your administrator.
- Click the DICOM Anonymizer Configurator button on the CTP client main page. (This option appears only after you are logged in.)
- Click the hypertext link in the first screen that opens. The DICOM Anonymizer Configurator page appears. On this page, you can enter, verify, or edit anonymization parameters. This customization overrides the default configuration in the
da.scriptfile. - Anonymize your DICOM images.
Anonymizing DICOM Images
The default configuration for submitting images to NBIA is detailed in the da.script file. You can override that script by customizing anonymization parameters on the DICOM Anonymizer Configurator page, which follows. This page indicates how the image's DICOM tags are modified to anonymize the data, thus meeting HIPAA regulations to preserve patients' privacy. For example, the patient's birth date and patient ID are anonymized.
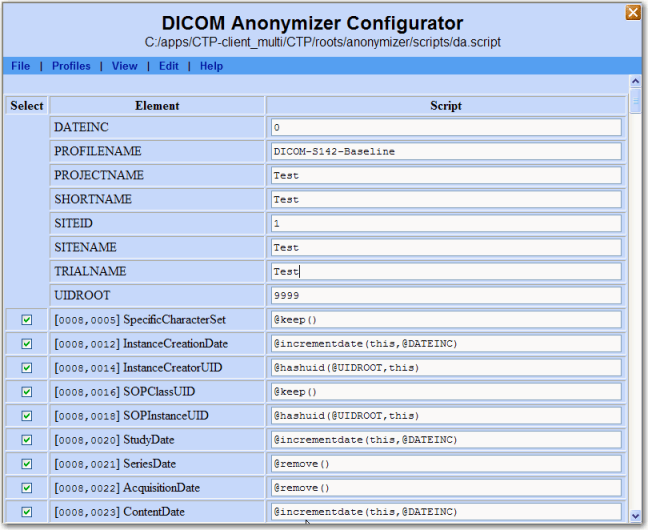
The following fields on this page are required:
- PROJECT NAME--This must correspond to whatever you are going to call the collection. The name might indicate the type of data, the research center that provided the data, or the collection type such as CT colonography for CT images of colonography.
- TRIAL NAME – This must be the same as the project name.
SITE NAME – This identifies where data is coming from. Example = BioU. Several different collections could be submitted from there, but all would have same site name. The NBIA user does not see the source site for the data, except when using the Verify Submission feature, described in Viewing Submission Reports.
Authorization controls
Authorization controls pay attention to the site. So a user, based on permissions, for example, may be able to search on collection X//site A, but not collection X//site B.
- SITE ID – This is a predetermined, unique ID that always maps to the specific site. This is always constant for a given site and must be used when you submit images to your image repository. Example: BioU = 17. The four values above are required; without them, the submission will fail.
The following field can also be configured.
- UID ROOT – This ID, assigned by an NBIA administrator, remains unique for every submitted collection from a particular research center. The anonymizer uses the identifier, typically a prefix for series instance UIDs, to determine the values for DICOM tags.
If you are submitting only to your local isolated system, you, as an administrator, can determine the UID root yourself.
- If a true globally unique ID Root is obtained, the UID Root will need to be appended by a UID Root End for each collection/site combination that will be submitted to that node of NBIA. This will keep the UIDs truly unique. For example:
- UID Root = 555
- Collection A, Site 1 UID Root End = .1
- Collection A, Site 2 UID Root End = .2
- Collection B, Site 1 UID Root End = .3
- Collection B, Site 2 UID Root End = .4
- Collection A, Site 1 UID Root = 555.1
- Collection A, Site 2 UID Root = 555.2
- Collection B, Site 1 UID Root = 555.3
Collection B, Site 2 UID Root = 555.4
Other fields can also be configured. For more information about the configuration and operation, see the CTP DICOM Anonymizer documentation .Anonymization baseline
The current CTP client contains a WG18 S142-compliant anonymization baseline. For more information about the Working Group 18, Supplement 142 profile, see Incorporation of DICOM WG18 Supplement 142 into CTP.
Once the CTP client has been configured, you can begin the submission process in FileSender. See Submitting Images. Once the CTP server has been configured, you can verify that the images have been received and stored in the database. See Verifying Status of a Submitted Image.
Configuring the CTP Server
CTP port numbers
Note the slight difference between the port numbers for the CTP client "24080" and the CTP server "23080".
To start your local CTP server, execute the
ctp.bat (ctp.shin Linux) in the CTP-Client/CTP folder. In Windows, the file path is:C:\apps\nbia\CTP-server\CTP\ctp.bat.Open a browser and enter the CTP Server URL for your local installation. You can find the port number by looking in the
config.xmlfile in the CTP folder. The third line of the standard file is"<Server port="23080" />". If changes are made to this number, the localhost port needed to access the CTP admin page changes in tandem. An example URL for the CTP server:http://localhost:23080/
The CTP Server Console opens in your browser. To determine the status of an image you have submitted, as described in Submitting Images, continue with the steps in Verifying Status of a Submitted Image.
Troubleshooting
If you are not able to use User Manager of CTP server to create or delete a user, check if Apache is the front end server of the CTP server. If yes, add the following directive to the Apache configuration file at ctpconsole.conf:
ProxyPreserveHost On
Submitting Images
- To open the FileSender, execute
filesender.bat (filesender.shin Linux) in the CTP-Client/FileSender folder. The FileSender opens to a screen that displays a Source panel on the left and a Destination panel on the right (shown in the following figure.)
In Windows, for example, the file path is:C:\apps\nbia\CTP-client\FileSender\FileSender.bat.
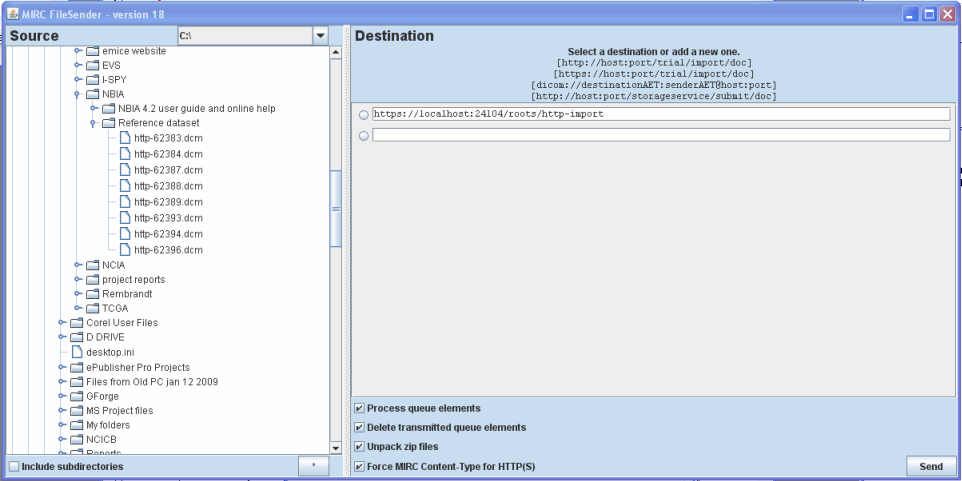
- In the left panel of FileSender, select one image or a folder of images to be submitted (see the previous figure). You cannot select and submit multiple individual images at one time.
- Select Include Subdirectories if you want subdirectories to your selection to also be submitted.
Select the default URL for the destination in the Destination panel. This is the host and port number (the port number for the
HttpImportServicedefined in theconfig.xml) where the CTP client is located.Tip
The CTP client must be started to successfully submit images.
- Leave the checkboxes at the bottom of the Destination panel checked in the default selections.
Click Send to execute the submission process to the CTP client. The Destination panel displays the progress of the task.
CTP Client: Database Verifier
To verify the images submitted, you must replace the default value in the URL field of the Processor tag or DatabaseVerifier tag in the config.xml of CTP Client.
Replace the default value, url= http://localhost:23304
with url=https://ctpsubmission.nci.nih.gov/verifier.
CTP Server: File Submission Configuration
To submit images using the user-defined username/password, follow these steps on the CTP Server:
- Click User Manager.
- Create a username/password. The new username and password should be same in the ExportService section of the configuration file, which is the
config.xmlof the CTP Client. - Make sure to click Import. By default, the Import checkbox is hidden. Click on Show All Roles to view import status.
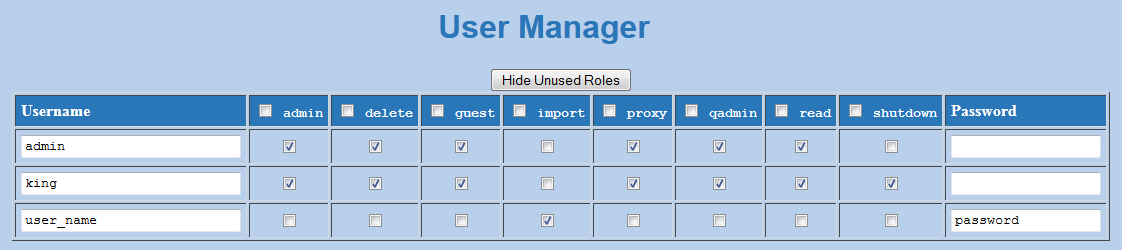
- Assign roles to the user using the checkbox. Click Save to save changes.
Verifying Status of a Submitted Image
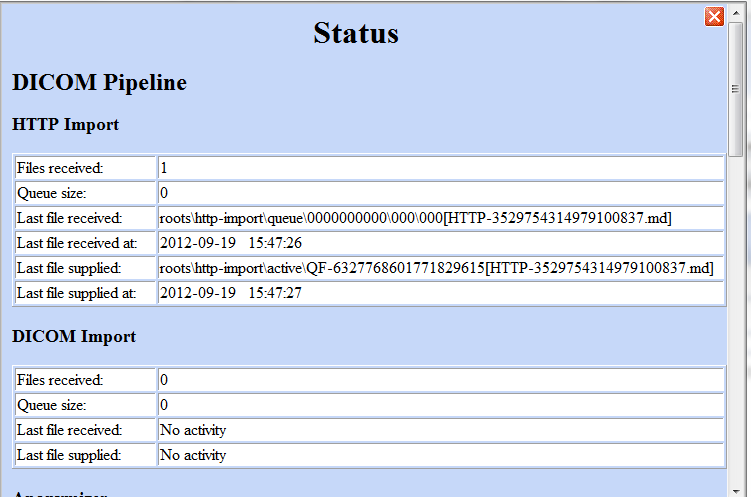
Once you have submitted one or more images, you can check their submission status. Click the Status button on the main page of the CTP client.
All of the fields supply information about the submission, but you might check especially the Last File Received At fields under each section. The following two figures show different examples. Correlate the date and time stamp when the submission was received with the time you sent the image(s). Refresh the page periodically to view the latest status.
CTP client showing in the HTTP Import section that a submitted image file has been received
The following figure shows that the file submitted was received by the CTP server, as shown in the Storage section:
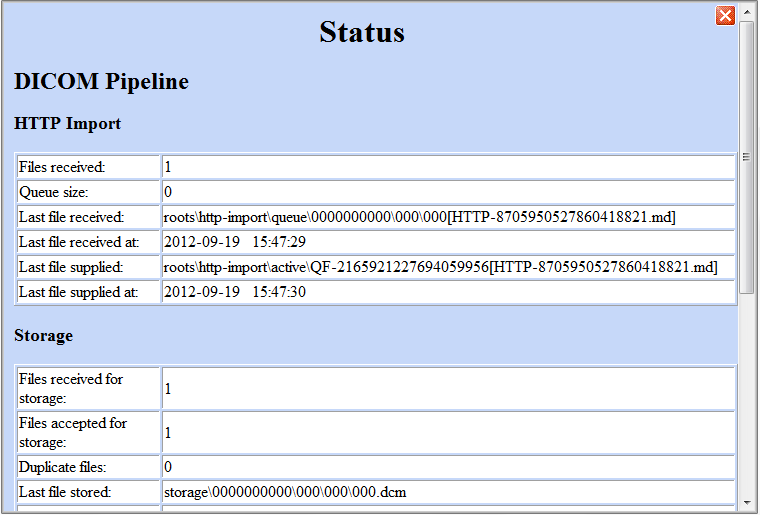
The file shown as received in the previous figure is stored in the "storage" location. In windows, the storage location is: C:\apps\nbia\CTP-server\CTP\storage. For example, the path to the file for the Last file stored as shown in the preceding figure is: C:\apps\nbia\CTP-server\CTP\storage\0000000000\000\000.dcm.
If the Status tab does not indicate that the file(s) were received, verify the URL on the Destination tab of File Sender.
Image(s) Transferred to your NBIA Database Repository
Once the CTP Server receives the images, it extracts all the attributes/information related to the images and uploads the data, together with the images(URI) into the NBIA database.
Use the View Submission Reports tool within NBIA to ensure the images were successfully added to the database and file system. The View Submission Reports tool requires the “VIEW_SUBMISSION_REPORT” role in the User Authorization Tool.
Troubleshooting Unsuccessful Image Submission
If you suspect your files have not been submitted successfully to the CTP client, click the Quarantines button in the CTP client main page to see if any files have been received there. If no files are quarantined, the quarantine indicators remain at zero.
Quarantines
Each stage of processing in CTP can cause a quarantine, therefore, the quarantine count is broken down by stage.
- To see the list of quarantined files per stage, click the corresponding hyperlink for that stage.
- If something is quarantined in the Import stage, the file is likely not a DICOM file.
If something is quarantined in the Anonymizer stage, there is likely an error in the anonymization script. Common problems with the anonymization script are:
incorrect syntax (See the CTP section of the mircwiki
for syntax.)referring to parameters that don't exist. For example, if @PROJECTNAME is referred to in a rule, but not defined as a parameter.
- If the quarantine feature indicates a file has been sent there, click the corresponding hypertext link. You will be able to view one link to the DICOM header file of the quarantined file.
- Click the Log button on the CTP client main page.
- Click the hypertext link to review the activity of the CTP client. This may help you determine the cause of an unsuccessful submission.
- The same troubleshooting rules apply for CTP server, but the stages are different.
- If a quarantine occurs in the storage service, a likely cause is that there is not enough disk space or the drive is not accessible by CTP.
- If a quarantine occurs in the export service, there is likely something more subtle "wrong" with the DICOM file that NBIA doesn't like. For example, submitting an image that has the same series instance UID as a different, previously submitted image could cause a quarantine here. Looking in the log may reveal the issue.
To troubleshoot server-side submission problems or for other submission issues, contact Application Support.
Alternative Image Configuration/Submission Methods
You can use several other alternative methods for configuring and submitting images to the CTP client and/or servers. An example is the PACS radiology machine which takes DICOM images and sends them directly to a CTP server, circumventing the need to send the images and accompanying patient information over the internet. For more information about using these alternative submission methods, contact Application Support.