Page History
...
The submission process can be monitored using the CTP client (to see how many images were sent), CTP server (to see how many images were received) and the View Submission Reports tool within NBIA to ensure the images were successfully added to the database and file system. The View Submission Reports tool requires the “VIEW_SUBMISSION_REPORT” role in the UAT.
Once receipt of the images is confirmed, users with the “MANAGE_VISIBILITY_STATUS” role can use the QC Tool to review images, make them visible to users with read access to the collection, set them as invisible or mark them for deletion. In order for images to be deleted by a user with the “NCIA.SUPER_CURATOR” role must approve the images that are marked for deletion using the Approve Deletion tool within NBIA. Images that have been approved for deletion will be auto-deleted that night during off-peak hours to save system resources. This two-step process is designed to minimize accidental deletions.
...
- To start your local CTP client, execute the
ctp.bat (ctp.shin Linux) in the CTP-Client/CTP folder. In Windows, the file path is:C:\apps\nbia\CTP-client\CTP\ctp.bat. Open a browser and type in the CTP client URL for your local installation. You can find the port number by looking in the
config.xmlfile in the CTP folder. The third line of the standard file is"<Server port="24080" />". If changes are made to this number, the localhost port needed to access the CTP admin page changes in tandem.Example URL for CTP client:
http://localhost:24080/Tip title Tip You may want to refer to the helpful information about this part of the CTP setup on the NCI wiki. You should also note Note that CTP only supports 32-bit Java.
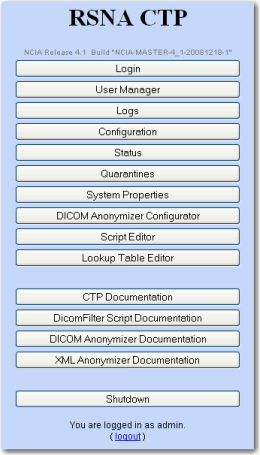
The CTP Client Console opens in your browser. The following image on the left shows the main menu when you are not logged in. The following image on the right shows the main menu when you are logged in.
Not logged in
Logged in
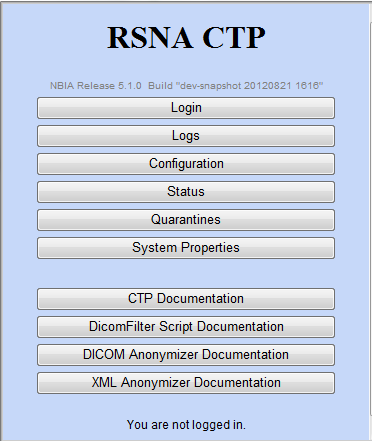
Info title Not logged in? You do not need to be logged in to the CTP client to review some of the pages. See the first figure. You do need to be logged in to configure the anonymizer.
- Click the Configuration button. The Configuration page appears.
- Verify the URL in the bottom section of the page, HTTP Export. This should point to the import service of the CTP server to which the images will be exported from the CTP client. You cannot change the text on this page; it must be changed in the
config.xmlfile referred to in step 2. - Once the file(s) are received in the CTP client, they are anonymized there. To configure the anonymization parameters, you must be logged in. Request the login credentials from your administrator.
- Click the DICOM Anonymizer Configurator button on the CTP client main page. (This option appears only after you are logged in.)
- Click the hypertext link in the first screen that opens. The DICOM Anonymizer Configurator page appears. On this page, you can enter, verify, or edit anonymization parameters. This customization overrides the default configuration in the
da.scriptfile. - Anonymize your DICOM images.
...
- UID Root = 555
- Collection A, Site 1 UID Root End = .1
- Collection A, Site 2 UID Root End = .2
- Collection B, Site 1 UID Root End = .3
- Collection B, Site 2 UID Root End = .4
- Collection A, Site 1 UID Root = 555.1
- Collection A, Site 2 UID Root = 555.2
- Collection B, Site 1 UID Root = 555.3
Collection B, Site 2 UID Root = 555.4
Other fields can also be configured. For more information about the configuration and operation, see the CTP DICOM Anonymizer documentation
.Multiexcerpt include MultiExcerptName ExitDisclaimer nopanel true PageWithExcerpt wikicontent:Exit Disclaimer to Include Info title Anonymization baseline The current CTP client contains a WG 18 WG18 S142-compliant anonymization baseline. For more information about the Working Group 18, Supplement 142 profile, see Incorporation of DICOM WG18 Supplement 142 into CTP.
...
Once the CTP Server receives the images, it extracts all the attributes/information related to the images and uploads the data, together with the images(URI) into the NBIA database.
Use the View Submission Reports tool within NBIA to ensure the images were successfully added to the database and file system. The View Submission Reports tool requires the “VIEW_SUBMISSION_REPORT” role in the User Authorization Tool.
...