Page History
...
Manage Array Designs Screen with Import a New Array Design Link
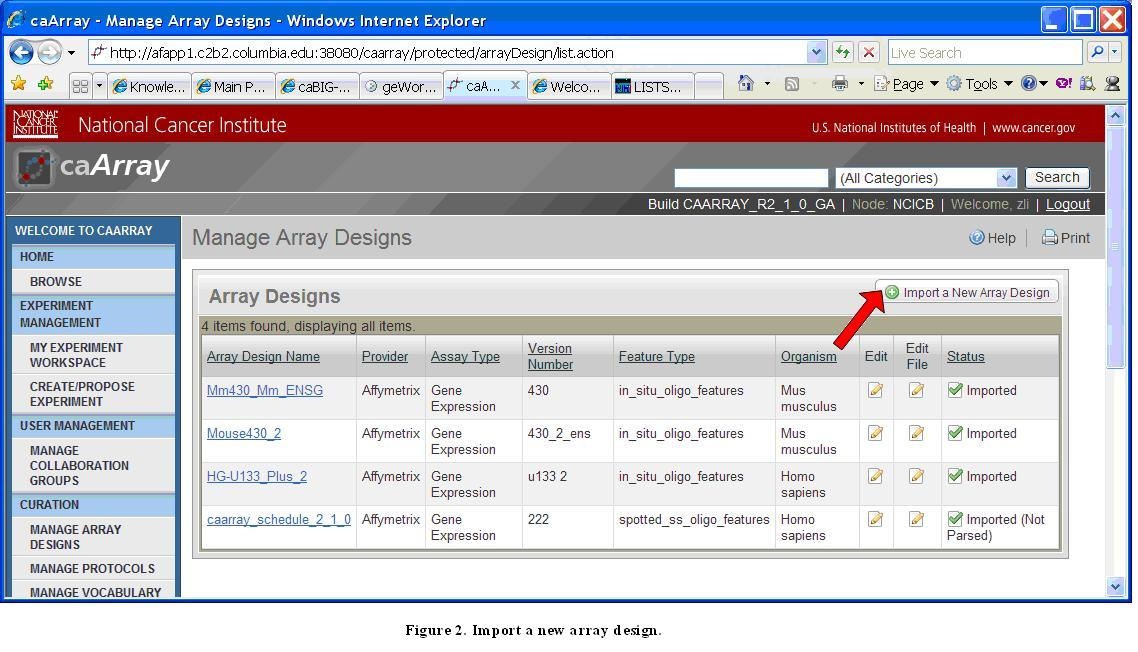
Otherwise, the user should click the "Import a New Array Design" link as shown in the preceding image, and follow the process described in the diagram below to import an Array Design File (only a registered user can import an Array Design File).
...
Diagram of Process Flow to Import a MAGE-TAB File
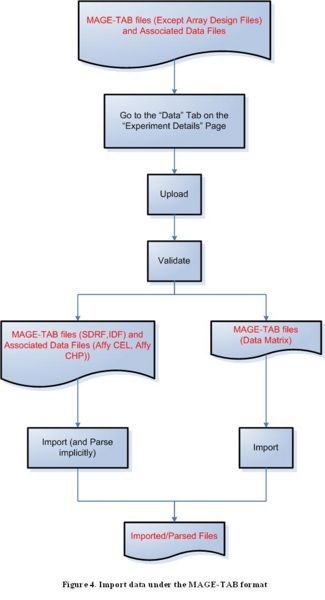
To import a MAGE-TAB file, first click on the ‘Data’ tab on the ‘Experiment Details’ page, then proceed to upload and validate the file you wish to import. The following MAGE-TAB file formats can be both imported and parsed by caArray: SDRF and IDF, along with their associated data files (Affymetrix CEL and CHP). MAGE-TAB data matrix file formats can be imported, but not parsed.
Step 3B: Import experimental data using the Affymetrix platform
...
Diagram of Process Flow to Import an Affymetrix DAT File
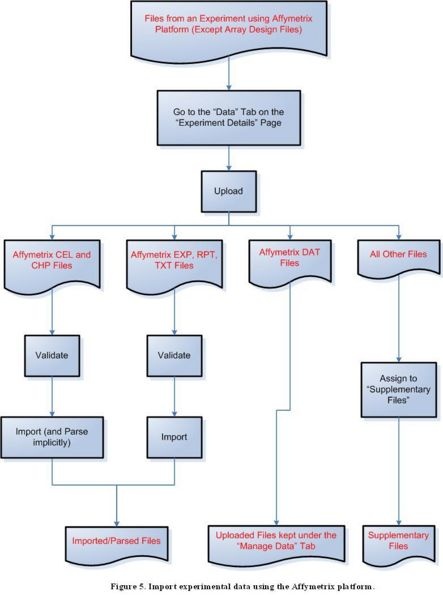
To import files containing experimental data from the Affymetrix platform, first click on the ‘Data’ tab on the ‘Experiment Details’ page, then proceed to upload the file. For a CEL or CHP file, the next step is to validate the file, then to import and implicitly parse it. For an EXP, RPT, or TXT file, the next step is to validate the file, then to import it. DAT files should not be validated or imported, and should instead be kept under the ‘Manage Data’ tab; all other file formats should be assigned to the ‘Supplementary Files’ category.
Step 3C: Import experimental data using the Illumina platform
Diagram of Process Flow to Import an Illumina Data File
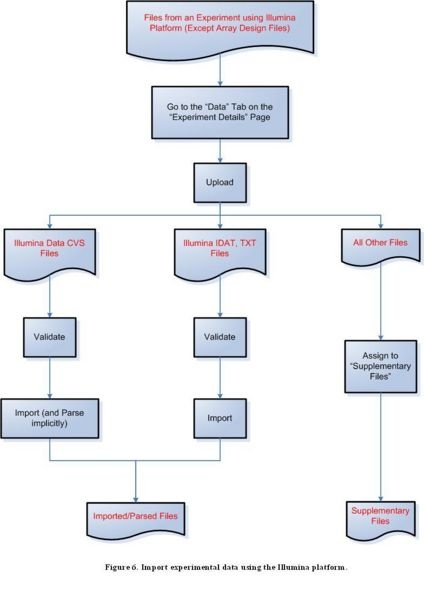
To import files containing experimental data from the Illumina platform, first click on the ‘Data’ tab on the ‘Experiment Details’ page, then proceed to upload the file. For a Data CVS file, the next step is to validate the file, then to import and implicitly parse it. For an IDAT or TXT file, the next step is to validate the file, then to import it. All other file formats should be assigned to the ‘Supplementary Files’ category.
Step 3D: Import experimental data using the Genepix platform
Diagram of Process Flow to Import a Genepix Data File
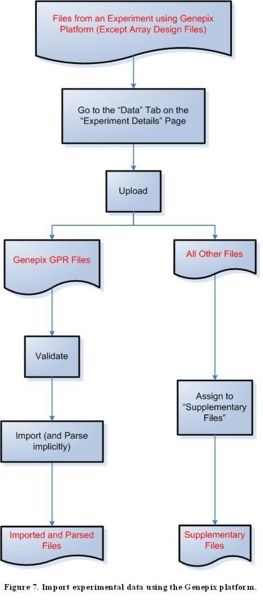
To import files containing experimental data from the Genepix platform, first click on the ‘Data’ tab on the ‘Experiment Details’ page, then proceed to upload the file. For a GPR file, the next step is to validate the file, then to import and implicitly parse it. All other file formats should be assigned to the ‘Supplementary Files’ category.
Step 3E: Import experimental data using the Agilent platform
...
Diagram of Process Flow to Import an Agilent Data File
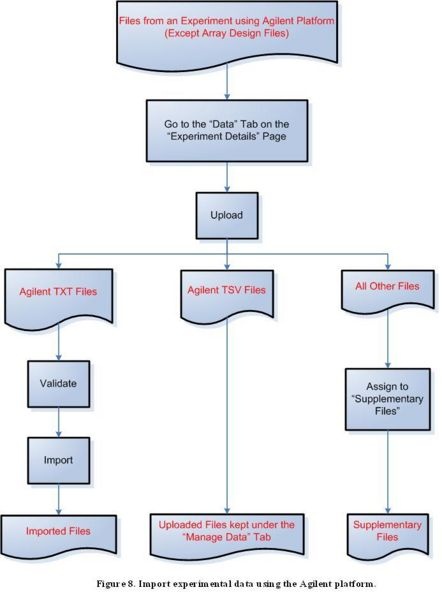
To import files containing experimental data from the Agilent platform, first click on the ‘Data’ tab on the ‘Experiment Details’ page, then proceed to upload the file. For a TXT file, the next step is to validate the file, then to import it. TSV files should not be validated or imported, and should instead be kept under the ‘Manage Data’ tab. All other file formats should be assigned to the ‘Supplementary Files’ category.
Step 3F: Import experimental data using the ImaGene platform
...
Diagram of Process Flow to Import an ImaGene Data File
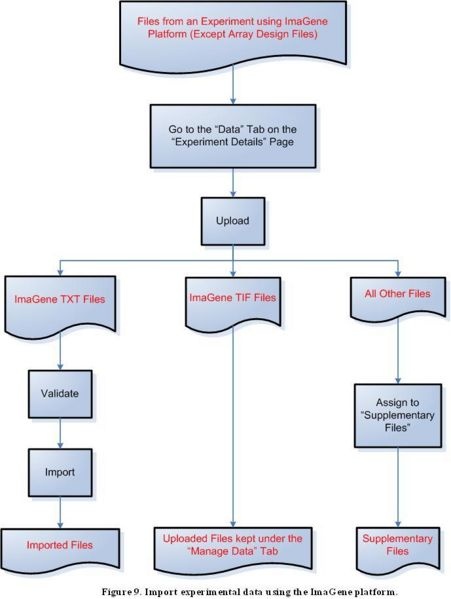
To import files containing experimental data from the ImaGene platform, first click on the ‘Data’ tab on the ‘Experiment Details’ page, then proceed to upload the file. For a TXT file, the next step is to validate the file, then to import it. TIF files should not be validated or imported, and should instead be kept under the ‘Manage Data’ tab. All other file formats should be assigned to the ‘Supplementary Files’ category.
Step 3G: Import experimental data using the Nimblegen platform
Diagram of Process Flow to Import a Nimblegen Data File
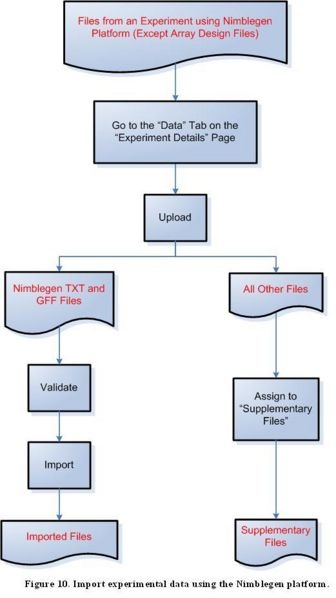
To import files containing experimental data from the Nimblegen platform, first click on the ‘Data’ tab on the ‘Experiment Details’ page, then proceed to upload the file. For a TXT or GFF file, the next step is to validate the file, then to import it. All other file formats should be assigned to the ‘Supplementary Files’ category.
Have a comment?
Please leave your comment in the caArray End User Forum.
...