Page History
| Wiki Markup |
|---|
{scrollbar:icons=false}

h1. { |
| Page info |
|---|
...
|
4.5.
...
Your
...
mapping
...
CSV
...
file
...
must
...
map
...
the
...
subject
...
IDs
...
in
...
your
...
annotations
...
to
...
the
...
sample
...
IDs
...
in
...
the
...
unmapped
...
samples
...
list.
...
A
...
screenshot
...
of
...
the
...
mapping
...
file
...
used
...
in
...
this
...
tutorial,
...
taken
...
from
...
a
...
Microsoft
...
Excel
...
2007
...
window,
...
is
...
shown
...
below.
...
The
...
file
...
is
...
a
...
table
...
of
...
two
...
columns
...
with
...
no
...
headings;
...
the
...
first
...
column
...
contains
...
IDs
...
of
...
the
...
subjects
...
from
...
the
...
annotation
...
source
...
and
...
the
...
second
...
column
...
contains
...
IDs
...
from
...
the
...
unmapped
...
samples
...
list.
...
Each
...
subject
...
in
...
the
...
left
...
column
...
corresponds
...
to
...
the
...
sample
...
in
...
the
...
right
...
column.
...
Note
...
that
...
the
...
file
...
doesn't
...
map
...
every
...
single
...
sample
...
ID
...
from
...
the
...
data source.
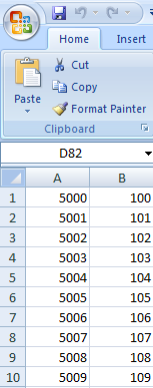
This CSV file maps the subject IDs from our annotation source (left column) to the sample IDs in our genomic source (right column).
To add your mapping CSV file to the study, click on the 'Choose File' button next to the 'Subject to Sample Mapping File' label.
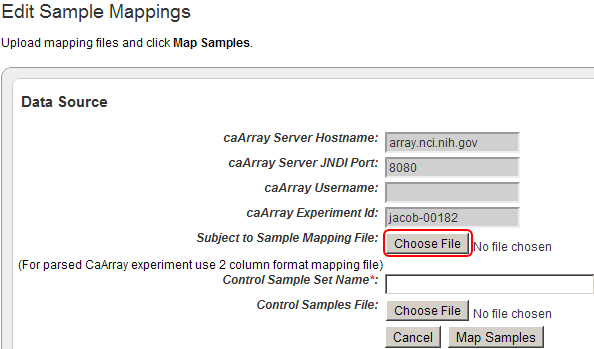
Click on the ‘Choose File’ button (highlighted in red) to choose a mapping file to open.
| Wiki Markup |
|---|
 source.

!worddavc7f18ff65f96d429f717b188a2f43d64.png|height=388,width=153,alt="screenshot illustrating step"!

_This CSV file maps the subject IDs from our annotation source (left column) to the sample IDs in our genomic source (right column)._

To add your mapping CSV file to the study, click on the 'Choose File' button next to the 'Subject to Sample Mapping File' label.

!step27.png|border=1,alt="screenshot illustrating step"!
_Click on the ‘Choose File’ button (highlighted in red) to choose a mapping file to open._

{scrollbar:icons=false} |