Page History
...
Welcome to the caIntegrator 1.4 Local Installation Guide. Topics in this document include:
| Table of Contents | ||
|---|---|---|
|
Introduction
This caIntegrator v.1.4 Installation Guide provides you with the instructions to install and configure a fresh caIntegrator v.1.4 application. The caIntegrator installation installs and configures a JBoss application server and creates a caIntegrator-specific schema within a pre-existing database on a preinstalled MySQL server.
...
- Downloading and installing required software
- Setting environment variables
- Downloading caIntegrator v.1.4 distribution files
- Installing
- GUI Installer Method
- Command-Line Method
- Configuring JBoss servers and MySQL server to run as a service
- Post-Installation Tasks
- Using UPT to Add caIntegrator Users
...
- As the root user, enter the following in the
/etc/profilefile. A PATH variable should already be created in this file, so be sure to define the JAVA_HOME and ANT_HOME export before the PATH export. Replace<some_path>with the correct path fragment for Java and Ant installations.
export JAVA_HOME=<some_path>/jdk1.6.0_31
export ANT_HOME=<some_path>/apache-ant-1.8.2;
export PATH=$JAVA_HOME/bin:$ANT_HOME/bin:$PATH - Log out and log back in so that the system recognizes your changes.
...
- From the command line, enter:
echo $JAVA_HOME
echo $ANT_HOME
Both of these commands should return the location where you installed these tools. - To verify your Java SDK installation, enter
java --versionfrom a command prompt. You should seejava version "1.6.0_31". - To verify your Ant installation, enter:
ant --versionfrom a command prompt. You should see:Apache Ant version 1.8.2
Windows
To set the environmental variables in Windows, follow these steps:
...
- From the command line, enter:
echo %JAVA_HOME%*
echo %ANT_HOME%*
Both of these commands should return the location where you installed these tools. - To verify your Java SDK installation, enter
java --versionfrom a command prompt. You should seejava version "1.6.0_31". To verify your Ant installation, enter
ant --versionInfo title Other environment variables Environment variables for caIntegrator and, optionally, UPT are modified and set in those sections of this document: #Installing a New caIntegrator v.1.4 and #Downloading and Installing UPT (Optional).
...
To download and install MySQL, follow the steps outlined on the MySQL website
| Wiki Markup |
|---|
{multi-excerpt-include:wikicontent:Exit Disclaimer to Include|name=ExitDisclaimer|nopanel=true} |
.
| Tip | ||||
|---|---|---|---|---|
| ||||
You should consult the following three links to successfully set up secure and well-performing MySQL servers, in preparation for installing caIntegrator:
|
| Tip | ||
|---|---|---|
| ||
|
...
In each *.properties file, any property value marked with uppercase REPLACE_* must be manually updated with the appropriate value.
- In each
*.propertiesfile, any property value marked with lowercasereplace_*may be optionally updated with the appropriate value. - If there is reference to a
database.system.userfor your MySQL server, you can determine which users have full privileges to create and manage other databases, by executing show grants from a MySQL prompt to determine the correct level of privileges.
...
- #Downloading caIntegrator v.1.4 Files
- #Installing a New caIntegrator v.1.4
- #Configuring JBoss
- caIntegrator 1.4 Local Installation GuidePost-Installation Tasks
...
- For a new command-line installer or command-line upgrade installer, download the
caintegrator2-install-1.4.zipfile (around 165MB). - For a GUI installer that you can use to do a fresh caIntegrator installation, download the
caintegrator2_gui_distribution_1.4.jar-201207171753.jarfile (about 190 MB).
Remember the download location, as you will be using this file to run the installation in the steps that follow.
| Tip | ||
|---|---|---|
| ||
These server components are installed and configured as part of the caIntegrator v.1.4 installation. You do not need to do anything further to download or install these components.
|
...
- A GUI Installation wizard. Instructions for this method start in the following section.
- A command-line installation. For instructions, see Command-Line Method of Installation caIntegrator 1.4 Local Installation Guide.
GUI Installer Method of Installation
...
- Open a command prompt in the directory where you downloaded the
caintegrator2_gui_distribution_1.4.jar-201207171753.jar. Enter this command to invoke the GUI installer:java --jar caintegrator2_gui_distribution_1.4.jar-201207171753.jar. - The Installation Wizard opens to facilitate the installation process. Click Next to proceed through the pages of the wizard, beginning with progressing past the Welcome page.
- Review the release notes.
- You must accept the license agreement.
- Select the Install installation type. For a new installation, select Install.
- Select Browse to navigate to the directory where you would like to install caIntegrator. The directory then displays in the text box. If the folder does not yet exist, click OK in the dialog box to indicate that you want the folder to be created.
- Select the type of installation you would like to perform. You can install everything, or just specific components (JBoss or Database only). The remaining sections in this guide assumes you chose to install everything.
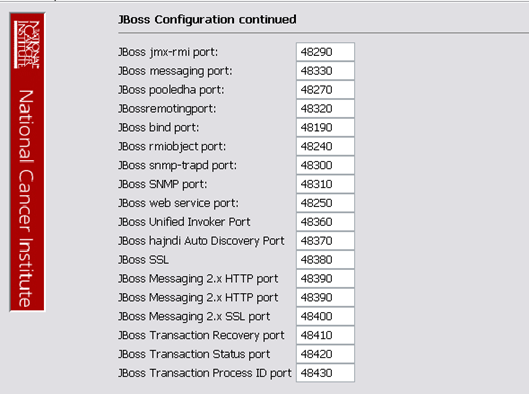
- Continue walking through the pages of the installer. Configure the caIntegrator JBoss server on the next two pages of the installation wizard. The screen shots show example values. The port values which are specified are the defaults and can be used unless you want to reconfigure the values because of values already in use.
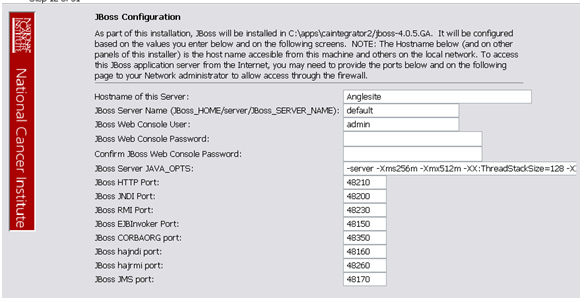
- JBoss Installation Options
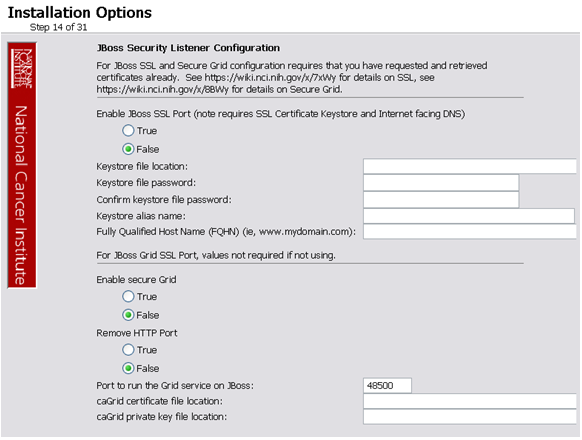
- JBoss SSL requires that you have requested and retrieved certificates already. If this does not apply to your installation, leave the values as false and continue.
- If your JBoss is externally accessible then fill out the JBoss External Hostname Configuration page. Otherwise, leave it blank and continue.
- For a standard installation of caIntegrator, do not use SSO.
- Specify the authentication type that caIntegrator should use. Database is the most likely choice if you aren't sure what to select here.
- If you selected LDAP in the previous step (authentication type), enter the appropriate configuration information for LDAP: the LDAP URL and the LDAP Search Back DN.
- If the authentication type is database, specify the following data base configuration information:
- The Database Host Name
- The Database Port Example: 3306
- Database name of the pre-existing database where the caIntegrator schema will be installed
- The pre-existing Database Application User to be used by caIntegrator to connect to its database.
Error messages inform you if the following occurs:- If the specified database host cannot be reached, or the field is blank.
- If the specified database does not already exist, or the caIntegrator DB user's credentials are wrong.
- Specify SMTP mail server connection information so that caIntegrator can send emails from users with new account requests. You must provide the following
- Mail Server Host Example:
localhost - Mail Server Port Number Example:
25 - Mail Server Authentication: default is false.
- Mail Server starttls: default is false.
- Mail Server Host Example:
- If jar signing is necessary for the installation, then enable it on the Jar Signing Configuration page. This step is optional and can be skipped.
- Review the summary of the information you entered.
- Review the selected installation type and the installation destination.
After you click Next from reviewing the installation destination, the installer runs. The installation wizard displays the installation progress and completion. - When you are informed that the process is finished, click Done in the lower right corner of the wizard to close the installer.
- To verify caIntegrator installation:
- Open your web browser to installed instance. The URL follows this format: http://<jboss.server.hostname>:<jboss.server.port>/caintegrator/workspace.action.
- Enter ncimanager as the user and changeme as the password. Refer to the
<user home>/.installer-caintegrator/caintegrator_installer/install.propertiesfile for the correct values.
- After successfully installing caIntegrator, make a backup of the
<user home>/.installer-caintegrator/caintegrator_installer/install.propertiesfile in a different directory for future reference.
...
- From the directory where you downloaded the
caintegrator2-install-1.4.zipdescribed in [#Downloading caIntegrator v.1.4 Files, unzip the Files, using one of these two methods:- Open a command prompt and use it to extract this file to a temporary location. For example, you may enter a command such as
unzip -q caintegrator2-install-1.4.zip. You must have a ZIP tool installed. This location will be referred to as the<installer_directory>henceforth. Use WinZip or a similar utility to unzip the files to a temporary location. This location will be referred to as the
<installer_directory>henceforth.
Example:<installer directory>=C:\caIntegrator_installerInfo title About setting property values Setting the property values is an important step in the installation process. Before you complete steps 2 & 3, review #Working with Properties Files.
- Open a command prompt and use it to extract this file to a temporary location. For example, you may enter a command such as
- Open the
<installer_directory>/install.propertiesfile, modify the values for your environment and save the file. For the latest details about configuring the properties for your environment, refer to the BDA Properties wiki page. Record the property values you have set.
Info title Other default values You should not need to modify the other default values as we have chosen unique ports to reduce the risk of other applications using the same values. However, be sure to verify that the ports in this file are not being used by other applications.
- From the command line, navigate to
<installer_directory>/(Example:cd C:\caIntegrator_2_0_installer), and typeant. This initiates the installation process. The anticipated duration is anywhere from 1-15 minutes, depending on your system's speed, power and memory.
The installer installs the caIntegrator schema in the specified pre-existing database on your MySQL server, and installs, configures, and starts the JBoss server for the caIntegrator application. - To verify caIntegrator installation, open your web browser to the installed instance. The URL follows this format: http://<jboss.server.hostname>:<jboss.server.port>/caintegrator/workspace.action.
Refer to the<installer_directory>/install.propertiesfile for the correct values. Enter manager as the user and manager as the password. - After successfully installing caIntegrator, make a backup of the
<installer_directory>/install.propertiesfile in a different directory for future reference.
...
| Note | ||
|---|---|---|
| ||
|
...
The directions in this section presume that you have a valid and functioning caIntegrator 1.3. It also assumes that Java SDK, Apache Ant and MySQL have all been successfully uploaded and installed, as described on pages Required Software--Not Included in caIntegrator caIntegrator 1.4 Local Installation Guide.
Overview of Properties Files
When you installed the previous version of caIntegrator 1.3, you configured the install.properties file. To complete the upgrade to caIntegrator 1.4, you must use some of the values from the original install.properties to configure values in the installer wizard GUI.
See steps 3 & 4 in #Upgrading caIntegrator Using the Command-Line Installer for more information.
Upgrading caIntegrator Using the GUI Installer
...
- Because of the upgrade from JBOSS4 to JBOSS5 in the caIntegrator 1.4 release, two GUI installer invocations are required. The first will install the new JBOSS5 in the same directory as the existing JBOSS4 and the second will update the database.
- Open the install.properties file for the existing 1.3 installation located at
<user home>/.installer-caintegrator/caintegrator_installer/install.propertiesand save it asinstall.properties_v1.3to your desktop for reference during the upgrade. - Open a command prompt in the directory where you downloaded the
caintegrator2_gui_distribution_1.4.jar-201207171753.jarand invoke the GUI installer using this:java --jar caintegrator2_gui_distribution_1.4.jar-201207171753.jar. - The Installation Wizard opens to facilitate the installation process. Click Next to proceed through the pages of the wizard, beginning with progressing past the Welcome page.
- Review the release notes.
- You must accept the license agreement to continue.
- Select the Install installation type in step #4.
- Select JBoss in step #6.
- Configure the JBoss Server-related settings.
- Specify the authentication type that caIntegrator is using. If you choose LDAP, configure the LDAP information: the LDAP Host Name, the LDAP Search Base, and the LDAP Search Prefix. An example of the Host Name is
ldaps://myldaphost.mydomain.com:636. - Review the summary of gathered information.
- Click Next to proceed through the next two pages.
- After you click Next from reviewing the installation destination, the installer runs. The installation wizard displays the installation progress and completion.
- When you are informed that the process is finished, click Done in the lower right corner to close the installation wizard.
- At this point if you open your web browser to the installed instance you will see a MYSQLGrammerException error displayed.
- Before invoking the GUI installer again, stop the server.
- Open a command prompt in the directory where you downloaded the
caintegrator2_gui_distribution_1.4.jar-201207171753.jarand invoke the GUI installer using this:java --jar caintegrator2_gui_distribution_1.4.jar-201207171753.jar. - The Installation Wizard opens to facilitate the installation process. Click Next to proceed through the pages of the wizard, beginning with progressing past the Welcome page.
- You must accept the license agreement to continue.
- Select the Upgrade installation type in step #4.
- Select Everything in step #6.
- Configure the JBoss Server-related settings.
- Specify the authentication type that caIntegrator is using. If you choose LDAP, configure the LDAP information: the LDAP Host Name, the LDAP Search Base, and the LDAP Search Prefix. An example of the Host Name is
ldaps://myldaphost.mydomain.com:636. - Review the summary of gathered information.Review the selected upgrade installation type and the upgrade destination.
- Click Next to proceed through the next two pages.
- After you click Next from reviewing the installation destination, the installer runs. The installation wizard displays the installation progress and completion.
- To verify the caIntegrator installation, open your web browser to the installed instance. The URL follows this format: http://<jboss.server.hostname>:<jboss.server.port>/caintegrator. Example: http://hostname:47210/caintegrator and enter ncimanager as the user and changeme as the password. Refer to the original
install.propertiesfor the correctjboss.server.hostnameandjboss.server.portvalues. - Once the update is verified you can delete the JBOSS4 directory.
...
- Because of the upgrade from JBOSS4 to JBOSS5 in the caIntegrator 1.4 release, two ant commands are required. The first will install the new JBOSS5 in the same directory as the existing JBOSS4 and the second will update the database.
- Open the install.properties file found in the application.base.path directory and save it to your desktop as
install.properties.v1.3.1for reference during the upgrade. - Delete the
caintegrator2-install-1.3.1.zipfile from its directory such as the application.base.path directory. - Download
caintegrator2-install-1.4.zipto the directory where the previous install zip file was such as the application.base.path directory. From the directory where you downloaded the install zip file, extract the files, using one of these two methods:- Open a command prompt and use it to extract this file. For example, you may enter a command such as
unzip -q caintegrator2-install-1.4.zip. You must have a ZIP tool installed. - Use WinZip or a similar utility to unzip the files.
- Open a command prompt and use it to extract this file. For example, you may enter a command such as
- When asked if you would like to replace the existing files, respond All.
- Open the
install.propertiesfile and replace allREPLACE_VALUEproperties with the values in theinstall.properties.v1.3.1file. Before doing so, review #Working with Properties Files.
For the latest details about configuring the properties for your updated environment, refer to the BDA Properties page. - In the
DATABASE SETTINGSsection of theinstall.propertiesfile replacedatabase.re-create=truewithdatabase.re-create=false. In theDATABASE SETTINGSsection of theinstall.propertiesfile add the property and valueexclude.database=true. Save this file to your desktop as
install.properties.v1.4step1. Save this file to your desktop a second time, this time asinstall.properties. Upload theinstall.propertiesfile to the application.base.path directory.Info title Modifying property values You shouldn't need to modify the other default values as we have chosen unique ports to reduce the risk of other applications using the same values. However, be sure to check the
*.propertiesfile to verify that the ports in this file are not being used by other applications.- From the command line, navigate to the directory where you unzipped the installer file and type ant. This is the first of two ant commands. The anticipated duration is anywhere 1-15 minutes depending on your system's speed, power and memory.
- When the installer detects that a database exists, it warns you to back it up, which you were instructed to do earlier in this process. Press Y to proceed.
- If you open the application now in a browser window you will see a MYSQLGrammerException error.
- Stop the server.
- Open the
install.propertiesfile and revertdatabase.re-create=falseback todatabase.re-create=true. Delete the property and valueexclude.database=true. - Save this file to your desktop as
install.properties.v1.4step2. Save this file to your desktop a second time, this time asinstall.properties. Upload theinstall.propertiesfile to the application.base.path directory. - From the command line, navigate to the directory where you unzipped the installer file and type ant upgrade:database.
- Restart the server.
- To verify caIntegrator installation, open your web browser to the installed instance. The URL follows this format: http://<jboss.server.hostname>:<jboss.server.port>/caintegrator /workspace.action. Example: http://hostname:47210/caintegrator/workspace.action and enter ncimanager as the user and changeme as the password. Refer to the original install.properties for the correct
jboss.server.hostnameandjboss.server.portvalues. - Once the update is verified you can delete the JBOSS4 directory.
...
To configure JBoss in Windows, follow these steps.
Modify the following entry to the JBoss run.bat file which is located at
<application_root_directory>/jboss-5.1.0.GA-nci/bin/run.bat. Find the line that begins withset JAVA_OPTS= -Dbda=bda -Dprogram.name=%PROGNAME% -serverand modify the"-Xms256m -Xmx512m"to read"-Xms4096m -Xmx4096m".Info title Physical memory If 4096m is higher than the physical memory on the machine, then performance could be severely impacted with performance degradation and errors. 4096m of physical memory is recommended.
Warning title Warning Be careful when copying and pasting from this installation guide. No spaces must come before and after the columns. A safe way to ensure that the text has no unwanted space and unwanted characters is to copy the text into a blank text editor such as NotePad first. Then you can correct the spacing and copy-paste back into the run.bat file.
Restart your JBoss 5.1.0 server for the changes to take effect. The method of doing this may depend on the start/stop/restart scripts you created after the installation. Most commonly, you can execute shutdown.bat and then
run.batunder$JBOSS_HOME/bin. Refer to the publicly available JBoss user's guideWiki Markup {multi-excerpt-include:wikicontent:Exit Disclaimer to Include|name=ExitDisclaimer|nopanel=true}for more information.
Configuring JBoss Servers and MySQL Server to Run as Services
| Info | ||
|---|---|---|
| ||
MySQL and the JBoss server that make up caIntegrator, and the JBoss server optionally installed for UPT, must run continually as services. The instructions in this section cover all of these scenarios. For a caIntegrator deployment, there are at least three servers, and if UPT is installed, four servers:
|
Running JBoss as a Service
...
See http://wiki.jboss.org/wiki/Wiki.jsp?page=StartJBossOnBootWithLinux
| Wiki Markup |
|---|
{multi-excerpt-include:wikicontent:Exit Disclaimer to Include|name=ExitDisclaimer|nopanel=true} |
.
Windows
To run an existing JBoss command line installation as a service, follow the directions for creating a user-defined service at http://support.microsoft.com/kb/137890/EN-US/. You need to have access to the Windows Resource Kit.
Running MySQL as a Service
...
| Wiki Markup |
|---|
{multi-excerpt-include:wikicontent:Exit Disclaimer to Include|name=ExitDisclaimer|nopanel=true} |
.
Windows
When installing MySQL server on Windows, choose the option to run MySQL as a Windows service.
...