Page History
| Include Page | caIntegrator:Document Disclaimer | caIntegrator:Document Disclaimer |
|---|---|---|
| Scrollbar | ||
|
| Page info | ||||
|---|---|---|---|---|
|
| Column |
|---|
| Section |
|---|
This section chapter introduces general caIntegrator procedures and how to obtain help to use caIntegrator.
Topics in this chaptersection chapter include:
...
| Table of Contents |
|---|
...
|
About caIntegrator
NCI , Center for Biomedical informatics Informatics and Information Technology (CBIIT) is developing a novel translational informatics platform called Anchor
caIntegrator is a web based or locally installed portal that allows researchers and study managers to access the biomedical informatics infrastructure and data analysis tools established by caIntegrator from one common software platform. As a caIntegrator user, you can perform the following tasks:
- Integrate subject annotation data with genomic and/or imaging data
- Import data of various types in a predefined flat format, and create new studies with multiple study data
- Update an existing study to add new attributes or to add/modify data
- Perform analyses on study data
Registering as a New caIntegrator User
To request a caIntegrator usercaIntegrator:requesting user account; account, requesting new user;registering new user account, you must register as a new user, completing the following steps:
- Go to the CBIIT caIntegrator login page or use the URL provided by your System Administrator for the caIntegrator instance at your institution.
- Click the Register Now hypertext link, under the caIntegrator login section in the upper left lower center of the page. This opens the account registration form ().
- New user account registration form
Enter the appropriate information. Fields
In the Register form, enter the appropriate informationItemswith an asterisk
or highlightare required
..
Security Information
...
Entry
...
Do
...
you
...
have
...
an
...
LDAP account?
An LDAP
...
account
...
is a
...
user
...
profile
...
you may have with
...
your
...
institution
...
or CBIIT. If you answer Yes, enter your username and
...
password
...
. This allows caIntegrator to verify that your credentials are correct.
If caIntegrator does not validate your LDAP profile, you are asked to reenter your credentials. You can choose to answer No. In this case, the System Administrator will manually ensure that you
...
do not get a duplicate LDAP account during provisioning. You can
...
then cancel the action or talk with your System Administrator about the problem.
...
If
...
you
...
select
...
No (you do not have an LDAP account), the text boxes for entering the LDAP account information disappear. You must indicate the role you would like to be assigned in caIntegrator, and continue entering the appropriate information in the Account Details section.
Info title Not logged in? After you submit your registration request, you can continue to use caIntegrator without an account to browse and search available data while your account is verified and activated.
Username
Enter your LDAP user name.
LDAP Password
Enter your password. Your password is case-sensitive.
Requested role(s)Anchor caIntegratorRoles caIntegratorRoles Select one or more of the roles, described in this table:
.Include Page caIntegrator roles caIntegrator roles - Enter your account details. Field names followed by asterisks are required.
- Click Submit Registration Request. Click Cancel to terminate the registration. A Registration Request confirmation page appears if you submit the request.
The registration workflow continues as follows.
- The caIntegrator system administrator receives
...
Role
...
Description
...
Permissible Actions
...
Study Manager
...
Creates, owns and manages studies
...
Configures and deploys studies
Assign annotations to studies
Edits studies
Search studies
Perform analyses on study data
...
Study Investigator
...
Investigates and queries the study data
...
Query study data
Save queries
Analyze using K-M Plot
Analyze using Gene Expression Plots
Analyze using GenePattern
...
...
Wiki Markup \[jpm\] study manager configures and deploys the study, adds or removes study data. Study Investigator - queries the study after the study manager deploys it.
- Account Details
- First Name{}*
- Last Name{}*
Wiki Markup *Email \[address\]{*}<span style="color: #ff0000">{<strong>}</strong>*</span>- Organization{}*
Wiki Markup *Address \[Lines 1{*}<span style="color: #ff0000">{<strong>}</strong>*</span> *and 2\}*- City{}*
- State{}*
- Country{}*
Wiki Markup *Postal \[or Zip\] Code{*}<span style="color: #ff0000">{<strong>}</strong>*</span>- Phone{}*
- Fax
- Click Submit Registration Request to execute the request, or click Cancel to abort the registration.
After registration is sent, the screen displays a confirmation message.
...
- an email containing all of the information you specified in the new user request form
...
- .
- An account request confirmation email is also sent to you, the prospective user, at your specified email address.
...
- The system administrator
...
- creates your user account and
...
- sends you an email verification.
You can log in to caIntegrator.
Info title While your account is activated Once you register, you can continue to use caIntegrator without an account to browse and search publicly available data and download data while your account is being activated.
When your account is registered, the user ID UserID and password you are assigned determine determines your access rights for the softwarefor the data in the system. Access rights include roles for the application as well as instance level security; they are provisioned to your account by the system administrator.
For information about administering user accounts, see 7 - Administering User Accounts.
Welcome to the caIntegrator Workspace
The caIntegrator :workspacecaIntegrator:using workspacecaIntegrator Welcome workspace enables quick access to all caIntegrator functions and information before and after you login. The Welcome page also displays after you log in, before you open any studies ().
| Anchor |
|---|
...
|
...
|
- Without logging in, you can browse any public studies. To do so, select from the drop-down list of
...
- Public Studies in the upper
...
- center of your browser
...
- .
...
- Use the customary steps to log into caIntegrator
...
- . If your login is successful, the Welcome to Browse/Study page appears.
| Info | ||
|---|---|---|
| ||
If your local installation of caIntegrator is configured with single sign-on, when you click the login button, you are redirected to the single sign-on login page hosted by a separate SSO server. Once you enter your credentials there, you are logged into both caIntegrator and caArray. You can navigate between the two applications without being challenged to provide login credentials again.
|
caIntegrator Functions
...
To access caIntegrator functions, use the options listed on the left sidebar of the workspace .
caIntegrator Functions
Once a study is created, its caIntegrator sidebar on the left side of the page. The following table describes each caIntegrator option in the workspace ()and described in the following table.
Sidebar Option | Function | <ac:structured-macro ac:name="unmigrated-wiki-markup" ac:schema-version="1" ac:macro-id="6588431f-8218-45cb-9405-af83b609303a"><ac:plain-text-body><![CDATA[|
|---|---|---|
[Study Name] | When you log in, one study displays in the left sidebar by default. Any study that you select in the My Studies drop-down list in the upper right of the page replaces this default selection.]]></ac:plain-text-body></ac:structured-macro> | |
Home | Click this to return to the home page for the selected study. | |
<ac:structured-macro ac:name="unmigrated-wiki-markup" ac:schema-version="1" ac:macro-id="eb8b81ed-6ddc-4651-a28f-a71045b911e2"><ac:plain-text-body><![CDATA[ | Search [Study Name] | Click this option to open the Search [Study Name] page from which you can launch queries into your selected study. For more information, see .]]></ac:plain-text-body></ac:structured-macro> 4 - Searching a caIntegrator Study. |
Study Data | Click Saved Queries > My Queries to open the list of previous queries you saved. Click any item in the list to open the saved query, which displays on the Criteria, Columns and Sorting tabs. From those tabs, you can modify criteria and/or launch the query again. For more information, see on page 62 Saving a Query. | |
Analysis Tools | Click any of the listed options to open a page where you can launch an analysis of the data in the selected study.
| |
Study Management | Click either of the listed options to manage the selected study through editing or deleting it or by creating a new study.
| |
Application Management | Click Manage Platforms to identify, add or remove platforms that caIntegrator supports. For more information, see on page 47 Managing Platforms. | |
caIntegrator Menu |
| |
Help | Click the Help icon at the top of each page to open a context-sensitive topic. The help page displays information (from this user's guide) that corresponds to the page from which help was opened. |
In the My Studies drop-down list in the upper right of the page, select the study you want to use for your current session. (The list includes all studies to which you are subscribed as well as public studies.) As you do so, the following left sidebar contents change to reflect options relevant to your study selection:
- the logo for the selected study (if it exists)
- the name for the selected study
- the list of saved queries and/or saved lists for that study
Viewing Existing Studies
- If you have not logged into caIntegrator, you can view any public studies in your browser.
- After logging in, you can view existing studies for which you have been granted permission as well as public studies. In the upper right corner of the page, in the My Studies drop down list, shown in the following figure, select the study you want to review or work in.
...
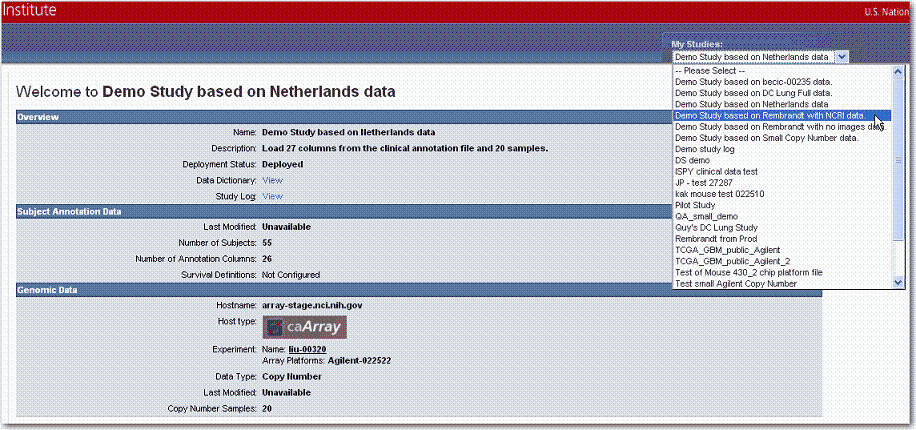
A study summary
...
The study you select opens in the browser. You can review the study data for which you have been granted permission.
After selecting the study name, in the My Studies drop-down list, a study summary should appear, including a status field should appear for the study you selected. If the status is not deployed, or if the study summary does not appear, then the study is not deployed and available for analysis.
When the annotations are uploaded during the creation of the study, each field is defined by the study manager.
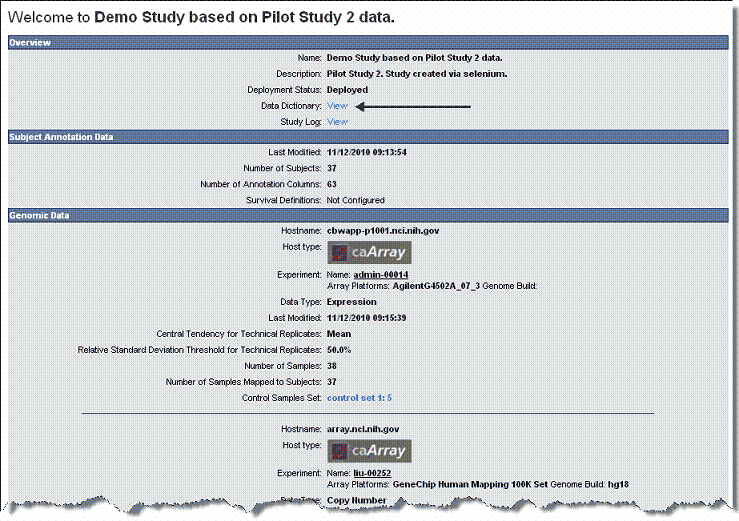
- Because in looking at the study, you may not know the meaning of all the annotations, you can open a reference page with a summary of the annotations. Click the Data Dictionary: View link on the study home page, as shown described in the following screen shotsection.
- From the study summary page, you can also open a log for the study. Click the Study Log: View link on the page to see all log entries with descriptions. See Study Log for more information.
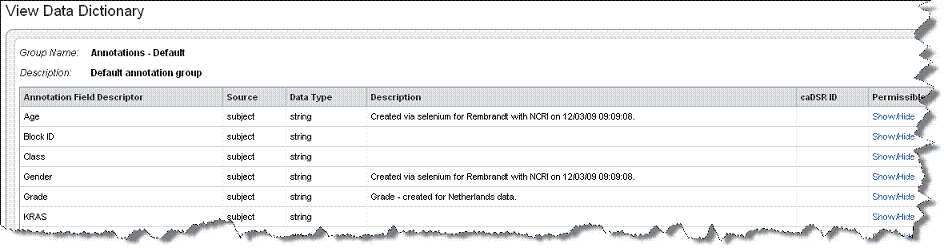
Data Dictionary
A link on a study home page, as shown by the arrow in the following screen shot, opens a data dictionary summary.
The Data Dictionary consists of a table that table, shown in the following figure, clarifies all annotations used in the study. It displays their field descriptors, descriptions, caDSR identifiers (if used), caDSR IDs and definitions, data type, and permissible settings, shown in the following figure. The Restrictions column indicates whether or not masks have been applied to numeric data in the study. For more information, see on page 23..
...
Assigning an Identifier or Annotation.
For more information about study details, see on page 17 Creating or Editing a Study.
Study Log
The study log which you can open by clicking the Study Log > View link on the study summary page lists the steps used to create a study. For more information, see on page 18.
...
Logging Out
To log out of caIntegrator, click the logout link in the upper right-hand corner of the page.
Using caIntegrator Online Help
The caIntegrator online help is in user's guide /online help format. It explains how to use all of the features .
To access online help, click the help icon at the top of each page to open a context-sensitive topic. Context-sensitive help displays information that corresponds to the page from which help was opened.
Logging Out
To caIntegrator:logging outlog out of caIntegrator, click the link in the upper right-hand corner of the page.
Application Support
For any general information about the application, application support or to report a bug, contact NCICB Application Support.
...
Email:
...
When submitting support requests via email, please include:
- Your contact information, including your telephone number.
- The name of the application/tool you are using
- The URL if it is a Web-based application
- A description of the problem and steps to recreate it.
- The text of any error messages you have received
...
Application Support URL
...
of the caIntegrator portal.
| Info | ||
|---|---|---|
| ||
You can open the user's guide without being logged into caIntegrator. |
To access the user's guide in caIntegrator, click the Help icon/menu options available in the upper right corner of the user interface ( ) and on the left sidebar under the caIntegrator Menu section. When you click the help icon, context sensitive topics relevant to the page open for your assistance.
Help and additional resource links remain fixed through all the user interface pages.
| Scrollbar | ||
|---|---|---|
|
...
Telephone: 301-451-4384Toll free: 888-478-4423
...