Page History
...
| Complete | How to |
|---|---|
| Characterization Type* | This is already filled in with Physico-Chemical, In Vivo, Ex Vivo, or Ex (required) when you click the tab of the same name or add one from the All tab. |
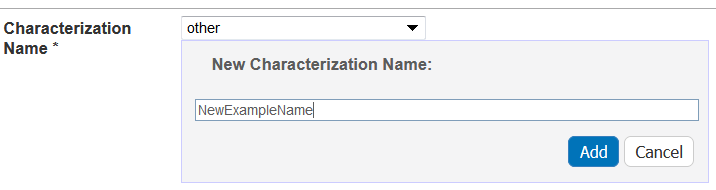
| Characterization Name* | Select the name of the characterization (required). To select an existing, non-standard Assay Type, select other_pc. To create a new, non-standard Assay Type
|
| Assay Type | Select an assay type from the list that populates automatically based on the Characterization Name. To add a new Assay Type
|
| Protocol Name – Version | If available, select a protocol from which the data is derived. If displayed, click the hyperlink to the protocol text file to open or save the file. |
| Characterization Source | Select or enter the source from which the characterization data is derived, such as a vendor or a laboratory (NCL). |
| Characterization Date | Select or enter the date the characterization was made (dd/mm/yyyy). |
Adding Findings to a Characterization
...
To perform the following tasks, you must have curator privileges.
| Info | ||
|---|---|---|
| ||
If a button described in this section does not display, you have read-only access to the data. |
...
To add results in the form of supporting documents, such as a graphic, spreadsheet or images to a characterization
- Edit the characterization.
- From the In the Finding section, next to Files, click Add.
- Upload, browse, and select the file or enter the file's URL where the document is located.
- Complete the following.
- Select the File Type (required), Document, Graph, Image, Movie, or Spreadsheet.
- Enter the File Title (required).
- Specify Keywords to associate with the file
- Enter a Description of additional information of the file.
Click Submit to add the file(s) to the sample.
| Tip |
|---|
You can add as many files as you wish. |
...
Printing a characterization
...
From the All tab's characterizations summary, click Print at the top right of the page.
...
Exporting characterizations
...
From the All tab's characterizations summary, click Export at the top right of the page.
...
Editing a characterization
...
- From the All tab's characterizations summary, click Edit at the right of the characterization section you want to change.
- The Characterization opens and you can edit it as needed.
...
Copying a characterization
...
The characterization files and/or derived data for a sample can be copied to other samples from the same primary point of contact.
- From the All tab's characterizations summary, click Edit at the right of a characterization section.
- The Characterization opens and at the bottom of the page, in the Copy to other samples... section, select one or more samples with the same primary point of contact.
- Click Also copy finding data and conditions?.
Click Submit to copy the characterization.
...
Deleting a characterization
...
| Info | ||
|---|---|---|
| ||
This deletes a characterization(s) from the selected sample. If the characterization(s) was copied to other samples, the characterization is not removed from those samples. |
To delete a characterization for a selected sample
- From the All tab's characterizations summary, click Edit at the right of a characterization section.
- The Characterization opens, and click Delete.
- The deleted characterization is placed in the sample archive for historical purposes.
Adding Findings to a Characterization
To add findings to the characterization, you can add data directly to Design and Methods by creating columns and adding data manually or you can import as many .csv files as needed. Information can include laboratory conditions, pH, or temperature. You can add as many files as you wish.
...
- Save the spreadsheet of data values to a csv (comma-separated value) file.
- Click Import csv and select and follow the prompts to add the data file to the Findings Info.

- The columns and data are added to Data and Conditions.
add findings to the characterization, you can add data directly to Design and Methods by creating columns and adding data manually or you can import as many .csv files as needed. Information can include laboratory conditions, pH, or temperature. You can add as many files as you wish.
- Add data values to Data and Conditions.
- To import a file of data values
- Save the spreadsheet of data values to a csv (comma-separated value) file.
- Click Import csv and select and follow the prompts to add the data file to the Findings Info.
- The columns and data are added to Data and Conditions.
- To add the data values manually
- Specify the number of columns and rows for the matrix, and click Update.

- Add the data values to the rows.
- Specify the number of columns and rows for the matrix, and click Update.
Info Whether you imported or added information manually, you can preface each data value with one of the following: Maintain the default, equal to (=), or select greater than (>), less than (<), or infinity (approximate).

- To import a file of data values
- To define a column, click an underlined column heading.

The Column Definition panel displays.
- Select a Column Type, Datum or Condition.
Select a Column Name or select other and add a new one.
Info title Column Notes You can add up to three cell viability Column Names, including cell viability, cell viability B, and cell viability C. You can further identify the column with the Column Value Type. For Column Type, Datum, the following characterization(s) display customized Column Name options.
Characterization Type Column Type and Column Name Option(s) Physico-Chemical - Molecular – Molecular Weight
- Purity – % purity for sample
- Relaxivity – R1, R2, T1, T2
- Size – PD1, Peak N , RMS size, Z Average
- Surface – charge, zeta potential
In Vitro Enzyme Induction – % of Control
In Vivo Click Other to name the column yourself. For Column Type, Condition, all characterizations provide the Column Name options in the left column of the following table. The Column Name autopopulates the Condition Property options in the right column.
Column Type, Condition Autopopulates Column Name Column Name Autopopulates
Condition PropertyN/A
media type, serum percentage
bandwidth, frequency, time, wavelength
N/A
lyophilized, time
time
N/A
N/A
lyophilized, time
ion concentration, ionic strength, molecular formula, osmolality, serum percentage, with serum
number of pulses, pulse duration
N/A
To further identify a column, select a Column Value Type.
Info Once the column information is saved, the Column Type is shown in parentheses after the Column Name, such as cell viability (mean). - Select a Column Value Unit, or select other and add one.
If you want the same value to fill all rows in a column, add a Constant Value.
Info title For Column Value Type, boolean For Column Value Type, boolean, enter a Constant Value of 1 for true and 0 for false. Click Save, and the column(s) are updated.
Info If needed, click Set Column Order to change the order of the column headings in the matrix.
- Click Save in the Finding section.
Characterization Tasks
To perform the following tasks, you must have curator privileges.
| Info | ||
|---|---|---|
| ||
If a button described in this section does not display, you have read-only access to the data. |
| Task | How to | ||||||||
|---|---|---|---|---|---|---|---|---|---|
| To add results in the form of supporting documents, such as a graphic, spreadsheet or images to a characterization
| ||||||||
Printing a characterization | From the All tab's characterizations summary, click Print at the top right of the page. | ||||||||
Exporting characterizations | From the All tab's characterizations summary, click Export at the top right of the page. | ||||||||
Editing a characterization |
| ||||||||
Copying a characterization | The characterization files and/or derived data for a sample can be copied to other samples from the same primary point of contact.
| ||||||||
Deleting a characterization |
To delete a characterization for a selected sample
|
...
| Info |
|---|
Whether you imported or added information manually, you can preface each data value with one of the following: Maintain the default, equal to (=), or select greater than (>), less than (<), or infinity (approximate). |
...
Select a Column Name or select other and add a new one.
| Info | ||
|---|---|---|
| ||
| You can add up to three cell viability Column Names, including cell viability, cell viability B, and cell viability C. You can further identify the column with the Column Value Type. |
For Column Type, Datum, the following characterization(s) display customized Column Name options.
...
- Molecular – Molecular Weight
- Purity – % purity for sample
- Relaxivity – R1, R2, T1, T2
- Size – PD1, Peak N , RMS size, Z Average
- Surface – charge, zeta potential
...
Enzyme Induction – % of Control
...
For Column Type, Condition, all characterizations provide the Column Name options in the left column of the following table. The Column Name autopopulates the Condition Property options in the right column.
...
...
N/A
...
...
media type, serum percentage
...
...
bandwidth, frequency, time, wavelength
...
...
N/A
...
...
lyophilized, time
...
...
time
...
...
N/A
...
...
N/A
...
...
lyophilized, time
...
...
ion concentration, ionic strength, molecular formula, osmolality, serum percentage, with serum
...
...
number of pulses, pulse duration
...
...
N/A
To further identify a column, select a Column Value Type.
| Info |
|---|
| Once the column information is saved, the Column Type is shown in parentheses after the Column Name, such as cell viability (mean). |
...
If you want the same value to fill all rows in a column, add a Constant Value.
| Info | ||
|---|---|---|
| ||
| For Column Value Type, boolean, enter a Constant Value of 1 for true and 0 for false. |
Click Save, and the column(s) are updated.
| Info |
|---|
If needed, click Set Column Order to change the order of the column headings in the matrix. |
...