Page History
...
- Login to UPT as a caIntegrator Admin.
- First, search to see if the user already exists. Click the User menu option.
- On the User page that opens, click Select an Existing User.
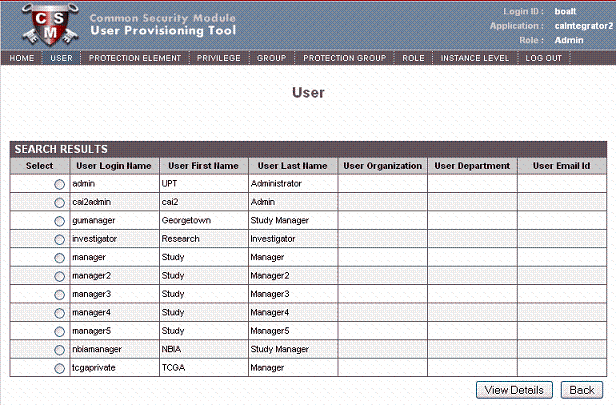
- Use the form and search for the user. If you define no criteria, UPT returns a list of all caIntegrator users currently in the system. See the following figure.
- If the user does not already exist (is not listed in the search results), then create a new user. To do so, select the User menu option again, then click Create a New User.
This opens the page for creating a new caIntegrator user, as shown in the following figure.

- Enter details for the following required fields:
- User Login Name
- User First Name
- User Last Name
- User Password
Note title Caution If the requestor is an LDAP user, then the User Login Name must match the LDAP login ID AND the User Password field must be left blank. If the requestor is not an LDAP user, then provide a password.
- Click Add to confirm the new user.
...
- Login to UPT as caIntegrator Admin.
- First search for an existing group that the user wishes to join. Click the Group menu option.
- On the Group page that opens, click Select an Existing Group.
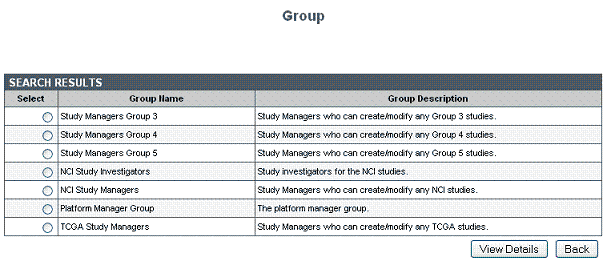
- Use the form and search for the group. If you define no criteria, UPT returns a list of all caIntegrator groups currently in the system
- If a user group does not already exist, then create a new user group. Click the Group menu option, then click Create a new Group.
- On the form that opens, shown in the following figure, enter a unique Group Name and a description, if appropriate. Click Add.
Info title Note Wiki Markup The recommended naming convention for a new User Group is *_\[insert organization name\] Study \[insert role\]s{*}._ Example: "Columbia University Study Managers".
Creating a New Protection Group
...
- Login to UPT as caIntegrator Admin.
- Click the Protection Group menu option.
- On the page that opens, click Create a New Protection Group. The page opens for defining PG Group details ().
, shown in the following figure.
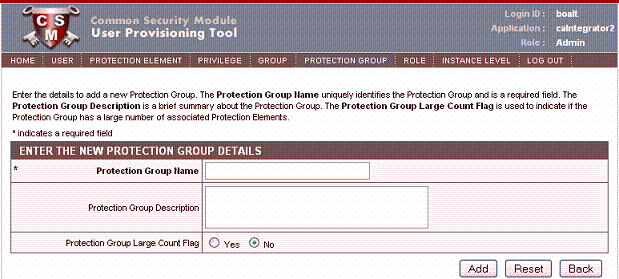
- Enter a unique Protection Group Name and Description, if appropriate. Click Add.
Info title Note Wiki Markup The recommended naming convention is *_\[insert organization name here\] Protected Studies{_}{*}. Example: "Columbia University Protected Studies".Note Assigning a User Group to a Protection Group
To give a User Group access to a Protection Group (a group of protected studies), follow these steps:
- Login to UPT as caIntegrator Admin.
- Find the user group that you want to assign.
- Click the Group menu option and click Select an Existing Group.
- In the page that opens, click Search. If you define no criteria, UPT returns a list of all caIntegrator groups currently in the system, as shown in the following figure.
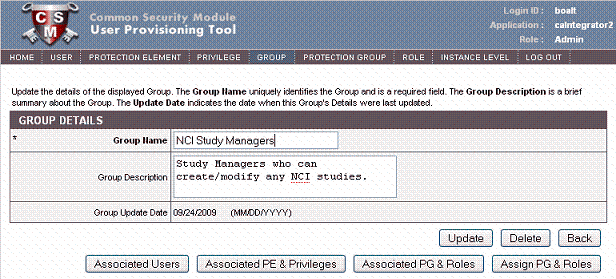
- Select the radio button next to the group name you want to assign to the Protection Group, and click View Details. This opens the Group Details page, shown in the following figure.
- Below the group details, click Associated PG & Roles. The page that opens, shown in the following figure, displays any PG to which the user group is already assigned.
- Below the group name, examine if the Protection Group of your choice is already listed there. If so, this means your user group is already assigned to the protection group of choice, and you can skip the remainder of the steps in this section. If the Protection Group is not listed there, then click Back.
- Back on the User Group details page, click Assign PG & Roles. This opens the Group, Protection Group and Roles Association page, shown in the following figure.

- From the list of Available Protection Groups, highlight your PG of choice and click Assign.
Now you can assign a role to the user. The caIntegrator Roles are defined in the following table:
Role Name
Role Definition
STUDY_MANAGER_ROLE
Assigning this role allows the user to modify existing studies, create new studies, and deploy existing studies.
STUDY_INVESTIGATOR_ROLE
Assigning this role allows the user to search the study, save queries about the study and perform analyses.
PLATFORM_MANAGER_ROLE
Assigning this role allows the user to create and delete array platforms for the entire caIntegrator installation. Caution: Array platforms are shared by all users and studies in the caIntegrator installation. A user with this role can affect the platforms that are used by by all users and studies in the caIntegrator installation.
- If this user group is a group of study managers, then select STUDY_MANAGER_ROLE. If this user group is a group of study investigators, then select STUDY_INVESTIGATOR_ROLE. Click Assign.
- Click Update Association at the bottom of the page. This completes the assigning of the user group to the protection group you chose.
If a User has the STUDY_MANAGER_ROLE role for more than one Protection Group, then any study that the User creates will be assign to each of those Protection Groups.Info title Note
...
- Login to UPT as caIntegrator Admin.
- Find the user that you want to assign to a user group. Click the User menu option, then click Select an Existing User.
- Enter the name of the user you are looking for and click Search. If you define no criteria, UPT returns a list of all caIntegrator users currently in the system, as shown in the following figure.
- Select the radio button next to the name and click View Details. The following figure shows details for a selected user.

- Click the Associated Groups button at the bottom of the page. This opens the page where you can assign a user to a group, as shown in the following figure.
- Select the group(s) that you want the user to be in and click Assign.
- At the bottom of the page click Update Association. This completes the assigning of the user to the user group. Now the user will have access to any studies to which the user group has been given access.
Tip title Tip You can add a user to more than one user group. For example, a user could be assigned to "Columbia University Study Managers" as well as to "Columbia University Study Investigators".
...
- Confirm if the User is an LDAP user or not. If the User is an LDAP user, then this person must change their password using the NCI password change utility. Skip the rest of these steps.
- If the User is not an LDAP user, then continue with the rest of these steps.
- Login to UPT as caIntegrator Admin.
- Find the User that you want to change. Click the User menu option, then Select an Existing User.
- Enter the name of the user you are looking for and click Search. If you define not criteria, UPT returns a list of all caIntegrator users.
- Select the radio button next to the name and click View Details.
- In the page that opens, shown in the following figure, replace the User Password and Confirm Password fields with the new password.

- At the bottom of the page click Update.