Page History
...
In preparing your data for upload, the first step is to find all the files associated with a given IDF file. To so, open any of the IDF files from your experiment in Microsoft Excel or another application suited for viewing tab-limited data. The partial screenshot below shows the first of twelve IDF files from our example experiment as viewed in Excel.

The field 'SDRF files' towards the bottom of your IDF file will display the name of the SDRF file that is associated with this IDF.
Most of the content of this file is irrelevant to our goal here and beyond the scope of this tutorial. Of interest is the bottom row with the field 'SDRF Files' and its corresponding value, the name of the SDRF file that is associated with this IDF file.
The IDF file in this example references a single SDRF file, but your IDF file may reference many, with each SDRF filename listed in its own row. Whether your IDF references one SDRF or many, make a note of all the SDRF filenames, as we will need to open each of them individually. The two partial screenshots below show the SDRF file that was referenced in our IDF file, as viewed in Excel.

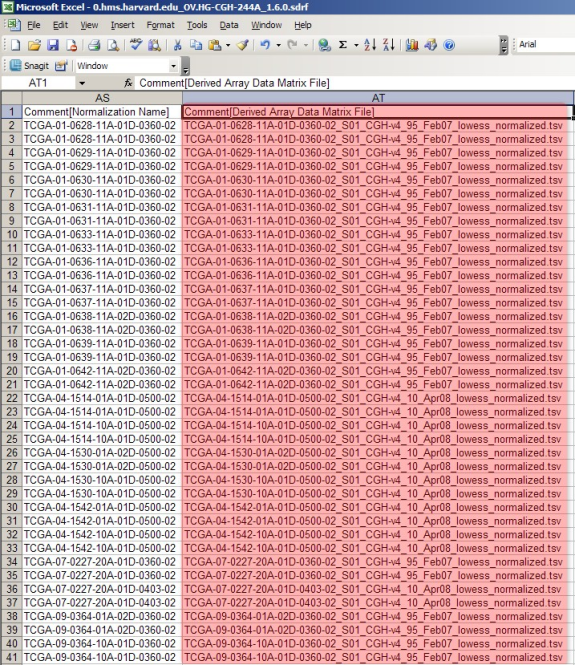
The SDRF file lists all the raw and derived array data files associated with the experiment. The raw files are listed under the column headed 'Array Data File' and the derived files are listed under the column headed 'Derived Array Data Matrix File'.
As with the IDF, most of the SDRF content is irrelevant to our goal here and beyond the scope of this tutorial. Of interest are the two columns headed 'Array Data File' (upper screenshot) and 'Derived Array Data Matrix File' (lower screenshot). These columns list the filenames of all the associated TXT and TSV files, respectively, from the example experiment. (Note that both of these columns are from the same file – they are shown in different screenshots only because the file is too large to be displayed in a single screenshot.)
...
Now that we've identified all the files associated with our IDF, our next step is to creative an archive of them. Launch WinZip, click the 'New' toolbar button, and enter a name for your archive in the 'New Archive' dialog. We'll call ours 'upload.zip', as shown below.
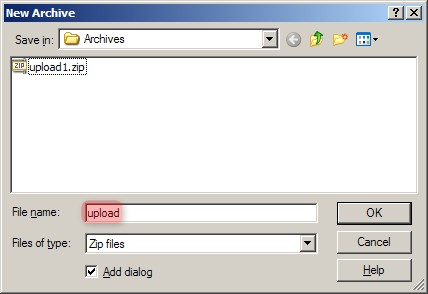
In WinZip's 'New Archive' dialog, specify a filename for the data archive to be created ('upload.zip in our example').
Once we've created the archive, we can now add files to it. We can refer to our previous notes of all the filenames associated with our IDF file. In our example, the archive will consist of a total of 42 files: one IDF, one SDRF, 20 TXT, and 20 TSV files. We can select these files in the 'Add' dialog as shown below, then click the 'Add' button at the bottom to begin creating the archive. (Hint: Hold down the CTRL key to select multiple files).
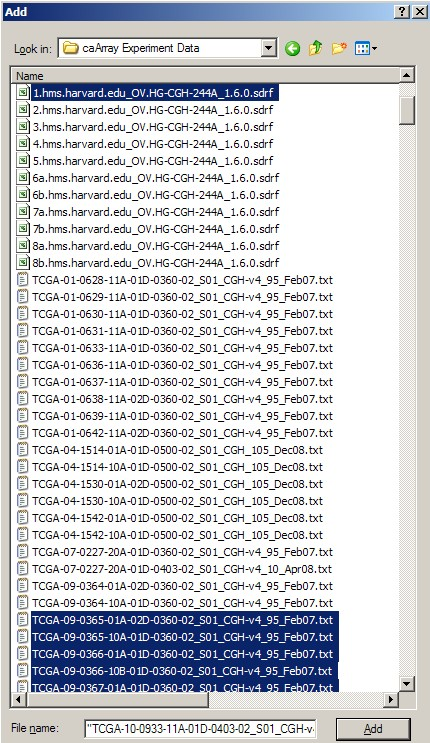
In WinZip's 'Add' dialog, select all the related IDF, SDRF, raw data, and derived data files (a total of 42 files in our example), then click the 'Add' button below to begin creating the archive.
(WARNING: After you've created the archive, ensure that the resulting file size is less than 2 GB. If it isn't, you will have to re-create the archive with a higher compression ratio. In our example, the size of the 'upload.zip' archive came out to approximately 900 MB, as shown below, so the file is ready to upload as is.)

In our example, the 'upload.zip' data archive we created is approximately 900 MB in size, which is below the 2 GB upload limit. If your data archive turns out to be larger than 2 GB, you will not be able to upload it until you re-create it with a higher compression ratio.
Uploading the Archive
To upload the archive, first log in to caArray and navigate to the experiment you will be upload your data into, then select the 'Data' tab, followed by the 'Manage Data' tab beneath it. Now click on the 'Upload New Files' button as shown below.
...