Page History
...
To upload the archive, first log in to caArray and navigate to the experiment you will be upload your data into, then select the 'Data' tab, followed by the 'Manage Data' tab beneath it. Now click on the 'Upload New Files' button as shown below.
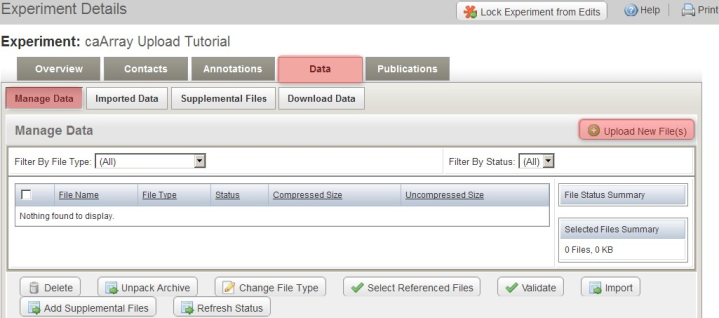
Click the 'Upload New Files' button under the 'Manage Data' tab to specify the location of your data archive.
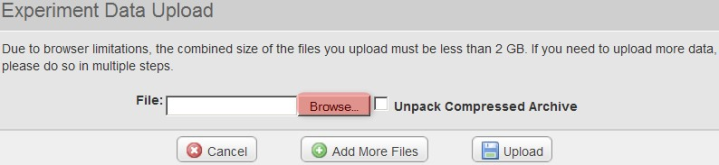
A new pop-up window entitled 'Experiment Data Upload' will appear in your Web browser, prompting you to upload files. Click on the 'Browse' button, then select the 'upload.zip' archive we created previously from the Open dialog as shown below.
Back on In the 'Experiment Data Upload' pop-up window, make sure that click the box labeled 'Unpack Compressed Archive' is checkedBrowse' button, then click on in the 'File Upload' button dialog, navigate to begin uploading the file. 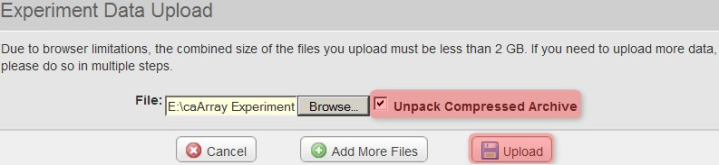
Depending on the size of the archive and the performance of the server your experiment is stored on, it may take anywhere from five to 20 minutes (and possibly longer!) for the archive to upload. Remember to keep the upload window open throughout the entire upload process, even after the blue progress bar has reached 100%.
'upload.zip' archive we created previously and click on the 'Open' button.
Back in the 'Experiment Data Upload' window, make sure that the box labeled 'Unpack Compressed Archive' is checked, then click on the 'Upload' button to begin uploading the file.
Back in the 'Experiment Data Upload' window, make sure that the box labeled 'Unpack Compressed Archive' is checked 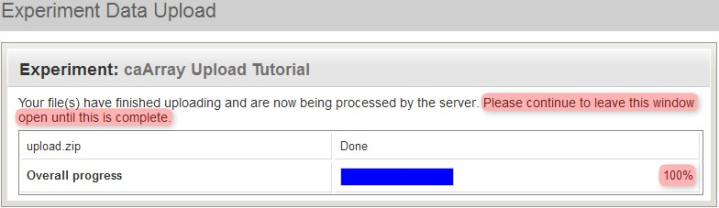 You'll know when the upload is complete when you see a new window overlaid over the upload window with the message 'Your file upload is complete', as shown below. Click the 'OK' button below this message, then click on the 'Close WindowUpload' button behind it to return to the main experiment window.
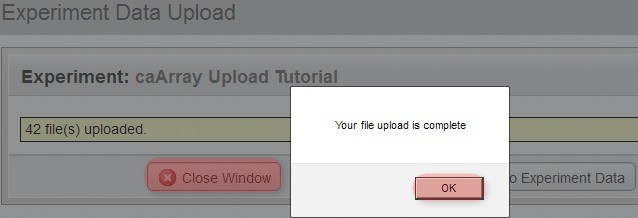
Verifying the Archive
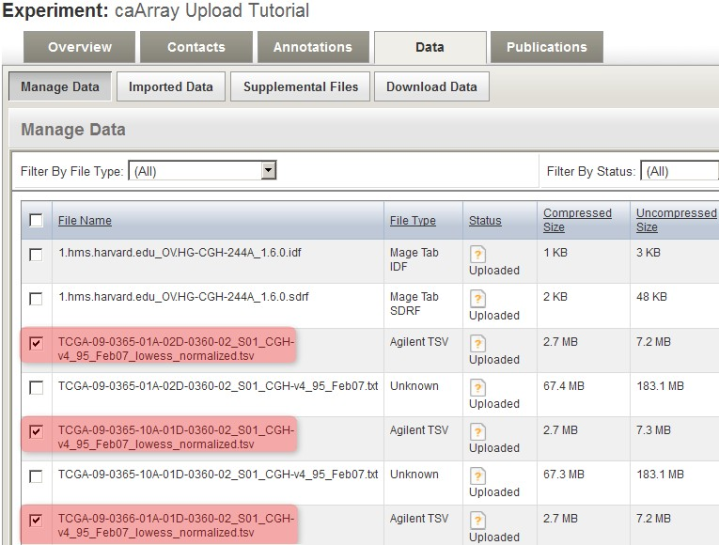
Back in the main experiment window, the contents of the archive we just uploaded are now listed under the 'Manage Data' tab. The TSV matrix files are considered supplemental, so we will move them to the 'Supplemental Files' tab by checking off all the TSV files in the list, then clicking on the 'Add Supplemental Files' button below.
...
begin uploading the file.
Depending on the size of the archive and the performance of the server your experiment is stored on, it may take anywhere from five to 20 minutes (and possibly longer!) for the archive to upload. Remember to keep the upload window open throughout the entire upload process, even after the blue progress bar has reached 100%.
Even when the blue upload progress bar reaches 100%, do not close the 'Experiment Data Upload' window. You will be notified when the upload is complete.
You'll know when the upload is complete when you see a new window overlaid over the upload window with the message 'Your file upload is complete', as shown below. Click the 'OK' button below this message, then click on the 'Close Window' button behind it to return to the main experiment window.
You'll know when the upload is complete when you see a new window overlaid over the upload window with the message, 'Your file upload is complete',
Verifying the Archive
Back in the main experiment window, the contents of the archive we just uploaded are now listed under the 'Manage Data' tab. The TSV matrix files are considered supplemental, so we will move them to the 'Supplemental Files' tab by checking off all the TSV files in the list, then clicking on the 'Add Supplemental Files' button below.
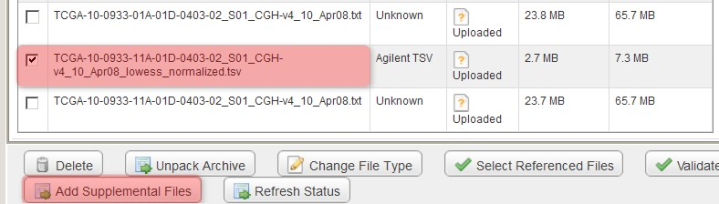
You can mark the derived array data files as supplemental by checking them off under the 'Manage Data' tab, then clicking the 'Add Supplemental Files' button.
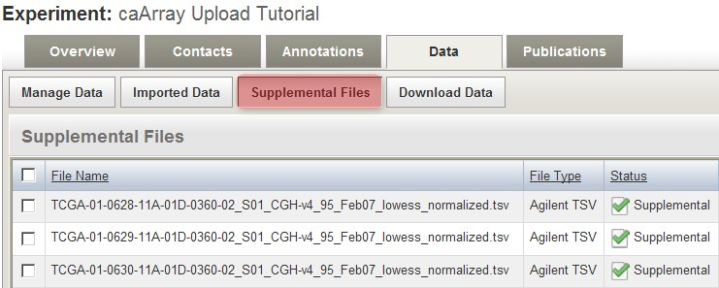
These TSV files now appear under the 'Supplemental Files' tab, alongside other TSV files from a previous upload to the same experiment.
The derived array data files we checked off under the 'Manage Data' tab now appear under the 'Supplemental Files' tab, alongside other such files from a previous upload to the same experiment.
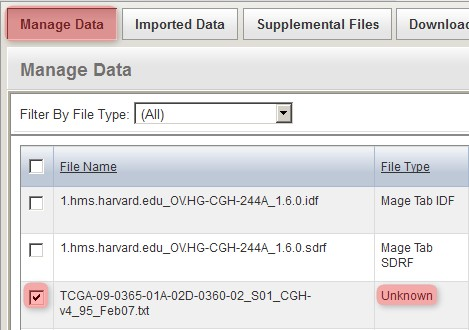
Back on the 'Manage Data' tab, the remaining files from our upload are one IDF, one SDRF, and 20 TXTs (only the first three of these files is shown below due to space constraints). Note that the status of the TXT file from the screenshot (and of all other TXT files in the list) shows as 'Unknown', which means that caArray did not automatically recognize the file type in this particular case. As a result, we will have to manually specify the file type ourselves by selecting all the TXT files in the list, then clicking the 'Change File Type' button below.

Since caArray didn't automatically recognize the format of the raw array data files we uploaded, we must manually specify the format ourselves by selecting the files under the 'Manage Data' tab, then clicking the 'Change File Type' button.
For the particular data in this example, the array data files are in the Agilent Raw TXT format. To specify this, in the 'Manage Files' window shown below, select 'Agilent Raw TXT' from the 'Select New File Type' drop-down list, then click on the 'Save' button above it. (NOTE: Depending on the assay type and array design used in your own experiment, your data may be in a different format, in which you will have to select the appropriate type from the drop-down list, or the file type may be automatically recognized by caArray, in which case you won't have to manually specify the file type yourself.)
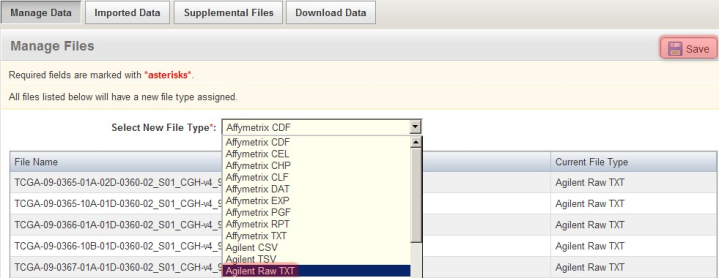
Manually specify the format of the uploaded raw array data files by selecting the appropriate format (Agilent Raw TXT format in this example)
These TSV files now appear under the 'Supplemental Files' tab, alongside other TSV files from a previous upload to the same experiment.
Back on the 'Manage Data' tab, the remaining files from our upload are one IDF, one SDRF, and 20 TXTs (only the first three of these files is shown below due to space constraints). Note that the status of the TXT file from the screenshot (and of all other TXT files in the list) shows as 'Unknown', which means that caArray did not automatically recognize the file type in this particular case. As a result, we will have to manually specify the file type ourselves by selecting all the TXT files in the list, then clicking the 'Change File Type' button below.
For the particular data in this example, the array data files are in the Agilent Raw TXT format. To specify this, in the 'Manage Files' window shown below, select 'Agilent Raw TXT' from the 'Select New File Type' drop-down list, then click .
Back on the 'Save' button above it. (NOTE: Depending on the assay type and array design used in your own experiment, your data may be in a different format, in which you will have to select the appropriate type from the drop-down list, or the file type may be automatically recognized by caArray, in which case you won't have to manually specify the file type yourself.)Manage Data' window, the status of all the TXT files now shows as 'Agilent Raw TXT', indicating that caArray now correctly recognizes the file type.
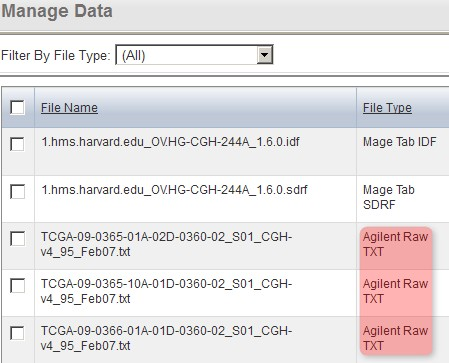
Back on the 'Manage Data' window, the status of all the TXT originally unrecognized raw array data files now shows as 'under the 'File type' column (Agilent Raw TXT 'in our example), indicating that caArray now correctly recognizes the file type.
Our next step is to validate all the files, which we will do in two passes: the first pass, validating only the TXT files (but not the IDF and SDRF), and the second pass, validating all the files (IDF, SDRF, and TXT). For the first pass, check off all the TXT files in the list, then click the 'Validate' button below.
...