Search this chapter:
This guide explains how to use the administrative features of NBIA.
Administration Functions Overview
Security applies to all administration tools in NBIA. When you log into NBIA, only the administration tools for which you have been granted permissions are visible in the Admin menu. Their use is described on this page.
Creating a New NBIA User
Only an NBIA administrator can create new users for NBIA.
Before NBIA users can be created, an administrator with access to the User Authorization Tool must register the NCIA application and assign an admin user to the NCIA application there. The administrator can then assign users to NBIA and roles to each user. The following table describes the role structure in NBIA.
Role | Functionality |
|---|---|
NCIA.READ | Search capability |
NCIA.MANAGE_VISIBILITY_STATUS | Privilege to access QC Tool |
NCIA.VIEW_SUBMISSION_REPORT | Privilege to access Verify Submission |
NCIA.MANAGE_COLLECTION_DESCRIPTION | Privilege to edit a collection description |
NCIA.SUPER_CURATOR | Privilege to approve the deletion of image series |
NCIA.DELETE_ADMIN | Privilege to execute the deletion of images approved for deletion |
The roles you assign allow a user to perform tasks in TCIA. Additionally, an administrator can perform the following tasks:
- Assign a user right to use the QC tool for the purpose of reviewing submitted imaging data and managing visibility status for the data. See Using the Quality Control Tool.
- Verify submitted files. This includes the permission to view the image submission report which includes submission statistics and information regarding what has been received by the image repositories. See Viewing Submission Reports.
- Configure security for data submitted to TCIA. For more information, see Configuring Security for Submitted Data.
For more information about creating new TCIA users/user groups and performing other tasks in the User Authorization Tool, see the User Authorization Tool documentation.
Using the QC Tool
Deleting Image Series
As an administrator, you can assist in the two-tier process of deleting TCIA data. To do so, you must have been granted specific roles. For more information about the roles and the deletion processes, see NBIA Administrator's Guide 6.5.3.1 and Manually Deleting Image Series.
Approving Image Deletions
For more information about roles, see Creating a New NBIA User.
This function is part of a two-tier deletion process. A super curator can approve the deletion of image series that have been identified as "To be deleted".
To approve series deletions, follow these steps:
- Click Admin > Approve Deletions.
The Approve Deletions page appears.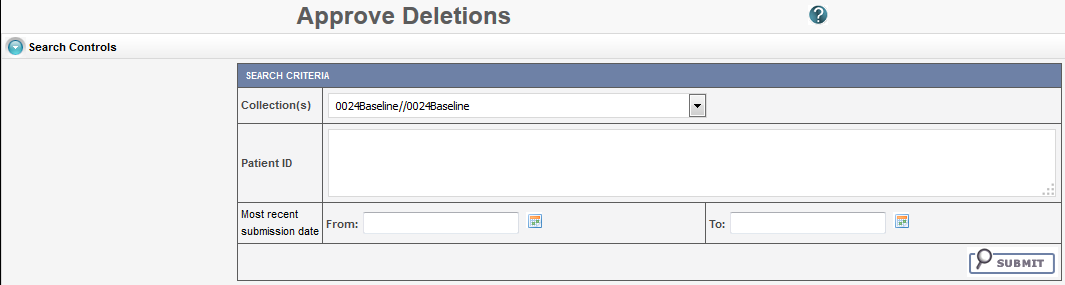
- From the Collection(s) list, select a collection (site).
- Optionally, enter Patient IDs. Separate multiple IDs by commas.
- Click Submit to initiate a search for the series marked for deletion.
From the results, click View to review the detail for an individual series. From the page that opens, click Delete to approve the deletion. Click the Skip button to go to the next series.
Tip
If you click Skip, this signals that you do not approve the deletion. If that is so, you should generate a report to see who requested the deletion and work with that person to resolve any deletion disagreement.
- For batch deletion, select the checkbox for one or more series and click Delete to approve the deletion.
Image series approved for deletion are still visible in the system, identified as "To Be Deleted". They are removed from the system at a system-configured time, such as at midnight (called an "off-line deletion"), unless a manual deletion (called an "online deletion") is performed. For more information, see Manually Deleting Image Series.
About deletions
- After an image series is approved for deletion, the action cannot be reversed.
- Any new image submissions to a series identified "To be deleted" will be successful, but the status of the series does not change.
- Images submitted to files that are identified as "Deleted" are quarantined.
Manually Deleting Image Series
For more information about roles, see Creating a New NBIA User.
This function is part of a two-tier deletion process. You can execute the online deletion of image series that are approved for deletion. This immediately removes images that are approved for deletion rather than requiring you to wait for the next scheduled system-wide deletion job.
To manually delete series, follow these steps:
- Click Admin > Perform Online Deletion.
A list of image series that have been approved for deletion appears. Click Delete to execute the real-time series removal.
Deleting individual series?
All series listed in this page are deleted. There is no way to specify individual series for online deletion.
Viewing Submission Reports
For more information about roles, see Creating a New NBIA User.
When a site submits images to NBIA, a user with admin privileges can run various reports to verify that the images have been received and to monitor the status of the submitted images. This is accomplished in NBIA by generating a report with this information.
To view submission reports, follow these steps:
- Click Admin > View Submission Reports.
The Submission Reports page appears.
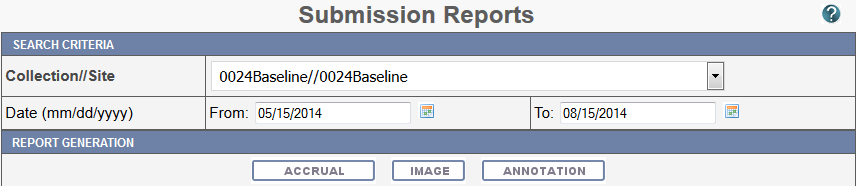
The Collection//Site section displays all collections for which you, as an Admin, have permissions to view. - Select a collection.
- Enter a valid date range or select one by clicking the calendar icons.
- Click the report type you want to run: Accrual, Image, or Annotation.
The search begins and may take a few moments.
To assist in viewing the reports, use the following icons:
- In the report results in the upper right segment of the page, click the Help button (
 ) to learn details about the report type you selected.
 - Click the arrow at the left of the section to hide (
 ) or show (
 ) the results.
 - To view an expanded view of the image report results, click the Expand icon (
 ) preceding each row of the New Image or Corrected summaries.
The results display Count by Day details of the submissions. For example, for each day in the time frame, you can view a list of affected patient IDs, study instance UIDs and series instance UIDs.
Accrual Report
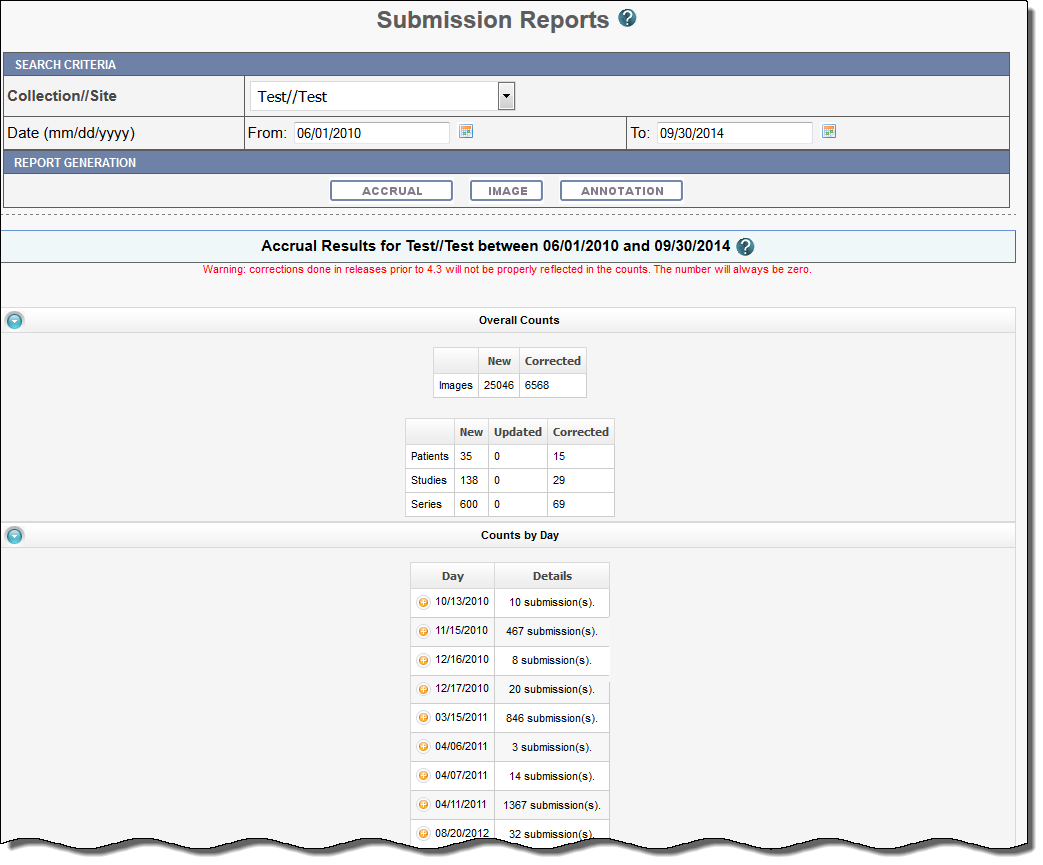
Fields that appear on the report are described in the following table.
Submitted Files Counts Fields | Description |
|---|---|
New Image | An image that does not exist in the system at the time of submission |
Corrected Image | An Image that has been successfully submitted more than once. The time of the original image submission does not affect whether a subsequent image is considered as "corrected". Each time, an image is re-submitted in the time frame, the count is incremented. |
New Patient | A patient that had no images submissions prior to the start of the date range, but at least one image submission within the date range |
Updated Patient | A patient that had at least one image submission prior to the start of the date range, and at least one image submission within the date range |
Corrected Patient | A patient that has at least one image submission in the time frame that has been corrected. |
New Study | A study that had no image submissions prior to the start of the date range, but has at least one image submission within the date range |
Updated Study | A study that had at least one image submission prior to the start of the date range, and at least one image submission within the date range |
Corrected Study | A study that has at least one image submission in the time frame that has been corrected. |
New Series | A series that no image submissions prior to the start of the date range, but has at least one image submission within the date range |
Updated Series | A series that had at least one image submission prior to the start of the date range, and at least one image submission within the date range |
Corrected Series | A series that has at least one image submission in the time frame that has been corrected |
Report content
The reports contain a count of patient/study, series or images that have been affected during the date range in the specified collection/site.
Image Submission Report
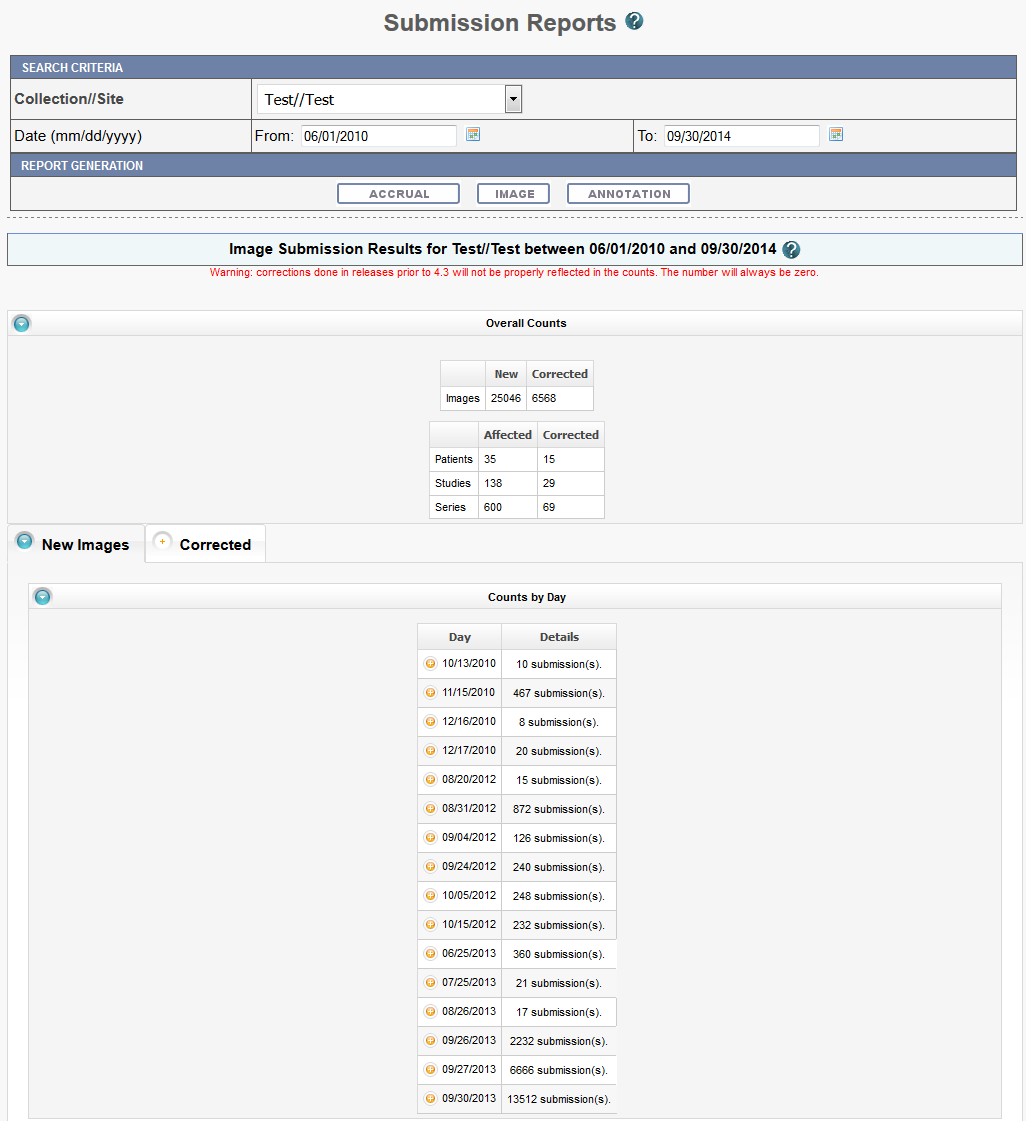
Image submission results display a count of patients, studies or series for or to which an image was submitted during the specified date range in the collection or site you selected. Fields that appear on the report are described in the following table.
Submitted Files Counts Fields | Description |
|---|---|
New Image | An image that does not exist in the system at the time of submission |
Corrected Image | An Image that has been successfully submitted more than once. The time of the original image submission does not affect whether a subsequent image is considered as "corrected". Each time, an image is re-submitted in the time frame, the count is incremented |
Affected Patient/Study/Series | A patient/study/series is one for which there was at least one new image submission |
Corrected Patient/Study/Series | A patient/study/series that has at least one image submission that has been corrected in the time frame. |
Report content
The reports contain a count of patient/study, series or images that have been affected during the date range in the specified collection/site.
Annotation Submission Report
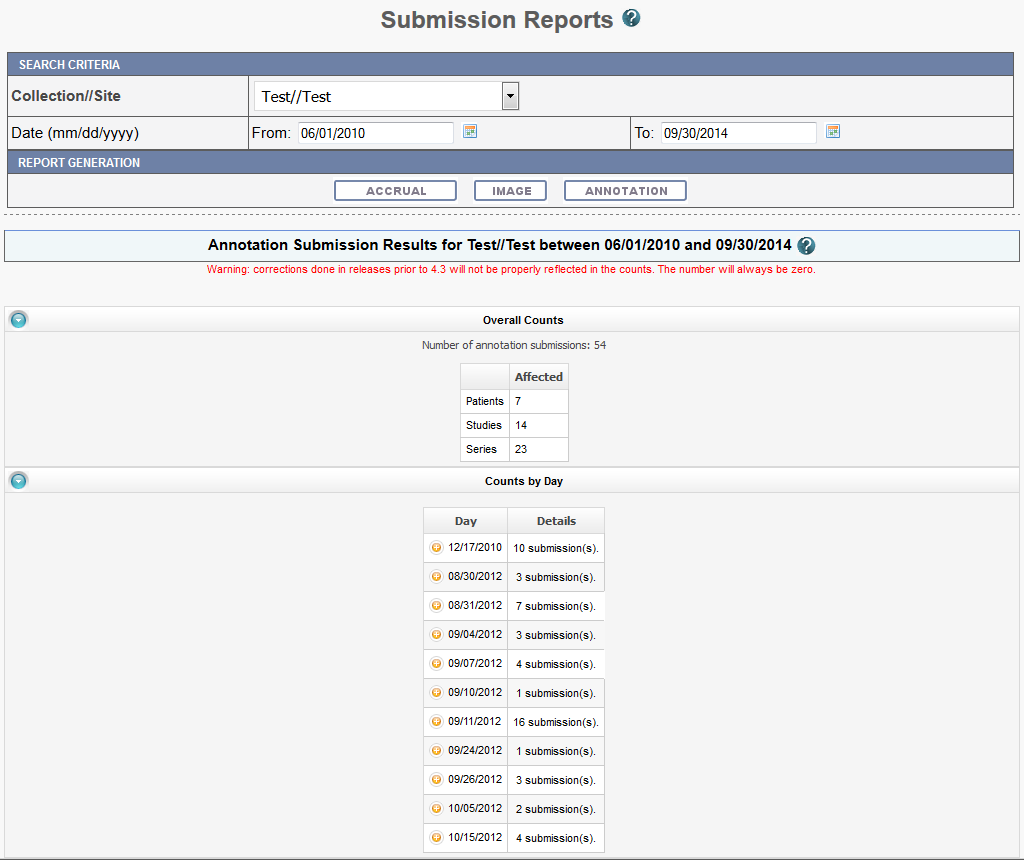
The annotation submission report contains a count of annotations submitted and affected patient/study/series during the specified date range for that collection site. Fields that appear on the report are described in the following table.
Submitted Files Counts Fields | Description |
|---|---|
Annotation | An annotation that has never been submitted in the system prior to the start of the date range |
Corrected Image | A patient/study/series is one for which there was at least one new annotation submission |
Report content
The reports contain a count of patient/study, series or images that have been affected during the date range in the specified collection/site.
Editing a Collection Description
For more information about roles, see Creating a New NBIA User.
This feature allows you as an administrator to enter a brief description for a collection so the NBIA user knows what type of data comprises the collection.
To edit a collection description, follow these steps:
- Click Admin > Edit Collection Description.
The Edit Collection Descriptions page appears.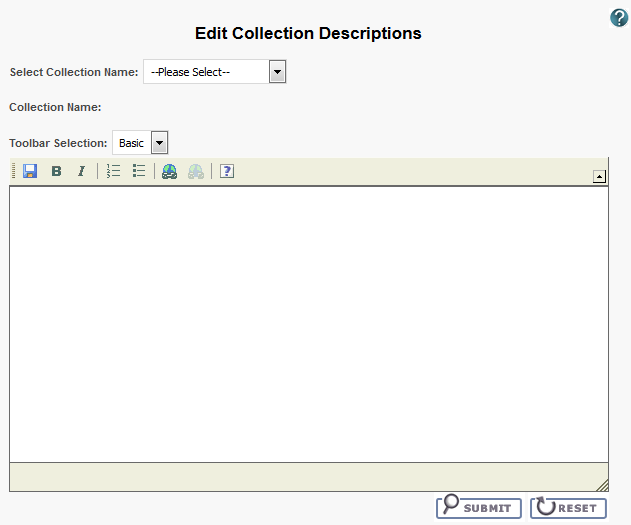
- From the Select Collection Name list, select a collection name.
- In the text box, enter a description or edit an existing description for the collection. Use the text formatting tools to format the text, if you like. If appropriate, you can add a hyperlink to a resource such as a wiki with a longer description.
The description displays on the simple/advanced search screen when you click the (?) button next to the collection name.
Creating a clickable link
To make a link clickable in this section, select Rich for Toolbar Selection, select Source (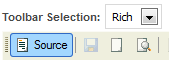 ), and create a link as shown in the following example:
<span contenteditable="false"><a href="https://www.google.com" target="_blank"><span>Link To Be Created</span> </a></span></p>
If you want to edit the link, select the Source button and set contenteditable to true.
Managing Workflow Items
For more information about roles, see Creating a New NBIA User.
A workflow is a business process that, in the case of NBIA, an image series must pass through before it is published. Since it is a business process, these steps must be defined first within an organization. NBIA allows you to change the visibility status of an image series. This visibility change is part of the definition of a workflow item. Workflow items can also trigger a web service call to a URL. When you define a workflow item, you specify a name for it, the type of action that will take place during it (such as a visibility change), which image collection and site are involved, and the URL of a web service if the information resulting from this workflow item should be sent to one.
You can create, edit, and delete workflow items
Creating a Workflow Item
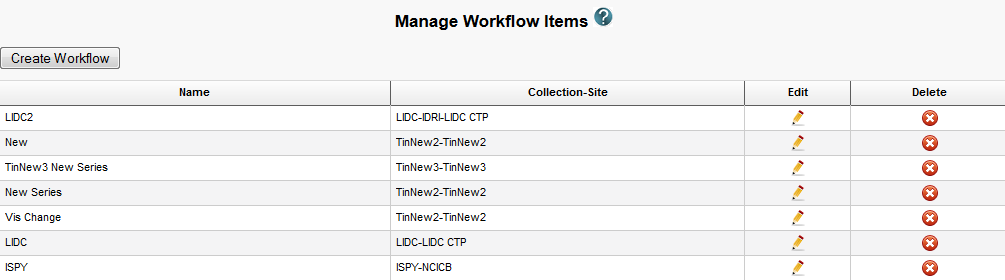
- Select Admin > Manage Workflow Items.
The Manage Workflow Items page appears.
- Click Create Workflow.
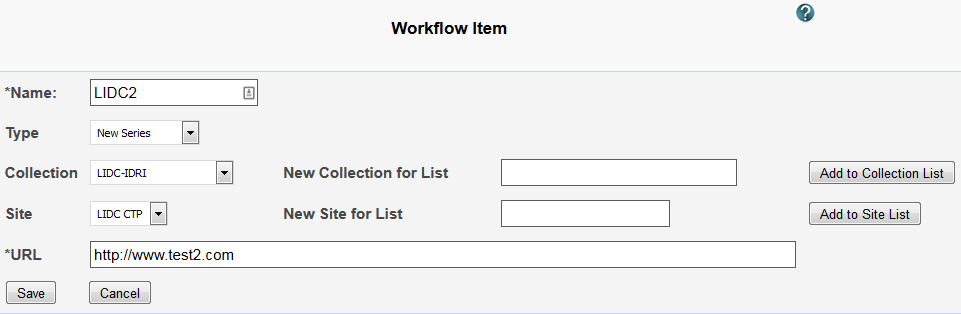
The Workflow Item page appears.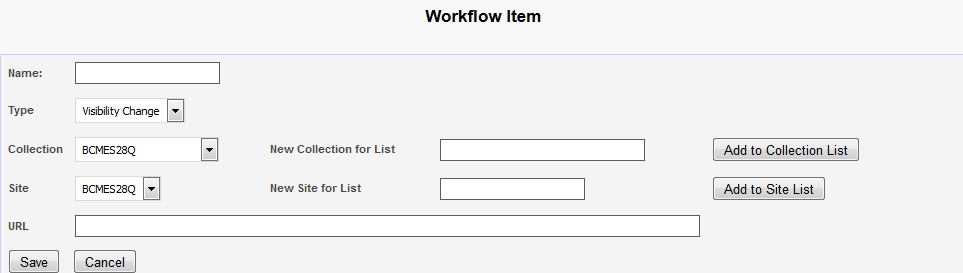
In the Name box, specify a name for the new workflow item. The name cannot be longer than 50 characters.
From the Type list, select Visibility Change or New Series.
Select the Visibility Change option when editing an existing workflow item. A visibility change occurs when the workflow item triggers a web service call to the URL you have entered in the URL field on this page.
Select the New Series option if you want the result of this workflow item to create a new image series. You can add this new series to a collection in the next step.
- From the Collection list, select an existing image collection to which this workflow item should apply. Existing image collections are in the Collection list. If you need to create a new collection to apply to this workflow item, enter it in the New Collection for List box and then click Add to Collection List.
- From the Site list, select an existing site. Existing sites are in the Site list. If you need to create a new site to apply to this workflow item, enter it in the New Site for List box and then click Add to Site List.
- To send information in this workflow item to a web service, enter the web service's URL in the URL box.
- Click Save.
The new workflow item appears on the Manage Workflow Items page.
Editing a Workflow Item
You can edit a workflow item's name and collection/site.
To edit a workflow item
- Select Admin > Manage Workflow Items.
The Manage Workflow Items page appears.
- Click the
 in the row of the workflow item you want to edit.
The Workflow Item page appears, showing the values already set for the workflow item you selected.
- Edit the name, type, collection, site, or URL as needed, consulting Creating a Workflow Item for details on these steps.
- Click Save.
Deleting a Workflow Item
To delete a workflow item
- Select Admin > Manage Workflow Items.
The Manage Workflow Items page appears.
- Click
 in the row of the workflow item you want to delete.
You are prompted to confirm the deletion.
Managing Saved Queries
You can review and delete queries saved by users in TCIA.
Permissions
This administrative feature is available only to logged-in users who have "manage visibility" privileges, as defined in UPT. For more information, see Registering a New TCIA User.
Reviewing Saved Query Information
To review a saved query
- Select Admin > Manage Saved Queries.
The Manage Saved Queries page appears listing all the queries saved by TCIA users.
The following information is listed for each query.
Column Name Description Query Name Click the name of the query to display the Criteria Selected by the user. The selected field name(s) and data are listed.

Last Executed Lists the date and time that the query was run. New Data Available  indicates that new data is available.
Query Creator User name of the person who saved the query.
Deleting a Saved Query
To delete a saved query
- Select Admin > Manage Saved Queries.
The Manage Saved Queries page appears. Check the box next to the Query Creator column of a query to be removed. You can delete multiple queries at once.
Removing All Saved Queriese
To remove all of the saved queries, check the box next to column name, Query Creator. All queries are selected.

- Click Remove Selected Items.
You are prompted to confirm the deletion and the selected queries are removed.
Using the User Authorization Tool
Administrators use the User Authorization tool to manage data access by users, user groups, protection groups, and roles.
Topics in this section include:
- NBIA Administrator's Guide 6.5.3.1
- Managing Users
- NBIA Administrator's Guide 6.5.3.1
- NBIA Administrator's Guide 6.5.3.1
- NBIA Administrator's Guide 6.5.3.1
- NBIA Administrator's Guide 6.5.3.1
Accessing the User Authorization Tool
To access and use the User Authorization Tool, you must be a TCIA administrator.
- Log in to TCIA.
- Select Admin > User Authorization Tool.
The User Authorization Tool appears, open to the User tab.
Managing Users
Once a user submits data, an administrator adds the user to TCIA. The administrator must create the user in LDAP to manage data access privileges.
What to do if the user is not in LDAP
Contact the Help Desk to request that a user be added to LDAP.
Managing users involves:
- NBIA Administrator's Guide 6.5.3.1
- NBIA Administrator's Guide 6.5.3.1
- NBIA Administrator's Guide 6.5.3.1
- NBIA Administrator's Guide 6.5.3.1
Adding a User to TCIA
- Select Admin > User Authorization Tool.
Select the User tab.
- Click
 .
.
The User Details dialog box appears.
- Add the user's Login Name. The login name is not case-sensitive.
- Add a valid Email address of the user.
To activate the user, select Active Status. To deactivate the user in TCIA, clear Active Status.
Click
 to save the changes.
The user is added to TCIA and the table on the User tab.
Finding a User
To find a user on the User tab, narrow the list by adding one or more characters to one or more column header boxes.
In the following example, the displayed users have 5523 as part of their login name and nlsc in their email address.

Updating User Information
- Select Admin > User Authentication Tool.
- Select the User tab.
Find the user whose information you want to update.
Click
 .
.
The User Details window appears.Update the Email address as needed. The Login Name cannot be updated.
For an active user, maintain Active Status. To deactivate the user in TCIA, clear Active Status.
Click Save to save the changes.
The user information is updated in the table.
Deactivating a User
A user cannot be deleted from TCIA, only deactivated.
- Select Admin > User Authentication Tool.
Select the User tab.
Find the user you want to deactivate.
Click
.
The User Details window appears.Clear the Active Status box and then click Save.
The user's Active Status value changes to False.
Managing Protection Groups
A TCIA administrator uses the Protection Group tab to add protection groups and assign protection elements to limit data access and visibility by image collection and site(s).
Protection elements are created automatically
Managing protection groups involves:
- Adding a Protection Group
- NBIA Administrator's Guide 6.5.3.1
- NBIA Administrator's Guide 6.5.3.1
- NBIA Administrator's Guide 6.5.3.1
- NBIA Administrator's Guide 6.5.3.1
- NBIA Administrator's Guide 6.5.3.1
Adding a Protection Group
From the Protection Group tab, click Add Protection Group.
The Add Protection Group window appears.
The following table lists and describes protection group information.
Name
Description
Protection Group Name Start the name with "NCIA” and enter your name of choice.
No Special Characters
Do not use special characters such as
#or\in group names.Protection Group Description
Add a description (optional).
Click
to save the changes.
The protection group is added to the table.
Associating Protection Elements with a Protection Group
Once you create the necessary protection group(s), assigning the associated protection element(s) is the beginning of setting up security for a collection's visibility in TCIA. The protection element identifies the collection, as well as the site, associated with the data.
Data Access and Protection Elements
To associate a protection element with a protection group
- On the Protection Group tab, find the protection group.
- Click
 in the Assign Protection Element column.
The Add Protection Element(s) to Protection Group window appears.
Click Available Protection Elements.
Select the elements to be associated with the protection group.
Narrowing a List
To narrow a list, type the name or part of the name next to the magnifying glass icon (
 ).
).Click
 to save the changes.
The Associated Protection Element(s) column lists the elements that you added.
In the following example protection element,
NCIA.SportInjury//ACL- NCIA.SportInjury is the collection.
ACL is the site.
Multiple Sites
If there are multiple sites for a collection, you might want to create a protection group for each site. This process would grant access to verify submissions per site.
Removing Protection Elements from a Protection Group
- On the Protection Group tab, find the protection group.
- Click
 in the Remove Protection Element(s) column.
The Remove Protection Element(s) from Protection Group window appears.
The Protection Group Name cannot be changed. Click Included Protection Elements, and select the elements to remove.
Narrowing a List
To narrow a list, type the name or part of the name next to the magnifying glass icon (
).Click x to return without saving.
Click
 to save the changes.
The protection element(s) is no longer listed in the Associated Protection Elements column.
Finding a Protection Group
On the Protection Group tab, you can perform a global search or a column search both described in the following table.
You can perform both searching techniques to further filter a list, but do not forget to clear the search boxes to expand the list.
| Type of Search | Performing a Search |
|---|---|
| Global Search | You can search for a term or part of a term in all the protection group columns in the table. All protection groups with the characters you entered are returned. In the following example, a Global Search of colonography finds protection groups with the word in the Protection Group name and the Associated Protection Elements.  |
| Column Search | You can also find protection groups in the table by adding a term to a column header or more than one column header to further narrow the list. In the following example, bbb in the Protection Group column and demo in the Description column, displays two results.
|

Updating a Protection Group Description
- On the Protection Group tab, find the protection group you want to update.
Click
 .
.
The Protection Group Details window appears.Update the group description.
Note that you cannot update the protection group name.Click
to save the changes.
Deleting a Protection Group
- On the Protection Group tab, find the protection group you want to delete.
Click
.
The Protection Group Details window appears.Click
 .
.
The row is removed from the table.
Managing User Groups
TCIA administrators create user groups to limit data access and visibility by protection group and user role. Before or after creating user groups, you can assign users and roles to protection groups.
Managing user groups involves:
- NBIA Administrator's Guide 6.5.3.1
- NBIA Administrator's Guide 6.5.3.1
- NBIA Administrator's Guide 6.5.3.1
- NBIA Administrator's Guide 6.5.3.1
Viewing Protection Groups and Roles Associated with a User Group
- Select Admin > User Authentication Tool.
Select the User Group tab.

- Click the arrow in the first column to see the protection group(s) and role(s) associated with the user group in that row.

The row expands to show the protection group(s) and role(s) associated with that user group.
Modifying Protection Groups and Roles for a User Group
- View the protection group(s) and role(s) for a selected user group.
- Click
 .
.
The Modify Authorization for Selected User Group window appears.
- To change the roles associated with this protection group, open the Role list. Click or clear the checkboxes you want to add or remove, respectively. Click
 .
. - To remove this protection group from this user group, click
 .
.
Assigning a Protection Group and Role to a User Group
You can associate a user group with a protection group and one or more roles.
To assign a protection group and role to a user group
- Select Admin > User Authentication Tool.
Select the User Group tab.
In the row associated with the user group whose access you want to specify, click
 .
.
The Add Protection Group to Selected User Group window appears.Open the Protection Group list and click one protection group to select it.
Narrowing a List
To narrow the list of protection groups, type the name or part of the name next to the magnifying glass icon (
). All protection groups with the characters you entered are returned.
The list closes and shows your selection in the window.Open the Role list and and click the box to the left of each role you want to assign to the selected protection group.
Narrowing a List
To narrow the list of roles, type the name or part of the name next to the magnifying glass icon (
). All protection groups with the characters you entered are returned.
The list closes and shows your selection(s) in the window.- Click .
The user group is now associated with the selected protection group and roles.
Deleting a User Group
Deleting a user group does not delete the users in it.
To delete a user group
- Select Admin > User Authentication Tool.
Select the User Group tab.
- In the row of the user group you want to delete, click
 .
.
The Delete the Following Group? window appears. - Click .
The user group no longer appears in the list.
Adding Protection Groups and Assigning Roles
A TCIA administrator creates protection groups to limit data access and visibility by image collection and site(s). Administrators add users to protection groups and can then further manage their access by assigning them one or more roles. Users can only access the protection group data in the way that the role specifies.
For example, John Smith needs to be a curator within the Mouse Astrocytoma protection group, so user johnsmith is assigned to protection group TCIA Mouse Astrocytoma with the role of CURATOR.
Topics in this section include:
- NBIA Administrator's Guide 6.5.3.1
- NBIA Administrator's Guide 6.5.3.1 with Roles
- NBIA Administrator's Guide 6.5.3.1
Adding a Protection Group
- Select Admin > User Authentication Tool.
- Select the Protection Group tab.
- Scroll down to the bottom of the page and click
 .
.
The Protection Group Details window appears.
Enter a name for the new group and optionally, a description.
No Special Characters
Do not use special characters such as
#or\in group names.Click
.
The protection group appears on the Protection Group tab.
Assigning a User to a Protection Group with Roles
Super Administrator
If you are a Super Administrator for one protection group, your privileges extend to all of the protection groups.
To assign a user to a protection group and assign roles
- Select Admin > User Authentication Tool.
Select the User Authorization tab.

Select a user from the list.
A page listing the protection groups and access roles associated with the selected user opens.
Click
 .
.
The Grant Access to Selected User window opens.
- From the Protection Group list, select the group to which you want to assign the user.
From the Role list, select the access role that the user should have in that protection group.
The following table lists and describes the access roles available in TCIA.Access RoleDescription of Access Role NCIA ADMIN Access the User Authorization Tool to manage users
NCIA CURATE Add or modify curation data
NCIA DELETE_ADMIN Super Administrator role for deletions
NCIA MANAGE_COLLECTION_DESCRIPTION Manage collection descriptions
NCIA MANAGE_VISIBILITY_STATUS Access the Quality Control (QC) Tool
NCIA READ Public role for searching
NCIA SUPER_CURATOR Super Administrator role for approving deletions
NCIA VIEW_SUBMISSION_REPORT Access the Submission Reports option to verify submissions.
- Click Save to save the changes.
The row is added to the table.
Working with the table
To adjust how the table is sorted, click the arrows in the column header. To narrow the list, type the name or part of the name in the column header. You can also enter information in multiple column headers to further narrow the list.
Changing a User's Access Role Within a Protection Group
- Select Admin > User Authentication Tool.
Select the User Authorization tab.
Select a user from the list.
A page listing the protection groups and access roles associated with the selected user opens.- In the row of the protection group you want to change, click
 .
.
The Grant Access to Selected User dialog box opens.
To change the user's access to roles in this protection group, click the down arrow to open the Role list. Select the boxes next to roles you want to assign to the selected user. Clear the boxes next to roles you do not want the user to have. Click
 to save your changes.
To delete a role, open the Role list, select a role, and click
.The User Authentication tab appears.
Resolving Errors in the User Authorization Tool
The following table lists and describes how to resolve error messages returned by the User Authorization Tool (UAT). Error messages appear in a red box.
Info Messages
Messages in a blue box, such as Info: Request sent to server. or Info: Sent., indicate that a request was sent to the server to save, update, or delete an item.
| UAT Error Message | Resolving a UAT Error |
|---|---|
| Error: No data found from server. | You performed a search and there were no results. Enter different search criteria. If a selected user has not been assigned to a protection group with a role, you will receive the following message: Error: No data found from server. |
| Error: Session expired. Please log in again. | You logged in but your session was too long and the session expired. You need to log in again. |
Error: Error occurred while retrieving data from server. Check the server connection please. Error code: <a number> | An unexpected error occurred. The error code shows a return http status code that may or may not be useful for debugging. |