Trials are conducted in participating sites. Information about the site (organization), investigator(s), and primary contacts (if a central contact is not provided) must be provided. Optionally, you can include contact information for a person’s title (functional role) rather than a person’s name. When you add a participating site to a trial, link (associate) an organization, site, investigator(s), and primary site contact information to it.
The system assigns investigators and primary contacts a status code that corresponds to the person’s/role’s curation status.
Information about participating sites can be included in the protocol document or in the Participating Sites document.
How to Abstract Participating Site Information
Search for the trial of interest. For instructions, refer to Searching for Trials in PA.
In the search results, select the NCI Trial Identifier link for the desired trial. This will open the Trial Identification page.
On the Trial Identification page, check out the trial. For instructions, refer to Checking In and Checking Out Trials. (This checkout step is optional for Super Abstractors.)
On the Administrative Data menu, select Participating Sites.
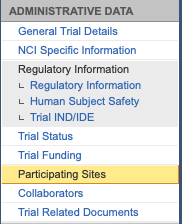
On the Participating Sites page, select Add.
The Participating Sites page displays three tabbed sections: Participating Site, Investigators, and Contact.
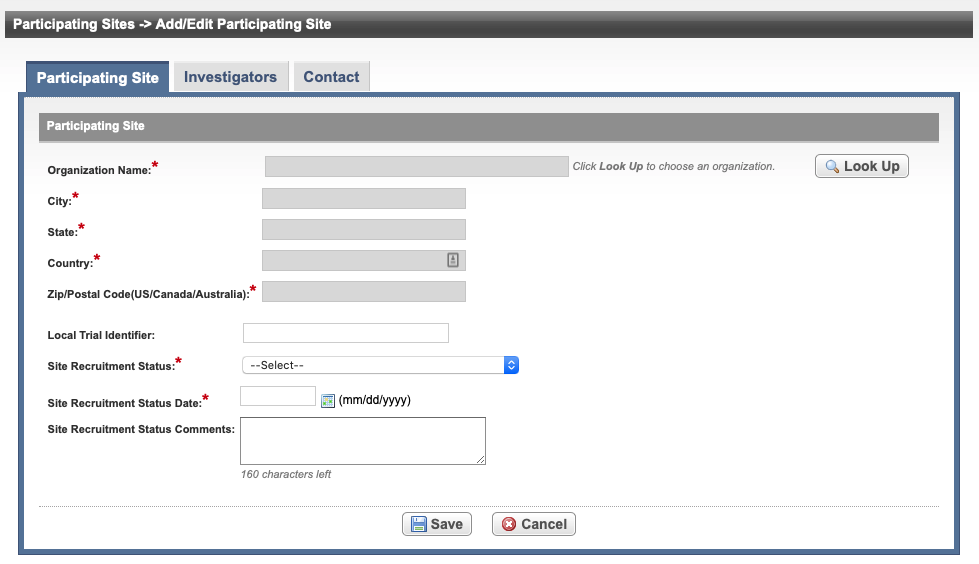
Add/Edit Participating Site- Complete Trial
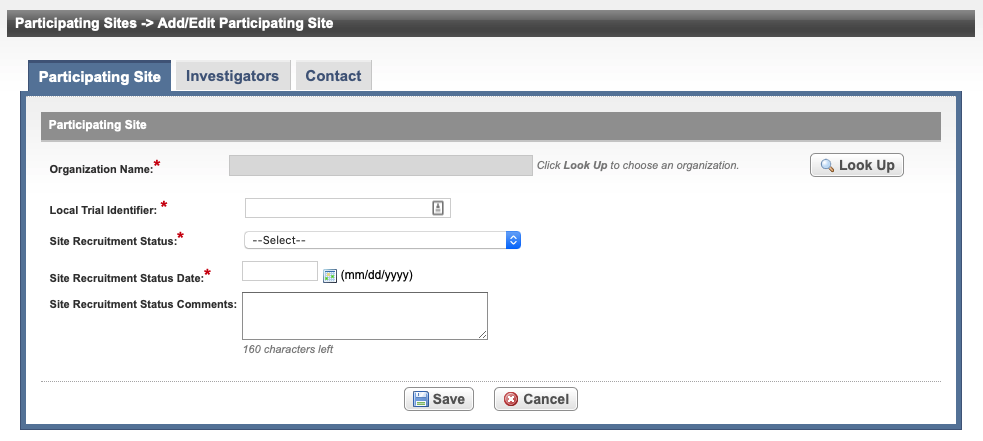
Add/Edit Participating Site - Abbreviated Trial
You must abstract the Participating Site information in the order indicated by the tabbed pages.
On the Participating Site tab, in the various fields, specify the appropriate information. The following table describes the fields. An asterisk (*) indicates a required field.
Field Label
Description/Instructions
Organization Name*
Click Look Up and follow the instructions in Searching for Organizations. For Complete trials, the City, State, Country, and Zip/Postal Codes fields are populated with the organization information you selected.
Local Trial Identifier*
Enter the site trial identifier.
Site Recruitment Status*
- Optionally, to view the trial’s recruitment status history, click History.
- Select the status from the drop-down list. For valid ClinicalTrials.gov recruitment values, refer to Trial Status Values in the CTRP and ClinicalTrials.gov and Expanded Access Statuses.
The system validates all status transitions when you save a trial status record. If you add or update a status transition that does not conform to the rules provided in Trial Status Transitions, the system displays errors and/or warnings. Warnings indicate that fixing the status record is optional; you do not have to resolve the transitions. However, Errors indicate that you must resolve the transitions by correcting trial status records in the Participating Sites Status History window. You can not check in the trial until you correct all status transition errors. For a comprehensive matrix of valid transitions, see Trial and Participating Sites Status Transition Rules.
Site Recruitment Status Date*
Enter the date that the status was recorded. The date must be the current date or earlier.
Site Recruitment Status Comments Enter one or more comments about the site recruitment status. Click Save.
Click the Investigators tab. The Investigators tab displays the trial investigators that may have been added during trial submission or abstraction.
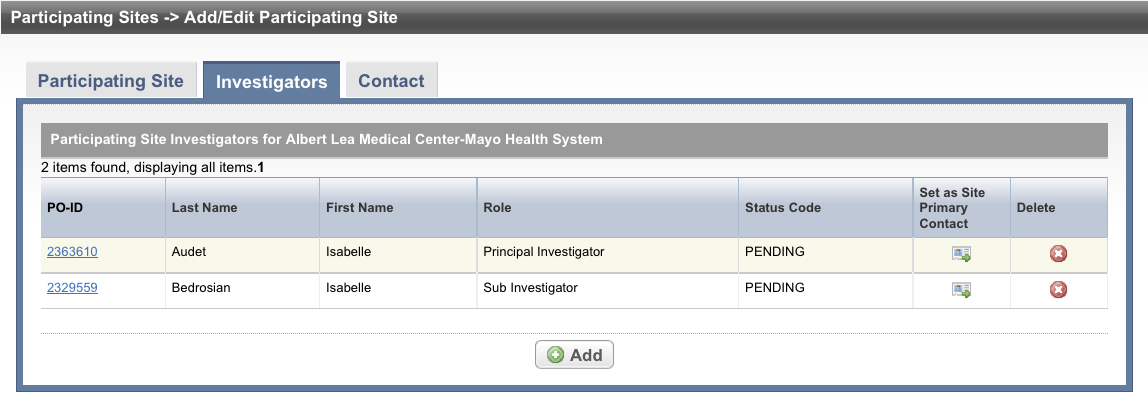
- Click Add and search for the investigator’s name by following the instructions in Searching for Persons.

- When you find the investigator in the search results list, assign the investigator role, either Principal Investigator or Sub Investigator, and then click Select. The person's record you selected appears on the Investigators tab.
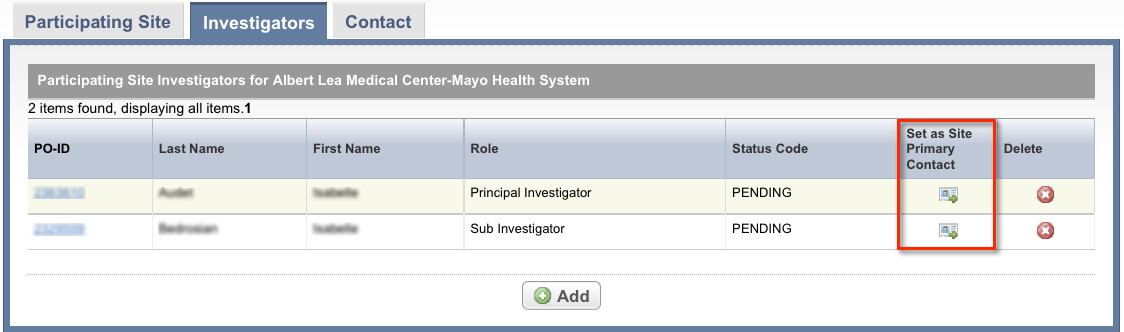
If you want to indicate that an investigator is the primary contact, click the Set as Site Primary Contact icon next to this investigator's record.
You will not be able to complete the abstraction if you do not indicate the primary contact.
Click the Contact tab. The Participating Sites page displays the Contact tab.
You must link a Participating Site to the trial before abstracting the site PI and contact information. You can add a contact by providing a person’s name (i.e., someone who is associated with the trial itself), or you can add a generic contact (i.e., someone who is associated with the site but not necessarily the trial) by providing a person’s title (functional role). You can not provide both types of contacts in the same record.
If you designated a primary investigator as the primary contact (on the Investigators tab), the investigator's name is displayed automatically on the Contact tab.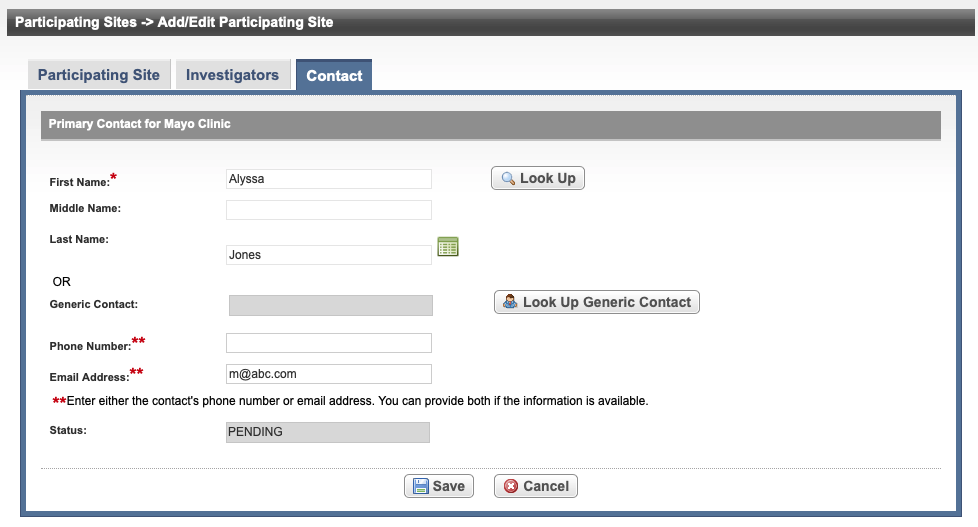
- On the Contact tab, next to the First Name field, click Look Up and search for the contact person’s name by following the instructions in Searching for Persons. The person’s name you selected appears in the Name fields on the Contact tab.
In the various fields, specify the appropriate information. The following table describes the fields. An asterisk (*) indicates a required field.
Field Label
Description/Instructions
Phone Number
Enter the contact’s primary telephone number (as 123-456-7890), including an extension if provided.
You must provide either the contact's phone number or email address. You can provide both if the information is available.
Email Address
Type the contact’s primary email address.
You must provide either the contact's phone number or email address. You can provide both if the information is available.
Status This field is populated by the system after you click Save. - Click Save.