If your user account has the Own permission level on a collection or a data file, you can manage permissions on that data.
To manage permissions:
- Use one of the following methods to locate the permissions icon for a collection or file:
- Search for data as described in Searching for Data via the GUI. The search results page appears. Locate the permissions icon for the collection or file of interest. (Within the results list, you might need to scroll to the right.)
- Browse for the data and view details as described in Viewing Metadata via the GUI. The Collection page or Data File page appears, listing all attributes for the collection or data file.
- Click the permissions icon (
 ). The Permissions page appears.
 - Consider sharing the data with one or more users or groups:
- At the bottom of the page, click Add Permission. The Add Permission dialog box appears.
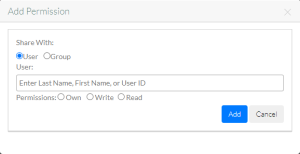
Specify whether you want to share the data with users or groups. - In the User or Group field, start typing a value:
- In the User field, start typing a user's first name, last name, or user ID. The system suggests names of matching users as you type. Select one of the suggested names. Repeat this process to add additional users.
- In the Group field, start typing a group name. The system suggests names of matching groups as you type. Select one of the suggested names. Repeat this process to add additional groups.
- In the Permissions field, select Own, Write, or Read.
- Click Save. The system adds the selected users or groups to the list on the Permissions page and displays a message to indicate whether the permissions for the collection or file were updated successfully.
- At the bottom of the page, click Add Permission. The Add Permission dialog box appears.
Consider changing the permission setting for a user or group:
Click Edit.
In the row for the user or group of interest, select the permission level you want that user or group to have. The following table describes each permission level:
Permission Level Description Own A user with the Own permission owns the data. This user can do everything a user with the Write level can do, as well as assign to other users or groups permissions to access the data. This user can also delete the data, if all other deletion criteria are met, as described in Deleting Data via the GUI and Deleting Data via the CLU. Write A user with the Write permission level can do everything a user with the Read level can do. This user can also create a collection, register files, update metadata, and move/rename data. Read A user with the Read permission level can view the data (via search or browse), bookmark a collection, and download the data. None All users can view reports and subscribe to notifications. However, if you assign to a user or group the None permission level for a collection or a data file, that user or group will not be able to view, download, or edit that data, or assign permissions to access that data. Click Save. The system displays a message to indicate whether the permissions for the collection or file were updated successfully. Also, the system sorts the list alphabetically by type (group or user) and then by name. If you had changed the permission level for a user or group to None, that user or group disappears from the list.
- Ask the specified user or group of users to log out of DME and log in again.