Directions are given on this page for installing v.1.4 or 1.4.x application and services. This page includes the following topics:
caIntegrator versions 1.4 and 1.4.x
All content on this page applies to both versions of caIntegrator.
Installing caIntegrator v.1.4 or 1.4.x Application and Services
To newly install the caIntegrator v.1.4 or 1.4.x application and services, follow the steps in these sections:
- Downloading caIntegrator v.1.4 Files
- Installing a New caIntegrator v.1.4
- Configuring JBoss
- Post-Installation Tasks
BEFORE YOU BEGIN
There must already be a pre-existing MySQL DB and connection username/password for caIntegrator to install into; caIntegrator does not create its own DB.
Downloading caIntegrator v.1.4 Files
To download the caIntegrator v.1.4 files, follow this step:
The various installation files for caIntegrator v.1.4 are between 150-200MB in size. All of the files can be downloaded from the caIntegrator GForge files archive.
- For a new command-line installer or command-line upgrade installer, download the
caintegrator2-install-1.4.zipfile (around 165MB). - For a GUI installer that you can use to do a fresh caIntegrator installation, download the
caintegrator2_gui_distribution_1.4.jar-201207171753.jarfile (about 190 MB).
Remember the download location, as you will be using this file to run the installation in the steps that follow.
Server components in caIntegrator v.1.4
These server components are installed and configured as part of the caIntegrator v.1.4 or 1.4.x installation. You do not need to do anything further to download or install these components.
- JBoss 5.1.0 (hosts the caIntegrator application)
Downloading caIntegrator v.1.4.2 Files
To download the caIntegrator v.1.4.2 files, follow this step:
Download the files from the caIntegrator distribution folder.
- To install caIntegrator using the command-line installer, download the
caintegrator-install-1.4.2.zipfile.- To upgrade caIntegrator using the command-line installer, download the
caintegrator-upgrade-1.4.2.zipfile. For more information about upgrading caIntegrator, see 6 - Upgrading caIntegrator..
- To upgrade caIntegrator using the command-line installer, download the
To install caIntegrator using the GUI installer, download the
caintegrator_gui_distribution_1.4.2.jarfile.Remember the directory location where you downloaded the file, as you will be using this file to run the installation in the steps that follow.
Installing a New caIntegrator v.1.4
You can perform a new installation of caIntegrator v.1.4 using either of these two methods:
- A GUI Installation wizard. Instructions for this method start in the following section.
- A command-line installation. For instructions, see Command-Line Method of Installation.
GUI Installer Method of Installation for v.1.4
For detailed information on all of the GUI installer fields, refer to the BDA Properties page.
For performing an installation using the GUI Installer, follow these steps:
- Open a command prompt in the directory where you downloaded the .jar file.
caintegrator2_gui_distribution_1.4.jar-201207171753.jar. Enter this command to invoke the GUI installer:java --jar caintegrator2_gui_distribution_1.4.jar-201207171753.jar. - The Installation Wizard opens to facilitate the installation process. Click Next to proceed through the pages of the wizard, beginning with progressing past the Welcome page.
- Review the release notes.
- You must accept the license agreement.
- Select the Install installation type. For a new installation, select Install.
- Select Browse to navigate to the directory where you would like to install caIntegrator. The directory then displays in the text box. If the folder does not yet exist, click OK in the dialog box to indicate that you want the folder to be created.
- Select the type of installation you would like to perform. You can install everything, or just specific components (JBoss or Database only). The remaining sections in this guide assumes you chose to install everything.
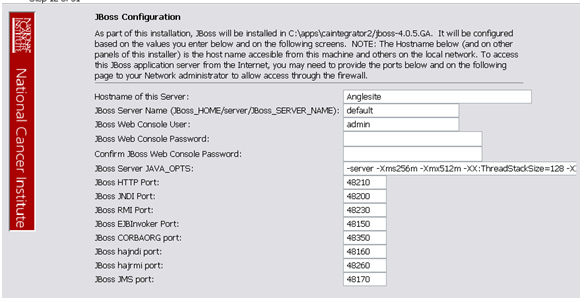
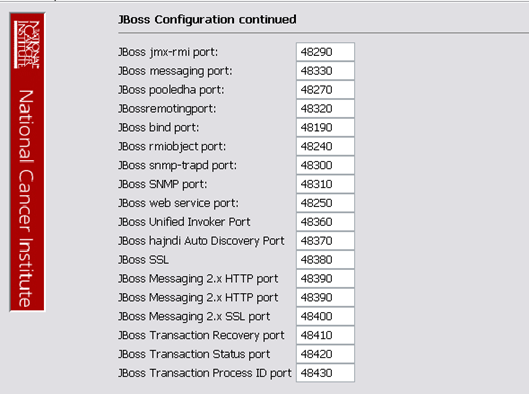
- Continue walking through the pages of the installer. Configure the caIntegrator JBoss server on the next two pages of the installation wizard. The screen shots show example values. The port values which are specified are the defaults and can be used unless you want to reconfigure the values because of values already in use.
- JBoss Installation Options
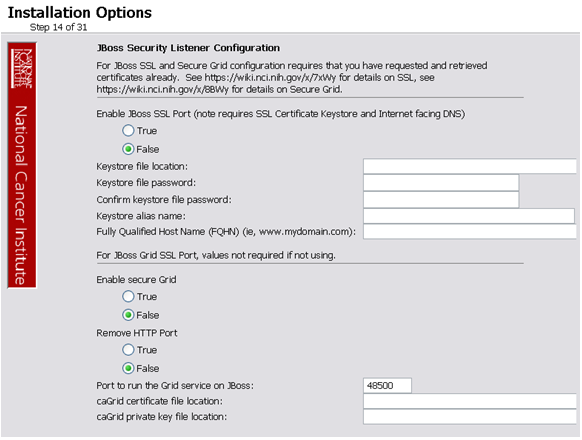
- JBoss SSL requires that you have requested and retrieved certificates already. If this does not apply to your installation, leave the values as false and continue.
- If your JBoss is externally accessible then fill out the JBoss External Hostname Configuration page. Otherwise, leave it blank and continue.
- For a standard installation of caIntegrator, do not use SSO.
- Specify the authentication type that caIntegrator should use. Database is the most likely choice if you aren't sure what to select here.
- If you selected LDAP in the previous step (authentication type), enter the appropriate configuration information for LDAP: the LDAP URL and the LDAP Search Back DN.
- If the authentication type is database, specify the following data base configuration information:
- The Database Host Name
- The Database Port Example: 3306
- Database name of the pre-existing database where the caIntegrator schema will be installed
- The pre-existing Database Application User to be used by caIntegrator to connect to its database.
Error messages inform you if the following occurs:- If the specified database host cannot be reached, or the field is blank.
- If the specified database does not already exist, or the caIntegrator DB user's credentials are wrong.
- Specify SMTP mail server connection information so that caIntegrator can send emails from users with new account requests. You must provide the following
- Mail Server Host Example:
localhost - Mail Server Port Number Example:
25 - Mail Server Authentication: default is false.
- Mail Server starttls: default is false.
- Mail Server Host Example:
- If jar signing is necessary for the installation, then enable it on the Jar Signing Configuration page. This step is optional and can be skipped.
- Review the summary of the information you entered.
- Review the selected installation type and the installation destination.
After you click Next from reviewing the installation destination, the installer runs. The installation wizard displays the installation progress and completion. - When you are informed that the process is finished, click Done in the lower right corner of the wizard to close the installer.
- To verify caIntegrator installation:
- Open your web browser to installed instance. The URL follows this format: http://<jboss.server.hostname>:<jboss.server.port>/caintegrator/workspace.action.
- Enter ncimanager as the user and changeme as the password. Refer to the
<user home>/.installer-caintegrator/caintegrator_installer/install.propertiesfile for the correct values.
- After successfully installing caIntegrator, make a backup of the
<user home>/.installer-caintegrator/caintegrator_installer/install.propertiesfile in a different directory for future reference.
Command-Line Method of Installation
About Properties
An important component of command-line installation is configuring properties.
Overview of command-line installer properties files
- When you do a command-line installation of caIntegrator for the first time, you will work with
install.propertiesfile included in thecaIntegrator_install_1_4.zip. - If you are upgrading by command-line from a previous version of caIntegrator, you will work with the
install.propertiesfile included in thecaIntegrator_install_1_4.zipas well as the existinginstall.propertiesfile.
See also Working with Properties Files .
caIntegrator Port Usage
Verify that default port values defined in install.properties files are not in use on your system by running netstat --a from the command line. If the ports are in use prior to installation, you will likely experience problems with your installation.
JBoss Errors During Installation
You may receive an error such as Exception in thread "main" java.lang.NoClassDefFoundError: org/jboss/Shutdown. This should not be a problem, as the installer attempts to stop previously installed servers to prevent problems during the installation. If this is your first time installing caIntegrator, you may receive and disregard this error message.
Command-line Installation Steps
To install a new instance of caIntegrator using the command-line, follow these steps:
- From the directory where you downloaded the
caintegrator2-install-1.4.zipfiles described in Downloading caIntegrator v.1.4 Files, unzip the files, using one of these two methods:- Open a command prompt and use it to extract this file to a temporary location. For example, you may enter a command such as
unzip -q caintegrator2-install-1.4.zip. You must have a ZIP tool installed. This location will be referred to as the<installer_directory>henceforth. Use WinZip or a similar utility to unzip the files to a temporary location. This location will be referred to as the
<installer_directory>henceforth.
Example:<installer directory>=C:\caIntegrator_installerAbout setting property values
Setting the property values is an important step in the installation process. Before you complete steps 2 & 3, review Working with Properties Files .
- Open a command prompt and use it to extract this file to a temporary location. For example, you may enter a command such as
- Open the
<installer_directory>/install.propertiesfile, modify the values for your environment and save the file. For the latest details about configuring the properties for your environment, refer to the BDA Properties wiki page. Record the property values you have set.
Other default values
You should not need to modify the other default values as we have chosen unique ports to reduce the risk of other applications using the same values. However, be sure to verify that the ports in this file are not being used by other applications.
- From the command line, navigate to
<installer_directory>/(Example:cd C:\caIntegrator_2_0_installer), and typeant. This initiates the installation process. The anticipated duration is anywhere from 1-15 minutes, depending on your system's speed, power and memory.
The installer installs the caIntegrator schema in the specified pre-existing database on your MySQL server, and installs, configures, and starts the JBoss server for the caIntegrator application. - To verify caIntegrator installation, open your web browser to the installed instance. The URL follows this format: http://<jboss.server.hostname>:<jboss.server.port>/caintegrator/workspace.action.
Refer to the<installer_directory>/install.propertiesfile for the correct values. Enter manager as the user and manager as the password. - After successfully installing caIntegrator, make a backup of the
<installer_directory>/install.propertiesfile in a different directory for future reference.
Installing a New caIntegrator v.1.4.2
You can perform a new installation of caIntegrator v.1.4.2 using either of these two methods:
- A GUI Installation wizard. Instructions for this method start in the following section.
- A command-line installation. For instructions, see Command-Line Method of Installation.
GUI Installer Method of Installation for v.1.4.2
For detailed information on all of the GUI installer fields, refer to the BDA Properties page.
For performing an installation using the GUI Installer, follow these steps:
- Open a command prompt in the directory where you downloaded the .jar file.
caintegrator_gui_distribution_1.4.2.jar. Enter this command to invoke the GUI installer:java --jar caintegrator_gui_distribution_1.4.2.jar. - The Installation Wizard opens to facilitate the installation process. Click Next to proceed through the pages of the wizard, beginning with progressing past the Welcome page.
- Review the release notes.
- You must accept the license agreement.
- Select the Install installation type. For a new installation, select Install.
- Select Browse to navigate to the directory where you would like to install caIntegrator. The directory then displays in the text box. If the folder does not yet exist, click OK in the dialog box to indicate that you want the folder to be created.
- Select the type of installation you would like to perform. You can install everything, or just specific components (JBoss or Database only). The remaining sections in this guide assumes you chose to install everything.
- Continue walking through the pages of the installer. Configure the caIntegrator JBoss server on the next two pages of the installation wizard. The screen shots show example values. The port values which are specified are the defaults and can be used unless you want to reconfigure the values because of values already in use.
- JBoss Installation Options
- JBoss SSL requires that you have requested and retrieved certificates already. If this does not apply to your installation, leave the values as false and continue.
- If your JBoss is externally accessible then fill out the JBoss External Hostname Configuration page. Otherwise, leave it blank and continue.
- For a standard installation of caIntegrator, do not use SSO.
- Specify the authentication type that caIntegrator should use. Database is the most likely choice if you aren't sure what to select here.
- If you selected LDAP in the previous step (authentication type), enter the appropriate configuration information for LDAP: the LDAP URL and the LDAP Search Back DN.
- If the authentication type is database, specify the following data base configuration information:
- The Database Host Name
- The Database Port Example: 3306
- Database name of the pre-existing database where the caIntegrator schema will be installed
- The pre-existing Database Application User to be used by caIntegrator to connect to its database.
Error messages inform you if the following occurs:- If the specified database host cannot be reached, or the field is blank.
- If the specified database does not already exist, or the caIntegrator DB user's credentials are wrong.
- Specify SMTP mail server connection information so that caIntegrator can send emails from users with new account requests. You must provide the following
- Mail Server Host Example:
localhost - Mail Server Port Number Example:
25 - Mail Server Authentication: default is false.
- Mail Server starttls: default is false.
- Mail Server Host Example:
- If jar signing is necessary for the installation, then enable it on the Jar Signing Configuration page. This step is optional and can be skipped.
- Review the summary of the information you entered.
- Review the selected installation type and the installation destination.
After you click Next from reviewing the installation destination, the installer runs. The installation wizard displays the installation progress and completion. - When you are informed that the process is finished, click Done in the lower right corner of the wizard to close the installer.
- To verify caIntegrator installation:
- Open your web browser to installed instance. The URL follows this format: http://<jboss.server.hostname>:<jboss.server.port>/caintegrator/workspace.action.
- Enter ncimanager as the user and changeme as the password. Refer to the
<user home>/.installer-caintegrator/caintegrator_installer/install.propertiesfile for the correct values.
- After successfully installing caIntegrator, make a backup of the
<user home>/.installer-caintegrator/caintegrator_installer/install.propertiesfile in a different directory for future reference.
Command-Line Method of Installation
About Properties
An important component of command-line installation is configuring properties.
Overview of command-line installer properties files
- When you do a command-line installation of caIntegrator for the first time, you will work with
install.propertiesfile included in thecaintegrator-install-1.4.2.zipfor - If you are upgrading by command-line from a previous version of caIntegrator, you will work with the
upgrade.propertiesfile included in thecaintegrator-upgrade-1.4.2.zipas well as the existingupgrade.propertiesfile.
See also Working with Properties Files .
caIntegrator Port Usage
Verify that default port values defined in install.properties files are not in use on your system by running netstat --a from the command line. If the ports are in use prior to installation, you will likely experience problems with your installation.
JBoss Errors During Installation
You may receive an error such as Exception in thread "main" java.lang.NoClassDefFoundError: org/jboss/Shutdown. This should not be a problem, as the installer attempts to stop previously installed servers to prevent problems during the installation. If this is your first time installing caIntegrator, you may receive and disregard this error message.
Command-line Installation Steps
To install a new instance of caIntegrator using the command-line, follow these steps:
- From the directory where you downloaded the
caintegrator-install-1.4.2.zipfiles described in Downloading caIntegrator v.1.4 Files, unzip the files, using one of these two methods:- Open a command prompt and use it to extract this file to a temporary location. For example, you may enter a command such as
unzip -q caintegrator-install-1.4.2.zip. You must have a ZIP tool installed. This location will be referred to as the<installer_directory>henceforth. Use WinZip or a similar utility to unzip the files to a temporary location. This location will be referred to as the
<installer_directory>henceforth.
Example:<installer directory>=C:\caIntegrator_installerAbout setting property values
Setting the property values is an important step in the installation process. Before you complete steps 2 & 3, review Working with Properties Files .
- Open a command prompt and use it to extract this file to a temporary location. For example, you may enter a command such as
- Open the
<installer_directory>/install.propertiesfile, modify the values for your environment and save the file. For the latest details about configuring the properties for your environment, refer to the BDA Properties wiki page. Record the property values you have set.
Other default values
You should not need to modify the other default values as we have chosen unique ports to reduce the risk of other applications using the same values. However, be sure to verify that the ports in this file are not being used by other applications.
- From the command line, navigate to
<installer_directory>/(Example:cd C:\caintegrator-install-1.4.2), and typeant. This initiates the installation process. The anticipated duration is anywhere from 1-15 minutes, depending on your system's speed, power and memory.
The installer installs the caIntegrator schema in the specified pre-existing database on your MySQL server, and installs, configures, and starts the JBoss server for the caIntegrator application. - To verify caIntegrator installation, open your web browser to the installed instance. The URL follows this format: http://<jboss.server.hostname>:<jboss.server.port>/caintegrator/workspace.action.
Refer to the<installer_directory>/install.propertiesfile for the correct values. Enter manager as the user and manager as the password. - After successfully installing caIntegrator, make a backup of the
<installer_directory>/install.propertiesfile in a different directory for future reference.


