Viewing Data with the Integrative Genomics Viewer
Once you have run a query for gene expression, or have run analyses for copy number, or analyses for genomic data, you can view results in the Integrative Genomics Viewer (IGV).
The IGV is a high-performance visualization tool for interactive exploration of large, integrated datasets. It supports a wide variety of data types including sequence alignments, microarrays, and genomic annotations.
IGV information
For more information about the Integrative Genomics Viewer or to connect independently to the IGV home page, see Integrative Genomics Viewer  .
.
You may also want to refer to the IGV User Guide
. The IGV viewer and the NCI Heat Map viewer both require you to install a version of Java containing Java Web Start. For more information, see Java for IGV and Heat Map Viewer.
There are two ways to integrate caIntegrator with the IGV. To configure the connection to IGV, follow one of these methods.
Method 1 IGV
- With the appropriate study open, at the bottom of the Query Results page, click the View in Integrative Genomics Viewer button.
- If you click the button at the bottom of the page with any of the query results line items selected, caIntegrator creates IGV files, with a monitor informing you of this. After the files are created, click the Launch Integrative Viewer hypertext link.
- Follow the instructions through the intermediate dialog boxes. After clicking Open with the Java program listed, the
IGV.jnlpopens, displaying the dataset in the computer screen. An example displays in the following figure.
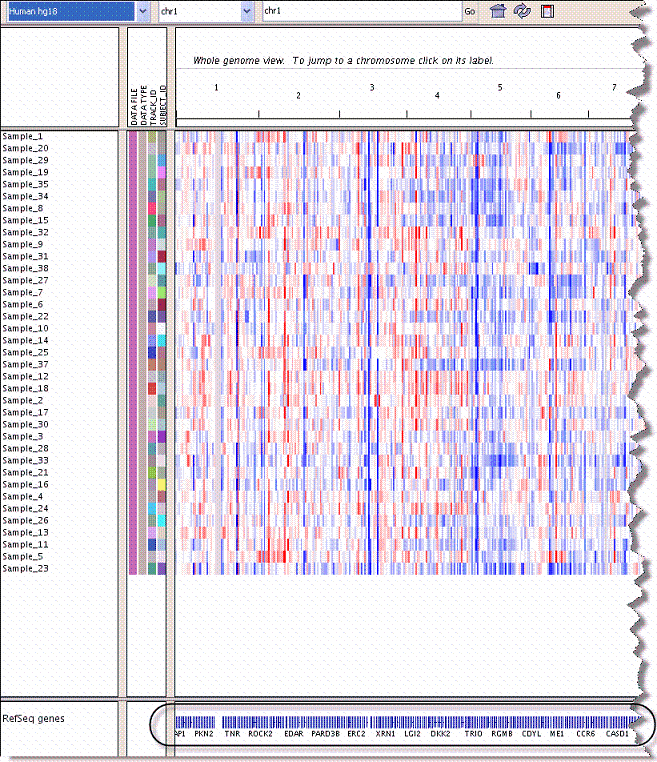
- Move your mouse to hover over the genes graphic at the bottom of the page, indicated in the figure.
- Click the mouse when you've identified a gene of interest.
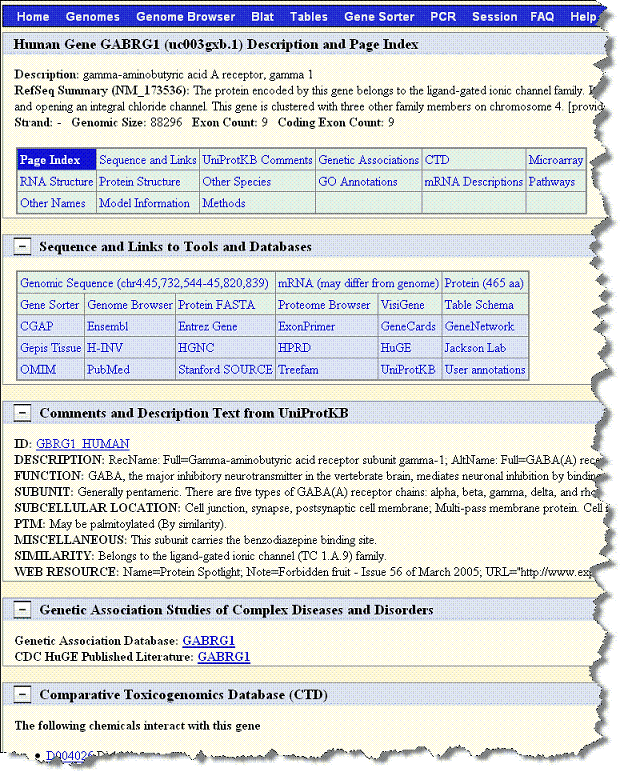
This opens the genome site at UCSC, where you can learn more about the gene. The following figures exhibits the kind of metadata you can expect from the UCSC genome site.
Method 2 IGV
- With the appropriate study open, click Integrative Genomics Viewer on the left sidebar. This opens the View IGV Selector page, shown in the following figure.
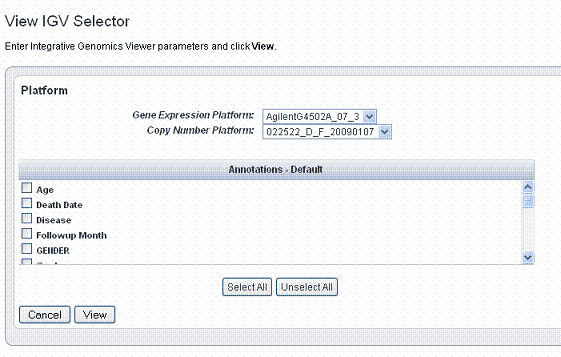
- In the drop-down list, select the Gene Expression Platform for the data you want to view.
- Select the Copy Number Platform ID.
- The Annotations - Default panel displays existing annotation fields for the gene expression data in the open study. Select those fields you want to view when you open the IGV. Use the buttons for convenience if you want to Select All or Unselect All, when all are checked.
- Click View to see the data in the Integrative Genomic Viewer. caIntegrator creates IGV files of the data.
- After the files are created, click the Launch Integrative Viewer hypertext link that appears.
- Continue with Step 3 in Method 1 IGV.
Viewing Data with Heat Map Viewer
Once you have run a query for gene expression, or for copy number, or have run analyses on genomic data, you can view results in the Heat Map Viewer (HMV).
HMV information
For more information about the Heat Map Viewer or to connect independently to the HMV home page, see Heat Map Viewer documentation or HMV documentation. The IGV viewer and the NCI Heat Map viewer both require you to install a version of Java containing Java Web Start. For more information, see Java for IGV and Heat Map Viewer..
There are two ways to integrate caIntegrator with the Heat Map Viewer. To configure the connection, follow one of these methods.
Method 1 HMV
- With the appropriate study open, at the bottom of the Query Results page, click the View in Heat Map Viewer button.
- If you click the button at the bottom of the page with any of the query results line items selected, caIntegrator creates HMV files, with a monitor informing you of this. After the files are created, click the Launch Heat Map Viewer hypertext link.
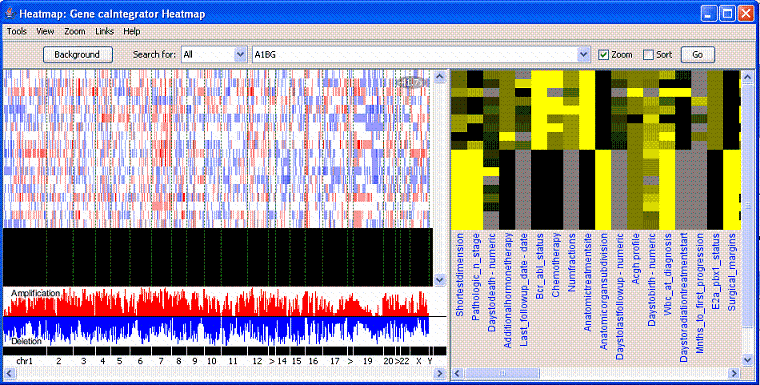
- Follow the instructions through the intermediate dialog boxes. After clicking Open with the Java program listed, the runs, displaying the dataset in the computer screen. An example displays in the following figure.
Method 2 HMV
- With the appropriate study open, click Heat Map Viewer on the left sidebar. This opens the View Heat Map Viewer Selector page, shown in the following figure.
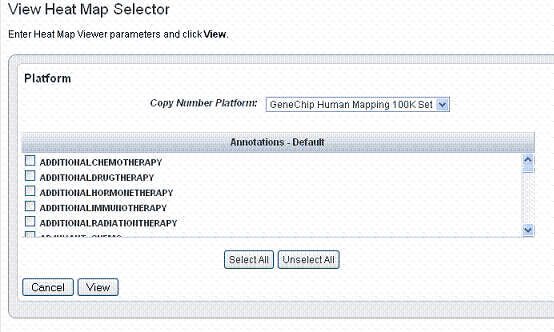
- Select the appropriate Copy Number Platform in the drop down list.
- The Annotations - Default panel displays existing annotation fields for the gene expression data in the open study. Select one or more annotations in the annotation list. For convenience, you can use the Select All or Unselect All buttons.
- Click View to view the data you select in Heat Map Viewer. caIntegrator creates Heat Map Viewer files of the data.
- After the files are created, click the Launch Heat Map Viewer hypertext link that appears.
Continue with Step 3 in Method 1 HMV.
HMV help files
For interpretation of the results and using HMV features, see the help files opened from HMV.
Java for IGV and Heat Map Viewer
To use the IGV and the NCI Heat Map viewer, described in Viewing Data with the Integrative Genomics Viewer and Viewing Data with Heat Map Viewer, you must install a version of Java containing Java Web Start. You must install recent versions of the Java Development Kit (JDK 1.5.0 aka JDK 5.0 or newer) or Java Runtime Environment (JRE 1.5.0 aka JRE 5.0 or newer). The easiest option is to install JRE 5.0
Without Java Web Start, when you click Launch Integrative Genomics Viewer or Launch Heat Map Viewer, a dialog box displays in your browser giving you the option to save or open with igv.jnlp (IGV) or retrieveFile.jnlp (HMV). Clicking the Open option starts the Java Web Start Launcher (default), installing the Java app so that you can view the files.
Upon first launch
The first time you launch the IGV or HMV with Java properly installed, regardless of browser type, a warning may appear: the "the digital signature cannot be verified". Click Run to proceed with opening the viewer.