Page History
...
| Info | ||
|---|---|---|
| ||
Annotation definitions by default are visible only to the Study Manager's group. They are not visible to all caIntegrator users, unless you change the visibility for each. |
Editing an Annotation Group
This topic opens from the Edit Annotation Group page. You may want to refer to #Adding an Annotation Group if you are adding a group for the first time.
To edit an annotation group, on the Edit Study page for a study with an existing annotation group, click the Edit Group button.
- You can change the Name and Description for the group.
- A list of annotation definitions applied to the original annotation group displays on the Edit Annotation Group page.
- In the drop-down list, you can select a different annotation group for the annotation definition.
- You can change the visibility for the annotation definition.
- Click Change Assignment to modify the properties of the annotation definition.
- Click Update Annotations to confirm your edits for the group.
Adding Subject Annotation Data
The Edit Study page, described in #Creating/Editing a Study, opens after you save a new study or click to edit an existing study.
To add subject annotation metadata on this page, follow these steps:
- In the Subject Annotation Data Sources section of the page, click the Add New button. The page expands to reveal new fields for you to identify information about the annotation data sources.
- Navigate to locate a subject annotation data file which is required for a study. Files must be in CSV file format.
- Click the appropriate box if you want caIntegrator to Create an annotation definition if one is not found.
- Click Upload Now to load the annotation source data.
After the data file is uploaded to this study, it will be listed in the Subject Annotation Data Sources section of the Edit Study page.
From this page you can initiate editing the annotations. In the Subject Annotation Data Sources section, click Edit Annotations corresponding to the subject annotations that have been uploaded for the study. This open the #Define Fields Page for Editing Annotations.
Define Fields Page for Editing Annotations
The Define Fields for Subject Data page, shown in the following figure, opens when you click Edit Annotations in the Subject Annotation Data Sources or the Image Data Sources section of the Edit Study page. The exception to this is if you have not yet imported annotations for the imaging data for the study, In that case, when you click the Edit Annotations button in the Imaging Data Sources section, a page opens where you can identify and upload image annotation data. See #Adding or Editing Image Annotations.
If this Define Fields page opens after clicking the Edit Annotations button, working with this page is identical for both subject and image annotations

The first column of the table on this page displays annotation groups that have been created for this study. For more information, see #Adding an Annotation Group.
To add subject or image annotation metadata in this page, follow these steps:
- You can specify visibility of specified annotation data in the Visible column.
- Select a checkbox for a row to make the corresponding data visible to all subscribers of the study or anonymous users if the study is made available to the public.
- Clear a checkbox to hide the corresponding annotation from any subscriber or anonymous user of the study. Data continues to exist but does not show up in query fields nor in query results.
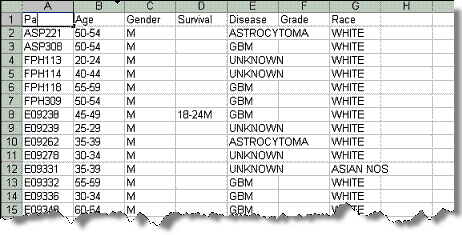
- The Annotation Header from File column on the Define Fields for Subject (or Image) Data page (the figure shown above) displays column headers taken from the source CSV file. The Define Fields... page also displays data values in the file you have designated. You must map each column name to an existing column name in the caIntegrator database or in caDSR. If it doesn't yet exist, you can create a custom column name. The following figure is an example CSV file whose data you would be mapping in caIntegrator in the Define Fields page.
The MOST important steps in creating a new study in caIntegrator are these:
- You MUST designate one column in the file as a unique "identifier" column type.
- You MUST review and define column annotation definitions for each column header in the file.
Note the following regarding the list of annotations on this Define Fields... page:- – If caIntegrator "recognizes" the same column header in other files already in the system, a term, for example "age" or "survival", which is the current definition, appears in the Annotation Definition column above the blue Change Assignment link on the page.
- – When the annotation definition has not been assigned, and the area above the blue Assign Annotation Definition link is blank on this page, no correlating term exists in the database. In this case, you must specify the field type, and then the term will populate the space. See #Assigning an Identifier or Annotation for more information.
- – A field name that displays in red indicates an error in the annotation. Click the Change Assignment button for more information about the error.
3 To indicate the unique identifier of choice, on the row showing the column header (PatientID in the figure, but other examples are subject identifier, sample identifier, etc), click Change Assignment in the Annotation Definition column.
Assigning An Identifier or Annotation
When you click Change Assignment on the #Define Fields page, the Assign Annotation Definition for Field Descriptor dialog box opens. On this page you can change the column type and the field definition for the specific data field you selected.
| Info | ||
|---|---|---|
| ||
When you change an assignment, you must make sure the data types match--numeric, etc. |
...