Page History
| Scrollbar | ||
|---|---|---|
|
...
| Page info | ||||
|---|---|---|---|---|
|
This chapter describes the processes for creating and managing studies in caIntegrator. Topics in this chapter include:
...
One of the most important tasks in creating a study in caIntegrator is in properly annotating the data. Each annotation has a definition you must identify. Because the process can be quite complex, you might want to review the following steps for working with annotations.
Annotation Workflow Summary
...
- Add an annotation group. This optional step is for users who have a rigid data dictionary of all annotations relevant to the study. This step can also be helpful in cases where a study has many annotations. For more information, see Adding an Annotation Group.
- Add subject annotation data. This consists of multiple sub-steps.
- Add a new subject annotation data sources file. This step uploads the file containing annotations and starts the workflow for assigning uploaded data definitions. See Editing an Annotation Group, step 1.
- Edit the annotations. This step opens the Define Fields for Subject Data page. See Editing an Annotation Group, step 2.
- In the Define Fields for Subject Data page, review possible definitions in the annotation group associated with this study. See Define Fields Page.
- Assign the visibility of each annotation definition. See Editing an Annotation Group, step 2.
- In the authorization column, select the annotation or annotations to be used to restrict data by subject for authorized groups. If authorization groups are to be used to restrict study data, at least one annotation authorization must be selected. If authorization groups are not to be used to restrict study data, selecting an annotation authorization is not necessary. Annotations used to restrict data by subject must contain permissible values. See Assigning an Identifier or Annotation for more information about permissible values.
- Locate and verify the assignment as "identifier" for one annotation. See Assigning an Identifier or Annotation.
- Review, verify and assign definitions for each annotation. You can do this in one of four ways:
--Accept existing default definitions as described in the associated annotation group. See Assigning an Identifier or Annotation.
--Create or manage definitions manually. See Assigning an Identifier or Annotation.
--Search for and use definitions existing in other caIntegrator studies. See Searching for Annotation Definitions.
--Search for and use definitions from caDSR. See Searching for Annotation Definitions.
- Load the Subject Annotation Source. Up until this point, you can periodically save your work with the annotations, but before you can deploy the study, you must complete this step.
- Deploy the study.
Adding an Annotation Group
| Info | ||
|---|---|---|
| ||
This optional step is for users who have a rigid data dictionary of all annotations relevant to the study. This step can also be helpful in cases where a study has many annotations. |
This topic opens from both the Create Annotation Group page and the Edit Annotation Group page. If you plan to create a group, continue with this topic. If you plan to edit an existing annotation group, see Editing an Annotation Group.
...
| title | Why sue this optional step |
|---|
...
.
...
An annotation group is a group of annotation definitions configured in a subject data source CSV file. This feature is primarily meant for the Study Manager who knows that they have tightly restricted vocabulary definitions that are relevant to a study. In this optional step, you can review the uploaded Group Definition Source file before assigning the appropriate definitions for your study.
...
- On the Edit Study page for a study, Annotation Groups section, click the Add New button.
- On the Edit Annotation Group page that opens, enter a name for the annotation group.
- Enter a description (optional).
- Browse for the Group Definition Source CSV file.
The CSV file must include columns with these column headers in the first row: File Column Name, Field Type, Entity Type, CDE ID, CDE Version, Annotation Def Name, Data Type, Permissible, and Visible. Subsequent rows in the file define each subject annotation column in the subject annotation file.- If a subject annotation is defined by a CDE Public ID, values for the following columns are required: File Column Name, Field Type, Entity Type, CDE ID, and Visible; a value for CDE Version is optional.
OR - If a subject annotation definition is not defined by a CDE Public ID, values for the following columns are required: File Column Name, Field Type, Entity Type, Annotation Def Name, Data Type (String, Date, Numeric), Permissible (Yes or No), and Visible (Yes or No).
- If a subject annotation is defined by a CDE Public ID, values for the following columns are required: File Column Name, Field Type, Entity Type, CDE ID, and Visible; a value for CDE Version is optional.
- Click Save. This uploads the file, whose name now displays on the Edit Study page under Annotation Groups
...
| title | No manually-created annotation groups? |
|---|
...
- the Edit Study page under Annotation Groups
When you open the Define Fields for Subject Data page, the annotation definitions in the file you uploaded display on the page, available for assignment in the study. Additionally, you can view the definitions by viewing the annotation group listed in the first column of the matrix.
...
The Edit Study page, described in Creating or Editing a Study, opens after you save a new study or click to edit an existing study.
| Warning | ||
|---|---|---|
| ||
When following the steps in this section, if you have not manually created Annotation Groups, you MUST check Create a new annotation definition if one is not found. |
To add subject annotation metadata on this page, follow these steps:
...
- If you are starting with parsed data, the mapping file will have 2 columns. If you are working with unparsed data, the mapping file will have 6-column columns. See step 3 below for more information. The six columns that may be part of your file are described as follows:
- All platforms – Raw (level 1) data cannot be mapped; only normalized, processed (level 2) data is acceptable.
- The required six-column file format uses the following columns:
- Subject ID
- Sample ID
- Name of supplemental file (if appropriate, as attached to the experiment in caArray)
- Probe Header – Name of column header (in the supplemental file) which contains the probe IDs.
- Value Header – Name of column header (in the supplemental file) which holds the level 2 data.
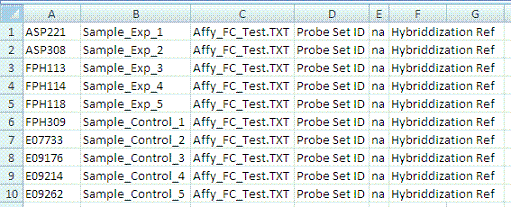
Sample Header– Name of column header (in the supplemental file) which holds the level 2 data.
Info title Last two columns Only one of the last 2 columns is used: a single sample per file uses the Value Header column; multiple samples per file used Sample Header column. Unused columns are blank.
The following figure shows an example multiple sample mapping file in CSV format.
- When you use the mapping file, make sure you use the subject ID for mapping. If the file is human data, the subject ID is the patient ID.
- Determine whether your data in from caArray is "imported and parsed" or "supplemental". These are the 'Loading Types' referred to in Step 4 3 of Steps for Mapping Genomic Data. Fill in the 2-column or 6-column mapping file according to the following standard:
- Imported and parsed – This mapping file for parsed data has only two columns, Source Subject ID and Subject Sample ID, without a header.
Supplemental– Supplemental files comes in two types: "single sample per file" and "multiple samples per file". In either case, only one of the last two columns is used. If the supplemental data format is , single sample per file, the column named "Sample_Header" can be left empty. If the supplemental data format is multiple samples per file, the column named "Value_Header" can be left empty.
Info title Configuring supplemental files Supplemental files from caArray for mapping data must be configured appropriately. For information, see Supplemental Files Configuration.
The following steps use data of either type.
...
Note that you can continue to work in caIntegrator while the study is being deployed.
...
| Scrollbar | ||
|---|---|---|
|