Page History
| Include Page | ||||
|---|---|---|---|---|
|
| Page info | ||||
|---|---|---|---|---|
|
Welcome to the caIntegrator 1.3 Local Installation Guide.
| Column |
|---|
...
| Info | ||
|---|---|---|
| ||
For any general information about the application, application support, or to report a bug, contact Application Support. |
Topics in this document include:
...
Required Software Name and Version | Description |
|---|---|
Java 2 Platform Standard Edition 6.0 Update 18 (J2SE 6.0). Be sure to download the correct Java SDK for your operating environment. For example, for Linux AMD 64, you would download jdk for Linux, | The J2SE Development Kit (JDK) supports creating J2SE applications. |
Apache Ant is a Java-based build tool. | |
MySQL is an open-source database software application. |
...
UPT is used to provision users in the caIntegrator application. Each CBIIT application installs with its own Common Security Module (CSM) schema that has sample/default users and a role/permissions structure. To add additional users you must provision the caIntegrator application in the UPT. Then you can assign users to caIntegrator.
You can download UPT 4.2
For instructions on how to install UPT 4.2, refer to the chapter, UPT Installation and Deployment, in the caCORE_CSM_v42_ProgrammersGuide.
| Info | ||
|---|---|---|
| ||
UPT 4.2 is backwards compatible to previous versions of CSM. When you provision the application in UPT 4.2, you will be asked to specify the CSM version caIntegrator is using. You should enter version |
...
The various installation files for caIntegrator v.1.3 are between 150-250MB in size. All of the files can be downloaded from the caIntegrator distribution folderGForge files archive.
- For a new command-line installer, download the
caIntegrator_install_1_3.zipfile (around 175MB). - For a command-line upgrade installer, download the
caIntegrator_upgrade_1_3.zipfile (about 175 MB). - For a GUI installer that you can use to do a fresh caIntegrator installation, download the
caIntegrator_gui_distribution_1_3.jarfile (about 207 MB).
...
- Open a command prompt in the directory where you downloaded the
caIntegrator_gui_distribution_1_3.jar. Enter this command to invoke the GUI installer:java –jar caIntegrator_gui_distribution_1_3.jar. - The Installation Wizard opens to facilitate the installation process. Click Next to proceed through the pages of the wizard, beginning with progressing past the Welcome page.
- Review the release notes.
- You must accept the license agreement.
- Select the Install installation type. For a new installation, select Install.
- Select Browse to navigate to the directory where you would like to install caIntegrator. The directory then displays in the text box. If the folder does not yet exist, click OK in the dialog box to indicate that you want the folder to be created.
- Select the type of installation you would like to do. You can install everything, or just specific components (JBoss or Database only). The remaining sections in this guide assumes you chose to install everything.
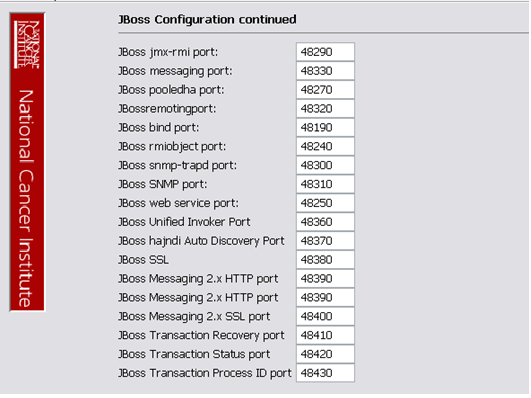
- Continue walking through the pages of the installer. Configure the caIntegrator JBoss server on the next two pages of the installation wizard. The screen shots show example values. The port values which are specified are the defaults and can be used unless you want to reconfigure the values because of values already in use.
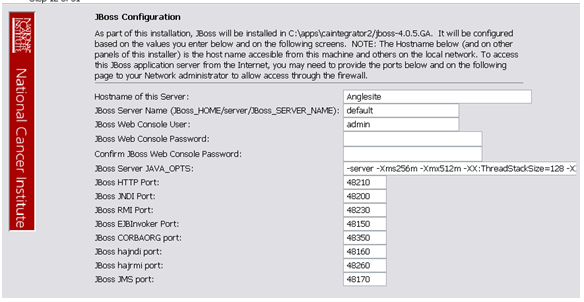
- JBoss Installation Options
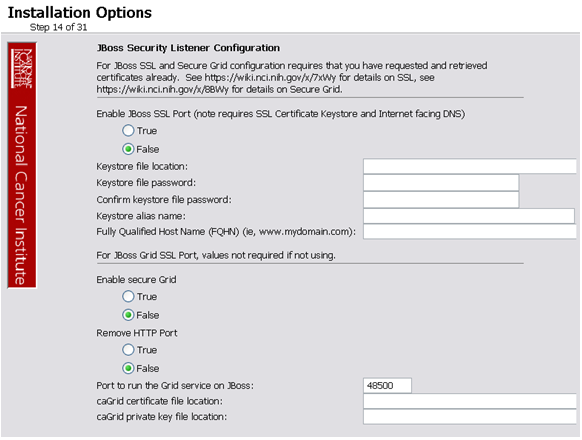
- JBoss SSL requires that you have requested and retrieved certificates already. If this does not apply to your installation, leave the values as false and continue.
- If your JBoss is externally accessible then fill out the JBoss External Hostname Configuration page. Otherwise, leave it blank and continue.
- Specify the authentication type that caIntegrator should use. Database is the most likely choice if you aren't sure what to select here.
- If you selected LDAP in the previous step (authentication type), enter the appropriate configuration information for LDAP: the LDAP URL and the LDAP Search Back DN.
- If the authentication type is database, specify the following data base configuration information:
- The Database Host Name
- The Database Port Example: 3306
- Database name of the pre-existing database where the caIntegrator schema will be installed
- The pre-existing Database Application User to be used by caIntegrator to connect to its database.
Error messages inform you if the following occurs:- If the specified database host cannot be reached, or the field is blank.
- If the specified database does not already exist, or the caIntegrator DB user's credentials are wrong.
- Specify SMTP mail server connection information so that caIntegrator can send emails from users with new account requests. You must provide the following
- Mail Server Host Example:
localhost - Mail Server Port Number Example:
25 - Mail Server Authentication: default is false.
- Mail Server starttls: default is false.
- Mail Server Host Example:
- If jar signing is necessary for the installation, then enable it on the Jar Signing Configuration page. This step is optional and can be skipped.
- Review the summary of the information you entered.
- Review the selected installation type and the installation destination.
After you click Next from reviewing the installation destination, the installer runs. The installation wizard displays the installation progress and completion. - When you are informed that the process is finished, click Done in the lower right corner of the wizard to close the installer.
- To verify caIntegrator installation:
- Open your web browser to installed instance. The URL follows this format: http://<jboss.server.hostname>:<jboss.server.port>/caintegrator/workspace.action.
- Enter ncimanager as the user and changeme as the password. Refer to the
<user home>/.installer-caintegrator/caintegrator_installer/install.propertiesfile for the correct values.
- After successfully installing caIntegrator, make a backup of the
<user home>/.installer-caintegrator/caintegrator_installer/install.propertiesfile in a different directory for future reference.
...
Contacting Application Support
NCICB CBIIT Application Support | Application Support http://ncicb.nci.nih.gov/NCICB/support |
| Include Page | ||||
|---|---|---|---|---|
|