Page History
Include Page browser and portal step include browser and portal step include Select Download Collection. The Download Collection page appears. (For instructions on adding this page to your favorites, refer to Managing Your Favorites.)
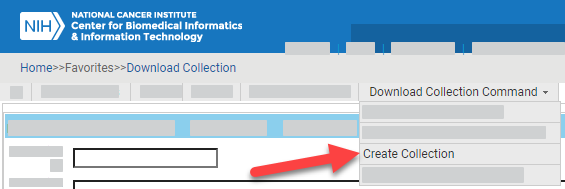
Select Download Collection Command > Create Collection. The Select Collection Type dialog box appears.
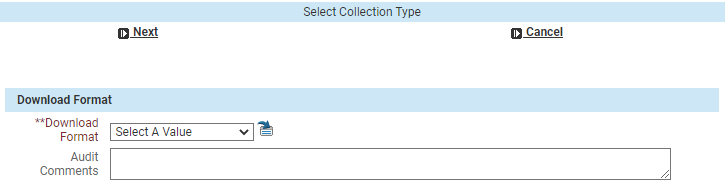
Select a download format. Optionally, you can also enter audit comments. Click Next. The Create Collection dialog box appears. The fields on this dialog box vary depending on the selected download format.
Panel borderColor silver borderStyle solid Tabs Container direction horizontal Tabs Page title ALS CDE 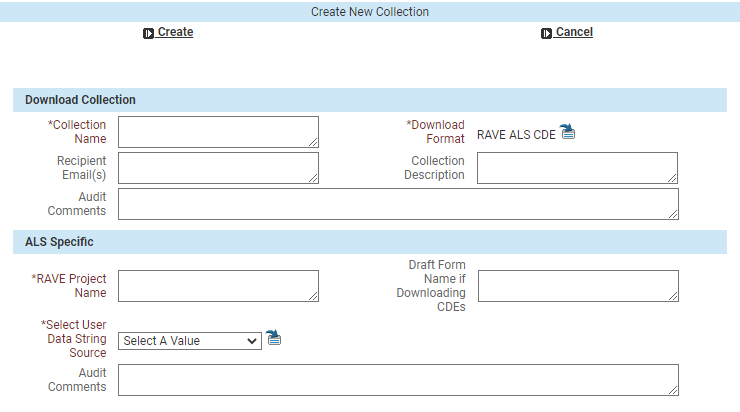
Tabs Page title ALS Form 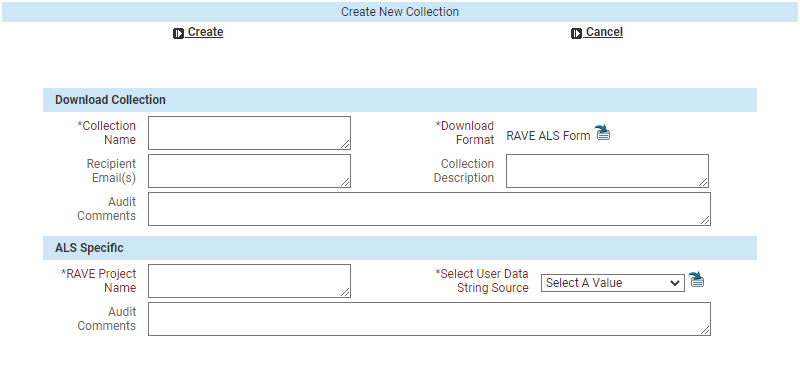
Tabs Page title all other download formats 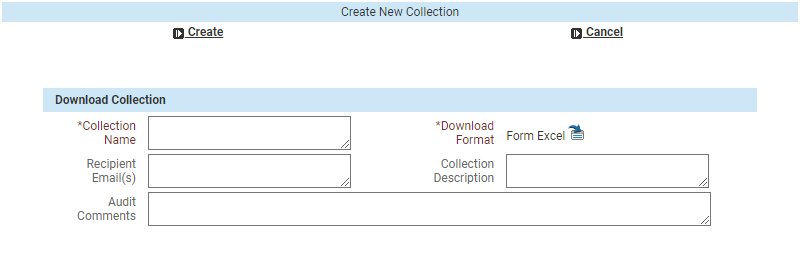
In the Download Collection section, enter information as described in the following table. Fill in each required field, as indicated by an asterisk (*):
Field Instructions *Collection Name The system uses the Collection Name you specify (along with the Collection ID and a system timestamp) to create your ALS file name, as follows:ALS_{PV|PVM}_{CollectionName}-{Collection ID}_{Timestamp}Keep in mind the following points:- Keep this name brief, 118 characters or less. (The maximum length for a Microsoft Excel file name is 218 characters. Accounting for a folder/path name of no more than 50 characters, the caDSR system appends up to 50 characters to the name for the collection ID and timestamp, leaving 118 characters for the Collection Name.)
- Avoid special symbols:
[ ] \ / ; : % # @ ' $ { } |
| Excerpt | ||
|---|---|---|
| ||
Started drafting instructions for DSRMWS-1230. |
Login to caDSR II: http://cadsr-stage.cancer.gov
Select “Manage>>Manage Data” from the tool bar
Select “Download Collection”
Click on the “Star” icon, then “Save” in the pop-up window to add to “Download Collection” to your Favorites
Click on “Download Collection” to open it
Click on “Download Collection Commands” and select “Create RAVE ALS Collection” or “Create ALS Collection”
Fill in the required fields listed in red preceded with an asterisk “*”:
Collection NameThis name will be used by the system to create your ALS File Name with the Collection ID and system timestamp. You may want to keep this name brief. Avoid the use of special symbols “[“, “]”, “\”, “/”, “;”, “:”, “%”, “#”, “@”, “$”, “{“, “}”, “|”.it is automatically prepended to the filename upon generation).Also, in Sprint 19 the choice of PV or PVM will be appended to the name- Collection Names cannot begin with the characters 0 through 9.
- To avoid redundancy, do not include the string “ALS”, “PV”, or “PVM” in the Collection Name (
so you may want to use- because the system prepends this information to the file name).
- You can create more than one collection
- , so consider using the project name or protocol
- Component Type – choose “Form”
- Downloading CDE collections is not ready for testing
- Download Format – Set as “RAVE ALS”
- RAVE Project Name
- This is the project name that will be imported into RAVE
- Select User Data String Source
- Choose PV or PVM
Fill in any desired optional fields in black: - .
- Audit Comments
- Draft Form Name if Downloading CDEs – will default to user name and time stamp if not entered – Collections of CDEs are NOT READY FOR TESTING
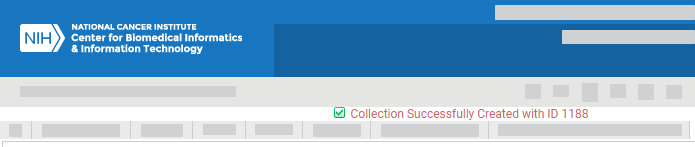
Click “Create”, see message displayed in red at top of screen “Collection Successfully Created with ID xxxx”
- Enter your User ID into “Created By” to search for your collections
Click “Apply Filter”
Results will be displayed, sorted by Date/Time Last Requested (Sprint 19) Last Trigger Date (Sprint 18) by default so that the most recently requested collection is on top. Columns can be sorted by clicking on them to show choices: Ascending, Descending or New Sort.
Click to edit the newly created collection and it will open
Select Download Collection Command >> Add Components Using Public IDs
Enter Form ID 3919983 or one of the others above in “Forms used in the test cases” for initial testing. Multiple IDs may be entered, separated by spaces, but we recommend that you first try testing just one form.
Click “Add”. Pressing “enter”or “return” on your keyboard will cause an error
The latest version of the items should be added and saved to your “Download Details”
A confirmation message will be displayed at the top of the UI in red showing the results of the “Add”. If a Public ID for the wrong type of item is entered, the item will not be added. E.g. a CDE ID is entered to be added to a Form Collection, or Form ID is entered to be added to a CDE collection, it will not be added. See screenshot of confirmation message below. The message was generated by attempting to add 1 CDE to a Form Collection. Total items in the “Add” were 1, no items were added, 1 item of the wrong type.
*Please note, we are working on improving and simplifying the confirmation messages when adding content to the Collection. At any time the end user can click on “Download Detail” to see what was successfully added.
Click “Download Detail” to verify that all the forms were added to the collection
- Click on the download collection name at the top of the tree e.g. “Denise Test Steps For Demo” to return to the Download Header and the system will display the Download Collection Command
Click Download Collection Command >> Request Download Generation
The system updates the Last Triggered Date (Sprint 18) or the Date/Time Last Requested (Sprint 19)
- When the system has generated your ALS, it will attach it to your Collection where you can click on it to download and it look like this:
Check the email account you specified in the Recipient Email(s) in your Collection. The email should contain the following text:
*Please note that this text is being modified to add more information based on user feedback, such as whether PV or PVM was selected for the generated file userDataString. The Filename will have “ASL _PV” or “ALS_PVM” appended before the collection name.
Sprint 18 email text:
“This is your requested RAVE ALS collection from caDSR, sent to you by [userid who generated the file] on [system date].
This file is designed to be saved to your computer and then imported directly into RAVE using Architect Loader.
Hint: If you are having trouble saving this file to a folder on your computer, you can save it to the computer "Desktop", and then try shortening the file name or saving it to a folder with a shorter path.
If you have any issues with loading the file into your RAVE system, please contact the person who sent you the file or the NCI Applications Support desk at NCIAppSupport@nih.gov.”
Sprint 19 email text:
“This is your requested RAVE ALS collection download sent to you by DWARZEL on 2021-10-05 11:42:21.
Collection Name: Jira-1207-Test Form 3919983 VD 3 times QA-1167
Collection ID: 1167
Component Type: Form
RAVE User Data String: PVM.
This file is designed to be saved to your computer and then imported directly into RAVE using Architect Loader.
Hint: If you are having trouble saving this file to a folder on your computer, try shortening the file name or saving it to the computer "Desktop", or saving it to a folder on your computer with a shorter folder path.
If you have any issues with loading the file into your RAVE system, please contact the person who sent you the file or the NCI Applications Support desk at NCIAppSupport@nih.gov.
Upload the file to RAVE. Report any uploading error messages on the supplied template.
Review the details in RAVE and report any unexpected transformation results in the supplied template.Optionally enter a description. Audit Comments Optionally enter comments. If you see an ALS Specific section, enter information as described in the following table. Fill in each required field, as indicated by an asterisk (*):
Field Instructions *RAVE Project Name Specify the project name that you intend to import into RAVE. This appears in the ALS on the CRFDraft tab, in the "ProjectName" column, and also as a field that can be used as a filter in the ALS Specific child filter. Draft Form Name if Downloading CDEs (for ALS CDE format only) If you are downloading CDEs, optionally specify a Draft Form Name. This text appears on the Forms tab in the "DraftFormName" column and is the name of the Primary Form when loaded into RAVE. *Select User Data String Source Choose PV or PVM. Based on this selection, the system inserts either the CDE's PV or the PVM as the "UserDataString" on the Fields tab, regardless of what is selected on the Form for this Question. Audit Comments Optionally enter comments. Click Create. The system creates your collection and displays a message with the Collection ID at top of the Download Collection page.
| Recipient Email(s) |
| Optionally enter one or more email addresses separated by spaces for receipt of the ALS file. | |
| Collection Description |
To add forms to your collection, refer to the following pages:
| Include Page | ||||
|---|---|---|---|---|
|