Page History
...
- Enter or change (if editing) the name and/or description, if you choose.
- Check the checkbox to make the study publicly available, if appropriate.
- For the study log feature, click View Log or Edit Log. See for details about the log.
- Click Save.
Info title Note You can save the study at any point in the process of creating it. You can resume the definition and deployment process later.
- If you choose to add a logo for the study, click the Browse button corresponding to Logo File. Navigate for the file, then click Upload Now. Once you save the study (or its edit), the logo displays in the center of the page (). On the home page for the study, the logo displays in the upper left, above the sidebar.

...
- On the Edit Study page for a study, Annotation Groups section, click the Add New button.
- On the Edit Annotation Group page that opens, enter a name for the annotation group.
- Enter a description (optional).
- Browse for the Group Definition Source CSV file.
The CSV file must include columns with these column headers in the first row: File Column Name, Field Type, Entity Type, CDE ID, CDE Version, Annotation Def Name, Data Type, Permissible, and Visible. Subsequent rows in the file define each subject annotation column in the subject annotation file.- If a subject annotation is defined by a CDE Public ID, values for the following columns are required: File Column Name, Field Type, Entity Type, CDE ID, and Visible; a value for CDE Version is optional.
– OR – - If a subject annotation definition is not defined by a CDE Public ID, values for the following columns are required: File Column Name, Field Type, Entity Type, Annotation Def Name, Data Type (String, Date, Numeric), Permissible (Yes or No), and Visible (Yes or No).
- If a subject annotation is defined by a CDE Public ID, values for the following columns are required: File Column Name, Field Type, Entity Type, CDE ID, and Visible; a value for CDE Version is optional.
- Click Save. This uploads the file, whose name now displays on the Edit Study page under Annotation Groups.
When you open the Define Fields for Subject Data page (see ), the annotation definitions in the file you uploaded display on the page, available for assignment in the study. Additionally, you can view the definitions by viewing the annotation group listed in the first column of the matrix.
...
The Define Fields for Subject Data page, shown in the following figure, opens when you click Edit Annotations in the Subject Annotation Data Sources or the Image Data Sources section of the Edit Study page (). The exception to this is if you have not yet imported annotations for the imaging data for the study, In that case, when you click the Edit Annotations button in the Imaging Data Sources section, a page opens where you can identify and upload image annotation data (). See #Adding or Editing Image Annotations.
If this Define Fields page opens after clicking the Edit Annotations button, working with this page is identical for both subject and image annotations

...
Assigning An Identifier or Annotation*
assigning, annotation identifier;annotation:assigning identifierWhen When you click Change Assignment on the Define Fields... page, the Assign Annotation Definition for Field Descriptor dialog box opens (), as shown in the following figure. On this page you can change the column type and the field definition for the specific data field you selected.
...
- To enter a new name annotation, or any other information about the annotation definition, click the New button and enter the information described in the following table.
Annotation Field
Field Description
Name
Enter the name for the annotation.
Definition
Enter the term(s) that define the annotation.
Keywords
Insert keyword(s) that can be used to find the annotation in a search, separated by commas.
Data Type
Select a string (default), numeric, or date.
Apply Max Number Mask
This field is available only for numeric-type annotations, or when a new definition is created. This feature is unavailable when permissible values are present.
Select the box and enter a maximum number for the mask, such as "80" for age. When you query results above the value of the mask, then the system displays the mask and not the actual age.
Note: If you enter masks of both "max number" and "range", caIntegrator applies both masks at the same time.
The Data Dictionary page now has a Restrictions column that shows restrictions whenever a mask has been applied.Apply Numeric Range Mask
This field is available only for numeric-type annotations, or when a new definition is created. This feature is unavailable when permissible values are present.
Select the box and enter a width of range for the mask, such as "5" representing blocks of 5 years. For example, if you enter a width of 5, the query only allows age blocks of 0-5, 6-10, 11-15, etc. When you query results above the value of the mask, then the system displays the mask and not the actual age ranges.
Note: If you enter masks of both "max number" and "range", caIntegrator applies both masks at the same time.
The Data Dictionary page now has a Restrictions column that shows restrictions whenever a mask has been applied.permissible value, annotation definition;annotation definition:permissible valuesannotation definition:field definition entriesPermissiblePermissible/Non-permissible Values
Note: The first time you load a file, before you assign annotation definitions (), these panels may be blank. If the column header for the data is already "recognizable" by caIntegrator, the system makes a "guess" about the data type and assigns the values to the data type in the newly uploaded file. They will display in the Non-permissible values sections initially. Use the Add and Remove buttons to move the values shown from one list to the other, as appropriate.
When you select or change annotation definitions by selecting matching definitions (described in ), this may add (or change) the list of non-permissible values in this section.
If you leave all values for a field in the Non-permissible panel, then when you do a study search, you can enter free text in the query criteria for this field.
If there are items in the Permissible values list, then the values for this annotation are restricted to only those values. When you perform a study search, you will select from a list of these values when querying this field. If there are no items in the permissible values list then the field is considered free to contain any value.
To edit a field's permissible values, you must change the annotation definition. You can do this even after a study has been deployed.
Note: You cannot edit permissible values in an existing annotation definition. To change permissible values, you must create a new annotation.
...
This opens the Edit Genomic Data Source dialog box. Enter the appropriate information in the fields (). This , shown in the following figure. The fields are described below.
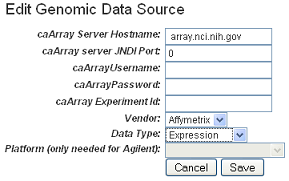
- caArray Web URL – Enter the URL for the caArray to be used for Edit Genomic Source dialog box"the genomic data sources. This will enable a user to link to the referenced caArray experiment from the study summary page.
- caArray Host Name – Enter the hostname for your local installation or for the CBIIT installation of caArray, If you misspell it, you will receive an error message.
- caArray JNDI Port – Enter the appropriate server port. See your administrator for more information. Example: For the CBIIT installation of caArray, enter 8080.
- caArray Username and caArray Password – If the data is private, you must enter your caArray account user name and password; you must have permissions in caArray for the experiment. If the data is public, you can leave these fields blank.
- caArray Experiment ID – Enter the caArray Experiment ID which you know corresponds with the subject annotation data you uploaded. Example: Public experiment "beer-00196" on the CBIIT installation of caArray (array.nci.nih.gov). If you misspell your entry, you will receive an error message.
- Vendor – Select either Agilent or Affymetrix
- Data Type – Select Expression or Copy Number.
- Platform – If appropriate, select the Agilent or Affymetrix platform.
Info title Note Because you can add more than one set of genomic data to a study, a study can also have multiple platforms, one for each set of genomic data.
- Central Tendency for Technical Replicates – If more than one hybridization is found for the reporter, the hybridizations will be represented by this method.
- Indicate if technical replicates have high statistical variability – If more than one hybridization is found, checking this box will display a ** in the genomic search results when a reporter value has high statistical variability.
- Standard Deviation Type - When the checkbox for indicating if technical replicates have high statistical variability is checked, this parameter becomes available. Select in the drop-down the calculation to be used to determine whether or not to display a ** (see previous bullet point).
--Relative{*}, which calculates the Relative Standard Deviation in percentage value
--Normal{*}, which calculates the Standard Deviation in numeric value - Standard Deviation Threshold – When the checkbox for indicating if technical replicates have high statistical variability is checked, this parameter becomes available. This is the threshold at which the Standard Deviation Type is exceeded and the reporter is marked with a **.
...
caIntegrator goes to caArray, validates the information you have entered here, finds the experiment and retrieves all the sample IDs in the experiment. Once this finishes, the experiment information displays on the Edit Study page under the Genomic Data Sources section (), shown in the following figure.

- If you want to redefine the caArray experiment information, you can edit it. Click the Edit link corresponding to the Experiment ID. The Edit Genomic Data Source dialog box reopens, allowing you to edit the information.
...
- On the Edit Study page, click the Map Samples button. This opens the Edit Sample Mappings page, shown in the following figure.

- The first two caArray fields may be populated with the information for the instance of caArray to which you have access. You can, however, enter the following caArray information, if appropriate.
- caArray Host Name – Enter the hostname for your local installation or for the CBIIT installation of caArray, If you misspell it, you will receive an error message.
- caArray JNDI Port – Enter the appropriate server port. See your administrator for more information. Example: For the CBIIT installation of caArray, enter 8080.
- caArray Username – Enter your caArray account user name and password; you must have permissions in caArray for the experiment if it is private. If the data is public, you can leave this field blank.
- caArray Experiment ID – Enter the caArray Experiment ID which you know corresponds with the subject annotation data you uploaded. Example: Public experiment "beer-00196" on the CBIIT installation of caArray (array.nci.nih.gov). If you misspell your entry, you will receive an error message.
- Enter the Loading Type of the data file you plan to map. (File types are described in #Creating a Mapping File).
- In the Subject to Sample Mapping File section, click Browse to navigate for the Sample Mapping CSV file that you created (described in #Creating a Mapping File). This provides caIntegrator with the information for mapping patients to caArray samples.
- Click the Map Samples button.
If the caArray data you have identified is imported and parsed, when you click the Map Samples button, the mapping takes place as the data is uploaded into caIntegrator. If the caArray data is supplemental, the mapping does not occur until the study is deployed.
Mapped samples will be listed in the Samples Mapped to Subjects section. Unmapped samples show at the top of the caIntegrator page. They were loaded from caArray, but they are not in the mapping file. These are not used for integration.Info title Note If you have already mapped samples, when you first open this page they are listed in the Samples Mapped to Subjects section. If you have not already mapped samples, all of the samples in the caArray experiment you selected are listed as unmapped, because caIntegrator does not know how these sample names correlate to the patient data in the subject annotation file until you upload the subject to sample mapping file.
...
- On the Edit Study page, under the Imaging Data Sources section click the Add New button.
Info title Note If you have already provided an imaging data source, it is listed in this section of the Edit Study page. To edit the imaging data source, click the Edit button which opens the same dialog box described in the following steps.
- In the Edit Imaging Data Source dialog box, configure the imaging data source in the fields (), shown in the following figure. Asterisks indicate required fields.
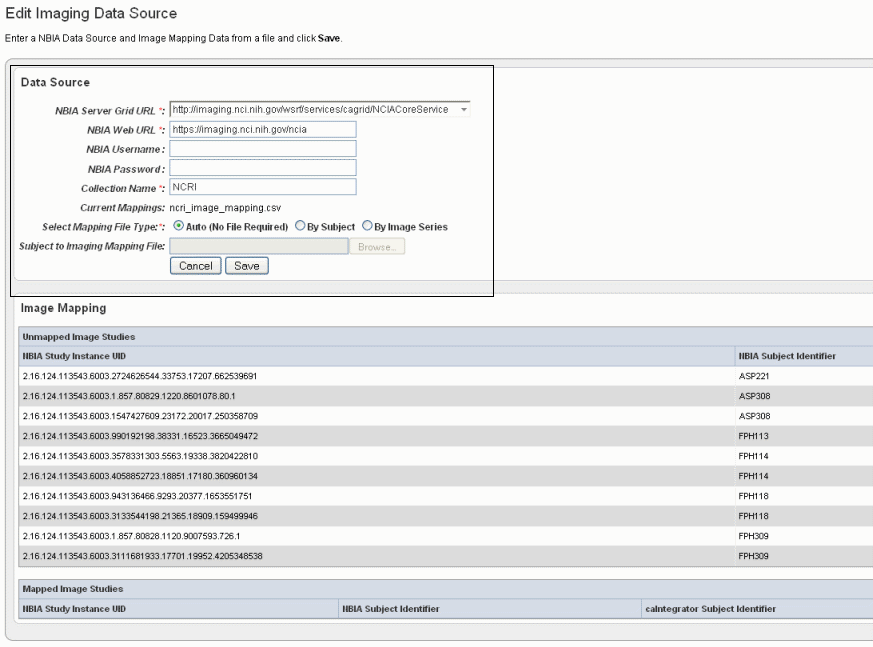
- NBIA Server Grid URL* – Enter the URL for the grid connection to NBIA.
...