Page History
...
Once you have loaded subject annotation data and identified patient subject IDs, you can add either one or more sets of array genomic sample data from caArray, which caIntegrator maps by sample IDs to the patient IDs in the subject annotation data, covered in this section, or you can load imaging files from NBIA, also mapped by IDs to the patient data, covered in . This is discussed in #Working with Imaging Data. You can also edit genomic data information that you have already added to the study. Genomic sample data and imaging data are independent of each other, so neither is required before loading the other.
...
caIntegrator supports a limited number of array platforms. For more information, see #Managing Platforms.
To add genomic data to your caIntegrator study, follow these steps:
- On the Edit Study page where you have selected and added the subject annotation data, click the Add New button under Genomic Data Sources. You can upload genomic data only from caArray.
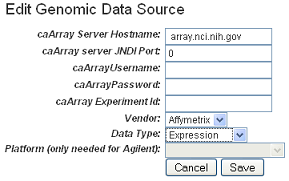
This opens the Edit Genomic Data Source dialog box. Enter the appropriate information in the fields, shown in the following figure. The fields are described below.
Field Types
Field Description
caArray Web URL
...
Enter the URL for the caArray instance to be used for
...
the genomic data sources. This will enable a user to link to the referenced caArray experiment from the study summary page.
caArray Host Name
...
Enter the hostname for your local installation or for the CBIIT installation of caArray, If you misspell it, you will receive an error message.
caArray JNDI Port
...
Enter the appropriate server port. See your administrator for more information. Example: For the CBIIT installation of caArray, enter 8080.
caArray Username and caArray Password
...
If the data is private, you must enter your caArray account user name and password; you must have permissions in caArray for the experiment. If the data is public, you can leave these fields blank.
caArray Experiment ID
...
Enter the caArray Experiment ID which you know corresponds with the subject annotation data you uploaded. Example: Public experiment "beer-00196" on the CBIIT installation of caArray (array.nci.nih.gov). If you misspell your entry, you will receive an error message.
Vendor
...
Select either Agilent or Affymetrix.
Data Type
...
Select Expression or Copy Number.
Platform
...
If appropriate, select the Agilent or Affymetrix platform.
Info title Note Because you can add more than one set of genomic data to a study, a study can also have multiple platforms, one for each set of genomic data.
Central Tendency for Technical Replicates – If more than one hybridization is found for the reporter, the hybridizations will be represented by this method.
Indicate if technical replicates have high statistical variability – If more than one hybridization is found, checking this box will display a ** in the genomic search results when a reporter value has high statistical variability.
Standard Deviation Type - When the checkbox for indicating if technical replicates have high statistical variability is checked, this parameter becomes available. Select in the drop-down the calculation to be used to determine whether or not to display a ** (see previous bullet point).
--Relative{*}, which calculates the Relative Standard Deviation in percentage value
--Normal{*}, which calculates the Standard Deviation in numeric valueStandard Deviation Threshold
...
When the checkbox for indicating if technical replicates have high statistical variability is checked, this parameter becomes available. This is the threshold at which the Standard Deviation Type is exceeded and the reporter is marked with a **.
- Click Save.
caIntegrator goes to caArray, validates the information you have entered here, finds the experiment and retrieves all the sample IDs in the experiment. Once this finishes, the experiment information displays on the caIntegrator Edit Study page under the Genomic Data Sources section, as shown in the following figure.

...
You, as the caIntegrator study manager, must create a Subject to Sample mapping file and then import it into caIntegrator before following the actual mapping steps. This file provides caIntegrator with the information for mapping patients to caArray samples.
- Start with the 6-column mapping file template, described as follows:
- All platforms – Raw (level 1) data cannot be mapped; only normalized, processed (level 2) data is acceptable. **
- The required six-column file format uses the following columns:
- Subject ID
- Sample ID
- Name of supplemental file (if appropriate, as attached to the experiment in caArray)
- Probe Header – Name of column header (in the supplemental file) which contains the probe IDs.
- Value Header – Name of column header (in the supplemental file) which holds the level 2 data.
- Sample Header – Name of column header (in the supplemental file) which holds the level 2 data.
Info title Note Only one of the last 2 columns is used: a single sample per file uses the Value Header column; multiple samples per file used Sample Header column. Unused columns are blank.
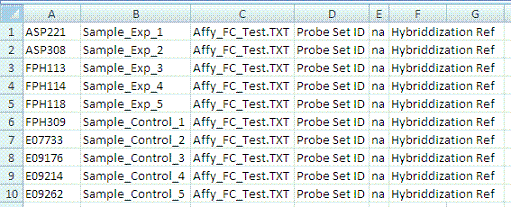
The following figure shows an example multiple sample mapping file in CSV format.
- When you use the mapping file, make sure you use the patient subject ID for mapping. If the file is human data, the subject ID is the patient ID.
- Determine whether your data in caArray is "imported and parsed" or "supplemental". These are the 'Loading Types' referred to in Step 4 of #Steps for Mapping Genomic Data. Fill in the 6-column mapping file according to the following standard:
- Imported and parsed – Complete only the first two columns of the 6-column mapping file as described above. You can ignore the remaining columns.
- Supplemental – Supplemental data comes in two flavors: "single sample per file" and "multiple samples per file". Only one of the last two columns is used. If the supplemental data format is:
- Single sample per file – the column named "Sample_Header" can be left empty.
- Multiple samples per file – the column named "Value_Header" can be left empty.
The following steps use data of either type.Info title Note Supplemental files from caArray for mapping data must be configured appropriately. For information, see on page 135 Supplemental Files Configuration.
Steps for Mapping Genomic Data
To map the samples from the caArray experiment to the patients subjects in the subject annotation data you uploaded, follow these steps:
- On the Edit Study page, click the Map Samples button. This opens the Edit Sample Mappings page, shown in the following figure.

- The first two caArray fields may be populated with the information for the instance of caArray to which you have access. You can, however, enter the following caArray information, if appropriate.
- caArray Host Name – Enter the hostname for your local installation or for the CBIIT installation of caArray, If you misspell it, you will receive an error message.
- caArray JNDI Port – Enter the appropriate server port. See your administrator for more information. Example: For the CBIIT installation of caArray, enter 8080.
- caArray Username – Enter your caArray account user name and password; you must have permissions in caArray for the experiment if it is private. If the data is public, you can leave this field blank.
- caArray Experiment ID – Enter the caArray Experiment ID which you know corresponds with the subject annotation data you uploaded. Example: Public experiment "beer-00196" on the CBIIT installation of caArray (array.nci.nih.gov). If you misspell your entry, you will receive an error message.
- Enter the Loading Type of the data file you plan to map. (File types are described in #Creating a Mapping File).
- In the Subject to Sample Mapping File section, click Browse to navigate for the Sample Mapping CSV file that you created (described in #Creating a Mapping File). This provides caIntegrator with the information for mapping patients to caArray samples.
- Click the Map Samples button.
If the caArray data you have identified is imported and parsed, when you click the Map Samples button, the mapping takes place as the data is uploaded into caIntegrator. If the caArray data is supplemental, the mapping does not occur until the study is deployed. - Mapped samples will be listed in the Samples Mapped to Subjects section; scroll down the page to view them (see the following figure). Unmapped samples show at the top of the caIntegrator page. They were loaded from caArray, but they are not in the mapping file. These are not used for integration.

Info title Note If you have already mapped samples, when you first open this page they are listed in the Samples Mapped to Subjects section (see following figure). If you have not already mapped samples, all of the samples in the caArray experiment you selected are listed as unmapped, because caIntegrator does not know how these sample names correlate to the patient data in the subject annotation file until you upload the subject to sample mapping file.
...
Uploading Control Samples
...