Page History
...
- NBIA Web URL|Enter the URL of the web interface of the NBIA installation.|
NBIA Username and NBIA Password
This information is not required, as currently all data in the NBIA grid is Public data.
Collection Name
Enter the name/source for the collection you want to retrieve.
Current Mapping
If a mapping file has already been uploaded to the study to map imaging data, the file name displays here.
Select Mapping File Type*
Click to select the file type:
- Auto – No file is required. Selecting this takes all subject annotation subject IDs and attempts to map them to the corresponding ID in the collection in NBIA. If the ID does not exist in NBIA, then no mapping is made for that ID.
- By Subject – Requires a mapping file to be uploaded. The "subject annotation to imaging mapping file" must be in CSV format with two columns that map the caIntegrator subject annotation subject ID to the NBIA subject ID.
- By Image Series – Requires a file to be uploaded. The subject annotation to imaging mapping file needs to be a two column mapping (CSV) from the caIntegrator subject annotation subject ID to the NBIA study instance UID.|
Subject to Imaging Mapping File
Click Browse to navigate to the appropriate subject annotation to imaging mapping file. See the Select Mapping File Type* field description.
Info title Note If mapping files have already been uploaded for the data sources you are editing, the Image Mapping tables of the dialog box show the mapping from NBIA Image Series Identifier to caIntegrator Subject Identifier.
...
After you have configured an image data source with an NBIA Grid service and uploaded the image data, described in #Adding or Editing Image Data Files from NBIA, you can load image annotations into caIntegrator from a file in CSV format or through an Annotations and Image Markup (AIM) service.
| Tip | ||
|---|---|---|
| ||
The image data shown in the Imaging Data Sources section indicate whether or not annotations have already be been imported from a file for these sources. See the marked area in the following figure. |
...
To add image annotations from a file, follow these steps:
- On the Edit Study page, click the Edit Annotations button under the Image Data Sources section.
Info title Note If you have not yet imported annotations, clicking this button opens the page from which you can import image annotations, shown in the following figure. Continue with the steps in this section. If you are editing annotations, clicking this button opens the Define Fields for Image Annotations dialog box where you can edit annotations. See the following figure; see #Define Fields Page for Editing Annotations.
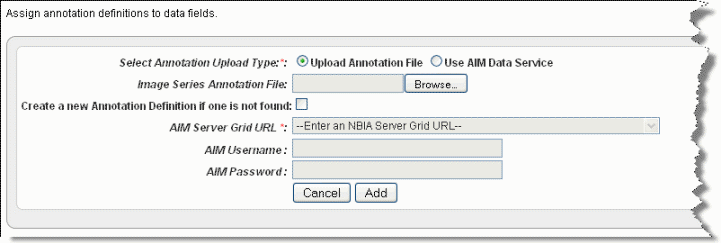
- Select the radio button Upload Annotation File.
- Click Browse to select an annotation CSV file for upload.
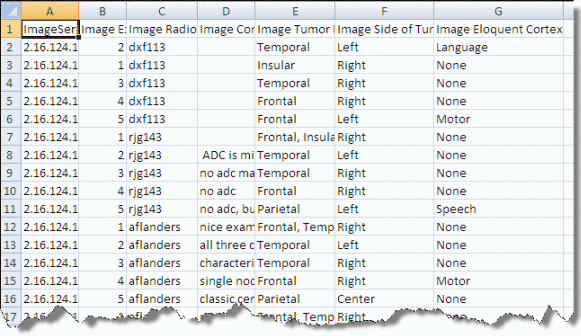
Info title Note An image annotation CSV file must include an Image Series ID column. See the highlighted column in the following figure.
- Check the box for Create a new Annotation Definition if one is not found (if appropriate).
- Click Add.
To load image annotations through an AIM service, follow these steps:
- On the Edit Study page, click the Edit Annotations link under the Image Data Sources section.
- Select the radio button Use AIM Data Service.
- Select an AIM Server Grid URL.
- Click Add.
Using either method, the image annotations are uploaded to caIntegrator. After this occurs, when you click the Edit Annotations button, the system opens to the Define Fields for Imaging Data page where you can edit the annotations. For more information, see This is the same page (with a customized title) as that described in #Define Fields Page for Editing Annotations. You must assign identifiers and annotations to the data in the same way you did with the subject annotation data. For more information, see #Assigning an Identifier or Annotation and #Searching for Annotation Definitions.
Adding External Links
This feature on the Edit Study page , described in , allows you to configure a CSV file with URLs to be used as external links relevant to a study. This allows you to easily share or configure references.
...
- As a study manager, you can configure a CSV file with URLs to be used as external links.
- On the Edit Study page, click the Add button under External Links section. External links can be any URL(s) to resources that are hosted external to caIntegrator but are relevant to the study being deployed.
- Assign a name to the external link.
- Add a description for the link, if appropriate.
- Browse for the CSV file containing URLs (HTTP linked) to resources outside of caIntegrator.
- Click Upload Now. caIntegrator does not validate any links in the file being uploaded.
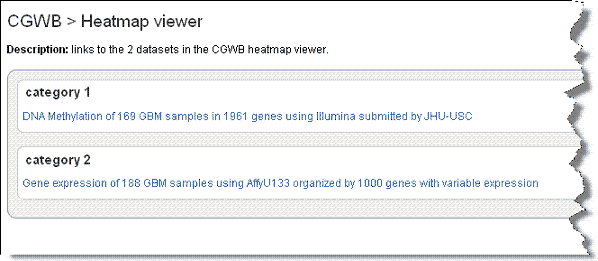
Once you have created external links for a study, when the study is open, an External Links section showing the link(s) displays on the left sidebar of the page, shown identified in the following figure.
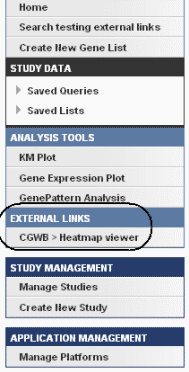
Click the external link to open a page that displays appropriately formatted web page links; an example is shown in the following figure.
...
When you are ready to deploy the study, click the Deploy Study button on the Edit Study page. caIntegrator retrieves the selected data from the data service(s) you defined and makes the study available to a study manager or to anyone else who may want to analyze the study's data. Using the Manage Studies feature, you can then configure and share data queries and data lists with all investigators who access the study.
Note that you can continue to work in caIntegrator while the study is being deployed. See also .
Managing a Study
| Info | ||
|---|---|---|
| ||
A user without management privileges has no access to this section of caIntegrator. |
...
- Add new attributes (annotations) and upload relevant data to an existing study.
- Delete a study
- Modify existing annotation definitions
- Reload a subset of a study data and re-deploy the study and perform new analyses
- Re-deploy the entire study with new set of data and mappings.
...
- On the left sidebar, click Manage Studies. The Manage Studies page appears, shown in the following figure.

All of the "in process" or "completed" studies display on this page , with associated metadata. Note that whoever edited or updated the study last is shown in the Last Modified Column, indicated as the Study Manager. - Click the Edit link corresponding to your study of choice to open the Edit Studies page, shown in the following figure.

On this page you can edit any details such as adding or deleting files, survival values, and so forth. For information about working with the Edit Study feature, see #Creating/Editing a Study. - Click the Delete link to delete the corresponding study.
...
- Click Manage Platforms on the left sidebar.
The Manage Platforms page that opens lists in the Existing Platforms section the platforms caIntegrator currently supports, those that the system can pull from caArray. See the following figure. You can also add a new platform by entering information in the fields in the Create a New Platform section.

- To add a platform, in the Platform Type field, select the appropriate platform type from the drop down list.
- Click Browse to navigate for the Affymetrix or Agilent file you want to add.
Info title Note Tab-delimited .txt or .tsv Agilent platform annotation files must contain the following column headers: ProbeId, GeneSymbol, GeneName and Accessions.
- Enter a Platform Name if the file is a NON-GEML.xml file.
Depending on the Platform Type you select, there may be other parameters to provide here as well, such as Platform Channel Type for an Agilent platform. - Click the Browse button to browse for the appropriate annotation file.
- When you have located it, click Open in the Upload File dialog box. The system displays the annotation file you select in the Annotation File box.
- Once all parameters have been entered, click Create Platform.
...