Page History
...
If this Define Fields page opens after clicking the Edit Annotations button, working with this page is identical for both subject and image annotations

The MOST important steps in creating annotation definitions on this page are these:
...
- You MUST designate one column in the file as a unique "identifier" column type.
...
- You MUST review and define column annotation definitions for each column header in the file.
Note the following regarding the list of annotations on this Define Fields... page: - If caIntegrator "recognizes" the same column header in other files already in the system, a term, for example "age" or "survival", which is the current definition, appears in the Annotation Definition column above the blue Change Assignment link on the page.
- When the annotation definition has not been assigned, and the area above the blue Assign Annotation Definition link is blank on this page, no correlating term exists in the database. In this case, you must specify the field type, and then the term will populate the space. See #Assigning an Identifier or Annotation for more information.
- A field name that displays in red indicates an error in the annotation. Click the Change Assignment button for more information about the error.
The first column of the table on this page displays annotation groups that have been created for this study. For more information, see #Adding an Annotation Group.
...
- For the column that you choose to be the one and only Identifier column (in this case, PatientID), in the Column Type drop-down list, select Identifier. The following figure shows the dialog box rendering when "identifier" is selected in the Field Descriptor Type drop-down list.
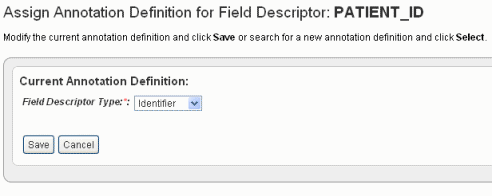
- Click Save to save the identifier. This returns you to the Define Fields for Subject Data page where the Identifier is noted in the Annotation Definition column.
- After you have defined which field is the Identifier, you must ensure that ALL other data fields also have an annotation definition assignment. For those fields without an annotation definition assignment or for those whose annotation definition you want to review, click Change Assignment.
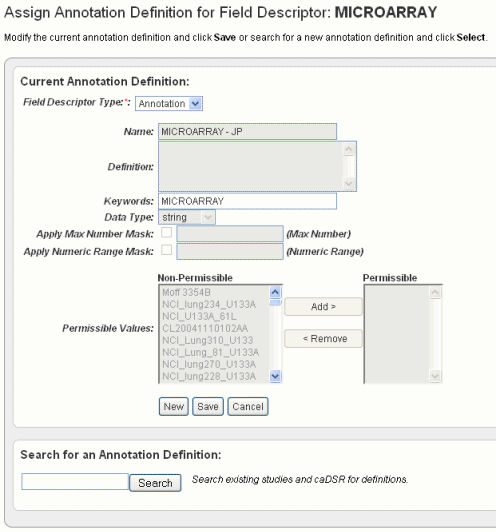
- In the Assign Annotation Definition for Field Descriptor dialog box, shown in the following figure, select Annotation in the drop-down list.
As you select the column type, you can work with column headers in one of four ways in this dialog box.##
- You can accept existing default definitions (those that are inherent in the data file you selected). See Step 5.
...
- You can create and/or manage your own definitions manually. See Step 6.
...
- You can search for and use definitions in other caIntegrator studies. See #Searching for Annotation Definitions.
...
- You can search for and use definitions found in caDSR. See #Searching for Annotation Definitions.
- Review the current annotation definition in the Assign Definition page, Current Annotation Definition section. Click Cancel to return to the Define Fields... page.
You can still initiate a search for another annotation definition in the Search for an Annotation Definition section on the browser page if you choose to change the definition. See the following figure. See also #Searching for Annotation Definitions. Click Save to retain any changes. - To enter a new name annotation, or any other information about the annotation definition, click the New button and enter the information described in the following table.
Annotation Field
Field Description
Name
Enter the name for the annotation.
Definition
Enter the term(s) that define the annotation.
Keywords
Insert keyword(s) that could be used to find the annotation in a search, separated by commas.
Data Type
Select a string (default), numeric, or date.
Apply Max Number Mask
This field is available only for numeric-type annotations, or when a new definition is created. This feature is unavailable when permissible values are present.
Select the box and enter a maximum number for the mask, such as "80" for age. When you query results above the value of the mask, then the system displays the mask and not the actual age.
Note: If you enter masks of both "max number" and "range", caIntegrator applies both masks at the same time.
The Data Dictionary page now has a Restrictions column that shows restrictions whenever a mask has been applied.Apply Numeric Range Mask
This field is available only for numeric-type annotations, or when a new definition is created. This feature is unavailable when permissible values are present.
Select the box and enter a width of range for the mask, such as "5" representing blocks of 5 years. For example, if you enter a width of 5, the query only allows age blocks of 0-5, 6-10, 11-15, etc.
When you query results above the value of the mask, then the system displays the mask and not the actual age ranges.
Note: If you enter masks of both "max number" and "range", caIntegrator applies both masks at the same time.
The Data Dictionary page now has a Restrictions column that shows restrictions whenever a mask has been applied.Permissible/Non-permissible Values
Note: The first time you load a file, before you assign annotation definitions, step #3 in #Assigning An Identifier or Annotation, these panels may be blank. If the column header for the data is already "recognizable" by caIntegrator, the system makes a "guess" about the data type and assigns the values to the data type in the newly uploaded file. They will display in the Non-permissible values sections initially. Use the Add and Remove buttons to move the values shown from one list to the other, as appropriate.
...
- On the Edit Study page, click Edit Survival Values. This opens the Survival Value Definitions dialog box, shown in the following figure.
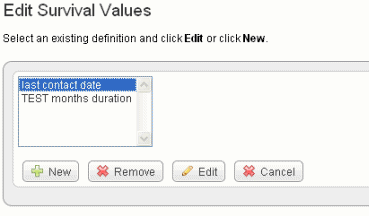
- Click New to enter new survival value definitions.
OR
...
Click Edit to edit existing survival value definitions.
The dialog box extends, now displaying radio buttons and three drop-down lists that show column headers for date metadata in the spreadsheet you have uploaded. If survival value ranges have already been added to a study, they display on the page. The dialog box is shown in the following figure.
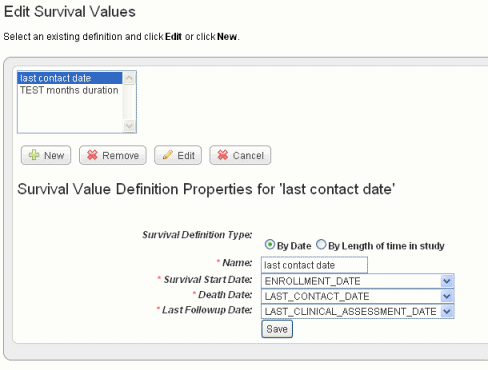
- Survival values can be defined by Date or by Length of time in the study. Select the radio button for the category that defines your survival data.
- In the drop-down lists, select the appropriate survival value definitions for each field listed. You might want to refer to the column headers in the data file itself. Dates covered by the definitions are already in the data set. You cannot enter specific dates.
Field Type
Description
Survival Definition Type
Select whether the survival time is defined by dates or length of time subject was in the study.
Name
Enter a unique name that adequately describes the survival values you are defining here. Example: Survival from Enrollment Date or Survival from Treatment Start. The name you enter displays later when you are selecting survivals to create the K-M plot.
Survival Length Units
Select the appropriate units for this data.
Survival Start Date
Select the column header for this data.
Death Date
Select the column header for this data.
Last Followup Date
Select the column header for this data.
...
- On the Edit Study page where you have selected and added the subject annotation data, click the Add New button under Genomic Data Sources. You can upload genomic data only from caArray.
This opens the Edit Genomic Data Source dialog box. Enter the appropriate information in the fields, shown in the following figure. The fields are described below.
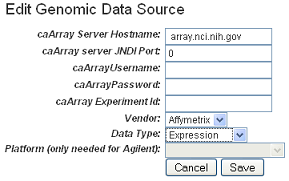
Field Types
Field Description
caArray Web URL
Enter the URL for the caArray instance to be used for the genomic data sources. This will enable a user to link to the referenced caArray experiment from the study summary page.
caArray Host Name
Enter the hostname for your local installation or for the CBIIT installation of caArray, If you misspell it, you will receive an error message.
caArray JNDI Port
Enter the appropriate server port. See your administrator for more information. Example: For the CBIIT installation of caArray, enter 8080.
caArray Username and caArray Password
If the data is private, you must enter your caArray account user name and password; you must have permissions in caArray for the experiment. If the data is public, you can leave these fields blank.
caArray Experiment ID
Enter the caArray Experiment ID which you know corresponds with the subject annotation data you uploaded. Example: Public experiment "beer-00196" on the CBIIT installation of caArray (array.nci.nih.gov). If you misspell your entry, you will receive an error message.
Vendor
Select either Agilent or Affymetrix.
Data Type
Select Expression or Copy Number.
Platform
If appropriate, select the Agilent or Affymetrix platform.
Info title Note Because you can add more than one set of genomic data to a study, a study can also have multiple platforms, one for each set of genomic data.
Central Tendency for Technical Replicates
If more than one hybridization is found for the reporter, the hybridizations will be represented by this method.
Indicate if technical replicates have high statistical variability
If more than one hybridization is found, checking this box will display a ** in the genomic search results when a reporter value has high statistical variability.
Standard Deviation Type
When the checkbox for indicating if technical replicates have high statistical variability is checked, this parameter becomes available. Select in the drop-down the calculation to be used to determine whether or not to display a ** (see previous bullet point).
-Relative-
...
calculates the Relative Standard Deviation in percentage value
-Normal-
...
calculates the Standard Deviation in numeric value
...
Standard Deviation Threshold
When the checkbox for indicating if technical replicates have high statistical variability is checked, this parameter becomes available. This is the threshold at which the Standard Deviation Type is exceeded and the reporter is marked with a **.
- Click Save.
caIntegrator goes to caArray, validates the information you have entered here, finds the experiment and retrieves all the sample IDs in the experiment. Once this finishes, the experiment information displays on the caIntegrator Edit Study page under the Genomic Data Sources section, as shown in the following figure.

...
- On the Edit Study page under the Imaging Data Sources section, click the Add New button.
Info title Note If you have already provided an imaging data source, it is listed in this section of the Edit Study page. To edit the imaging data source, click the Edit button which opens the same dialog box described in the following steps.
- In the Edit Imaging Data Source dialog box, configure the appropriate imaging data source information in the fields as shown in the selected area of the following figure and described below. Asterisks indicate required fields.
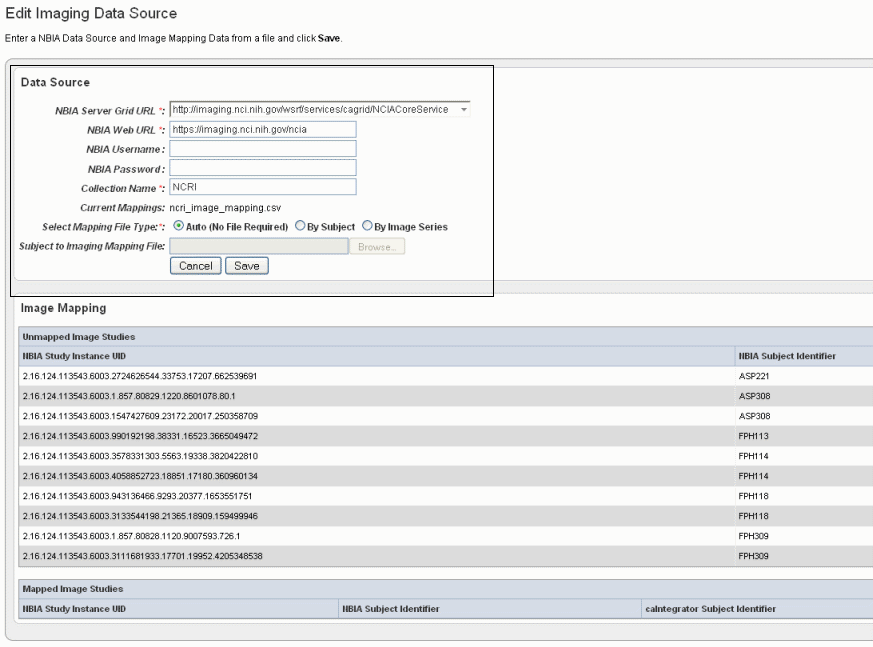
Fields
Description
NBIA Server Grid URL*
Enter the URL for the grid connection to NBIA.
NBIA Web URL
Enter the URL of the web interface of the NBIA installation.
NBIA Username and NBIA Password
This information is not required, as currently all data in the NBIA grid is Public data.
Collection Name
Enter the name/source for the collection you want to retrieve.
Current Mapping
If a mapping file has already been uploaded to the study to map imaging data, the file name displays here.
Select Mapping File Type
Click to select the file type:
--Auto – No file is required. Selecting this takes all subject annotation subject IDs and attempts to map them to the corresponding ID in the collection in NBIA. If the ID does not exist in NBIA, then no mapping is made for that ID.
--By Subject – Requires a mapping file to be uploaded. The "subject annotation to imaging mapping file" must be in CSV format with two columns that map the caIntegrator subject annotation subject ID to the NBIA subject ID.
--By Image Series – Requires a file to be uploaded. The subject annotation to imaging mapping file needs to be a two column mapping (CSV) from the caIntegrator subject annotation subject ID to the NBIA study instance UID.
...
By Image Series – Requires a file to be uploaded. The subject annotation to imaging mapping file needs to be a two column mapping (CSV) from the caIntegrator subject annotation subject ID to the NBIA study instance UID.
...
Subject to Imaging Mapping File
Click Browse to navigate to the appropriate subject annotation to imaging mapping file. See the Select Mapping File Type* field description.
Info title Note If mapping files have already been uploaded for the data sources you are editing, the Image Mapping tables of the dialog box show the mapping from NBIA Image Series Identifier to caIntegrator Subject Identifier.
- Click Save to upload the data from NBIA to caIntegrator. The imaging data displays on the Edit Study page under the Imaging Data Sources section, as shown in the following figure.

- Once the data is uploaded, you can add image annotations. For more information, see #Adding or Editing Image Annotations.
...