 |
Page History
...
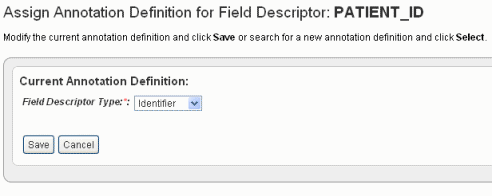
- For the column that you choose to be the one and only Identifier column (in this case, PatientID), in the Column Type drop-down list, select Identifier. The following figure shows the dialog box rendering when "identifier" is selected in the Field Descriptor Type drop-down list.
- Click Save to save the identifier. This returns you to the Define Fields for Subject Data page where the Identifier is noted in the Annotation Definition column.
- After you have defined which field is the Identifier, you must ensure that ALL other data fields also have an annotation definition assignment. For those fields without an annotation definition assignment or for those whose annotation definition you want to review, click Change Assignment.
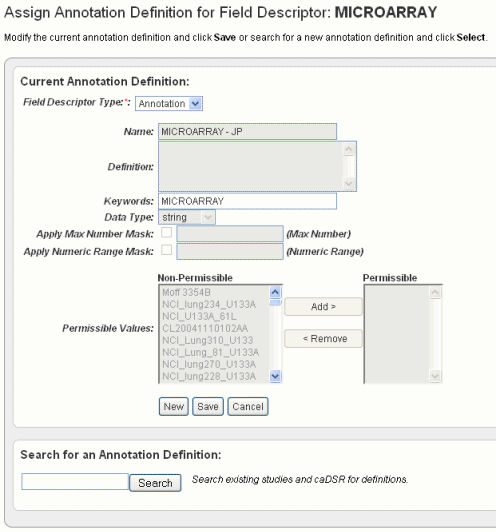
- In the Assign Annotation Definition for Field Descriptor dialog box, shown in the following figure, select Annotation in the drop-down list.
As you select the column type, you can work with column headers in one of four ways in this dialog box.- You can accept existing default definitions (those that are inherent in the data file you selected). See Step 5.
- You can create and/or manage your own definitions manually. See Step 6.
- You can search for and use definitions in other caIntegrator studies. See #Searching for Annotation Definitions.
- You can search for and use definitions found in caDSR. See #Searching for Annotation Definitions.
- Review the current annotation definition in the Assign Definition page, Current Annotation Definition section. Click Cancel to return to the Define Fields... page.
You can still initiate a search for another annotation definition in the Search for an Annotation Definition section on the browser page if you choose to change the definition. See the following bottom section of the preceding figure. See also #Searching for Annotation Definitions. Click Save to retain any changes. - To enter a new name annotation, or any other information about the annotation definition, click the New button and enter the information described in the following table.
Annotation Field
Field Description
Name
Enter the name for the annotation.
Definition
Enter the term(s) that define the annotation.
Keywords
Insert keyword(s) that could be used to find the annotation in a search, separated by commas.
Data Type
Select a string (default), numeric, or date.
Apply Max Number Mask
This field is available only for numeric-type annotations, or when a new definition is created. This feature is unavailable when permissible values are present.
Select the box and enter a maximum number for the mask, such as "80" for age. When you query results above the value of the mask, then the system displays the mask and not the actual age.
Note: If you enter masks of both "max number" and "range", caIntegrator applies both masks at the same time.
The Data Dictionary page now has a Restrictions column that shows restrictions whenever a mask has been applied.Apply Numeric Range Mask
This field is available only for numeric-type annotations, or when a new definition is created. This feature is unavailable when permissible values are present.
Select the box and enter a width of range for the mask, such as "5" representing blocks of 5 years. For example, if you enter a width of 5, the query only allows age blocks of 0-5, 6-10, 11-15, etc.
When you query results above the value of the mask, then the system displays the mask and not the actual age ranges.
Note: If you enter masks of both "max number" and "range", caIntegrator applies both masks at the same time.
The Data Dictionary page now has a Restrictions column that shows restrictions whenever a mask has been applied.Permissible/Non-permissible Values
Note: The first time you load a file, before you assign annotation definitions, step #3 in #Assigning An Identifier or Annotation, these panels may be blank. If the column header for the data is already "recognizable" by caIntegrator, the system makes a "guess" about the data type and assigns the values to the data type in the newly uploaded file. They will display in the Non-permissible values sections initially. Use the Add and Remove buttons to move the values shown from one list to the other, as appropriate.
...
If there are items in the Permissible values list, then the values for this annotation are restricted to only those values. When you perform a study search, you will select from a list of these values when querying this field. If there are no items in the permissible values list then the field is considered free to contain any value.
To edit a field's permissible values, you must change the annotation definition. You can do this even after a study has been deployed.
Note: You cannot edit permissible values in an existing annotation definition. To change permissible values, you must create a new annotation.|
Searching for Annotation Definitions
...
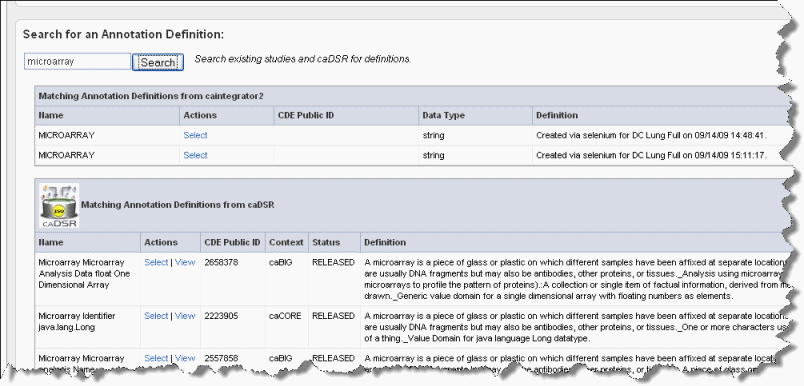
- Enter search keyword(s) in the Search text box on the Assign Annotation Definition page (the preceding figure). Click Search or click Enter to launch the search. After a few moments, the search results display on the page shown in the following figure.
Wiki Markup To view the definitions corresponding to any of the "Matching Annotation Definitions", which are those currently found in other caIntegrator studies, click the \[term\], such as "age", hypertext link. The definition then appears in the Current Annotation Definition segment of the page just above. In summary, when you click the link, that assigns the definition to the Define Fields for Subject Data page, and it also closes the Annotation Definition page.
...
You can modify any portion of the definition, as described
...
in Step 6 in [#Assigning an Identifier or Annotation].- The matches from caDSR display some of the details of the search results. To view more details of a match, such as permissible values, click View, which opens caDSR to the term. If you click Select, the caDSR definition automatically replaces the annotation definition for this field with which you are working.
Note title Caution Take care before you add a caDSR definition that it says exactly what you want. caDSR definitions can have minor nuances that require specific and limited applications of their use.
- Once you have settled on an appropriate field definition for the annotation, click Save. This returns you to the Define Fields for Subject Data page.
Info title Note If you have not clicked Select for alternate definitions in this dialog box, then click Save to return to the Define Field...dialog box without making any definition changes.
- From the Define Fields for Subject Data page, be sure and designate the data types for each field in the file. Click Save on each page to save your entries or click New to clear the fields and start again. You will not be able to proceed until every field definition entry on the Fields for Subject Data screen has an entry, one as the unique Identifier and the remainder as annotations.
...


