Page History
...
The Edit Study page, as shown in the following figure, displays the Name and Description that you entered for a new study, or for an existing study that you are editing.

To continue creating a study or to modify a study, complete these steps:
...
- Enter search keyword(s) in the Search text box on the Assign Annotation Definition page (the preceding figure). Click Search or click Enter to launch the search. After a few moments, the search results display on the page shown in the following figure.
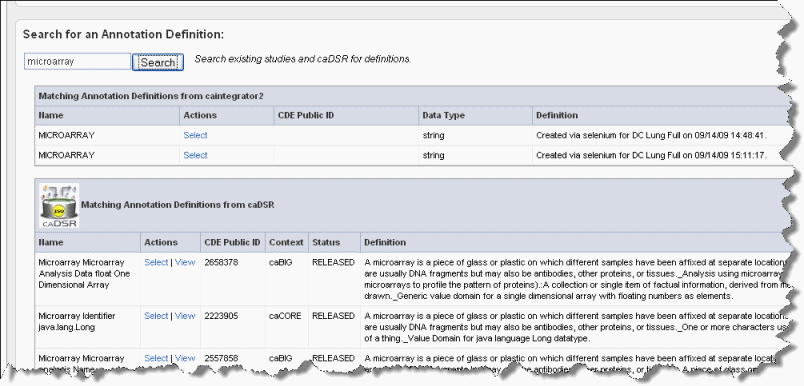
Wiki Markup To view the definitions corresponding to any of the "Matching Annotation Definitions", which are those currently found in other caIntegrator studies, click the \[term\], such as "age", hypertext link. The definition then appears in the Current Annotation Definition segment of the page just above.
Info title In Summary When you click the link for a definition, that assigns the definition to the Define Fields for Subject Data page, and it also closes the Annotation Definition page. You can modify any portion of the definition, as described in Step 6 in #Assigning an Identifier or Annotation.
- The matches from caDSR display some of the details of the search results. To view more details of a match, such as permissible values, click View, which opens caDSR to the term. If you click Select, the caDSR definition automatically replaces the annotation definition for this field with which you are working.
Note title Caution Take care before you add a caDSR definition that it says exactly what you want. caDSR definitions can have minor nuances that require specific and limited applications of their use.
- Once you have settled on an appropriate field definition for the annotation, click Save. This returns you to the Define Fields for Subject Data page.
Info title Note If you have not clicked Select for alternate definitions in this dialog box, then click Save to return to the Define Field...dialog box without making any definition changes.
- From the Define Fields for Subject Data page, be sure and designate the data types for each field in the file. Click Save on each page to save your entries or click New to clear the fields and start again. You will not be able to proceed until every field definition entry on the Fields for Subject Data screen has an entry, one as the unique Identifier and the remainder as annotations.
The Data From File columns on the Define Fields... page display the column header values of the first three rows you designated as "annotations".
The Edit Study page now displays a "Not Loaded" status for the file whose annotations (column headers) you have defined. An example of a file whose annotations have been defined but not yet loaded is shown in the following figure.Tip title Tip Saving your entries in this way saves the study by name and description, but does not deploy the study. See #Deploying the Study.
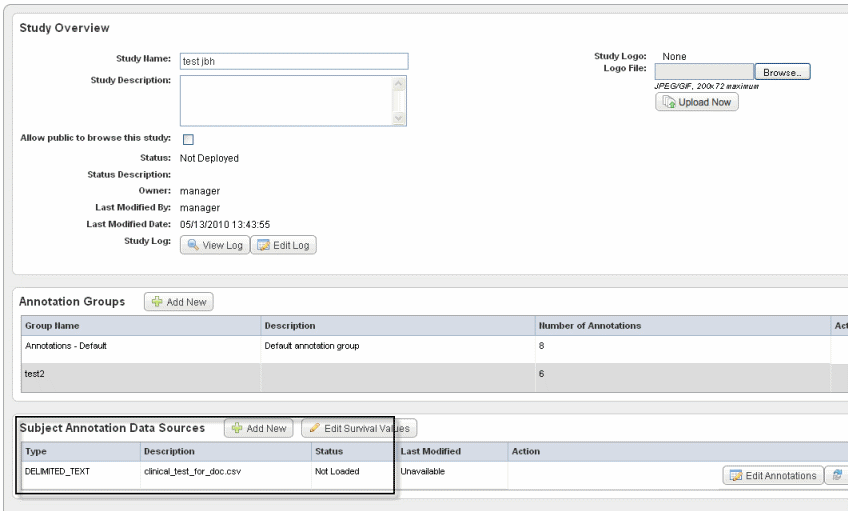
Status definitions:- Definition Incomplete – An annotation definition or definitions must be modified on the Define Fields for Subject Data page. This status may be displayed because an identifier has not been selected. See #Define Fields Page for Editing Annotations.
- Not Loaded – The annotation definitions must be loaded before a study can be deployed. If an error appears after attempting to load a subject annotation source, cick the Edit Annotations button which takes you to the Define Fields for Subject Data page where the problematic annotations will appear in red. See #Define Fields Page for Editing Annotations.
- Loaded – The annotation definitions are properly loaded.
- Click the Load Subject Annotation Source button in the Action section to load the data file you have configured, The Deploy Study button, to this point has been unavailable, but this step activates the button.
Tip title Adding Files You can add as many files as are necessary for a study. Patients 1-20 in first file, 21-40 in second file, or many patients in first file and annotations in second file, etc. As long as IDs are defined correctly, it works.
- Click Deploy Study. caIntegrator now loads data from the file to the caIntegrator database, and the file status changes to "Loaded".
Tip title Changing Assignments You can change assignments even after the study is deployed, using the Edit feature. For more information, see #Creating/Editing a Study.
...
caIntegrator goes to caArray, validates the information you have entered here, finds the experiment and retrieves all the sample IDs in the experiment. Once this finishes, the experiment information displays on the caIntegrator Edit Study page under the Genomic Data Sources section, as shown in the following figure.

| Info | ||
|---|---|---|
| ||
If you want to redefine the caArray experiment information, you can edit it. Click the Edit link corresponding to the Experiment ID. The Edit Genomic Data Source dialog box reopens, allowing you to edit the information. |
...
- Start with the 6-column mapping file template, described as follows:
- All platforms – Raw (level 1) data cannot be mapped; only normalized, processed (level 2) data is acceptable.
- The required six-column file format uses the following columns:
- Subject ID
- Sample ID
- Name of supplemental file (if appropriate, as attached to the experiment in caArray)
- Probe Header – Name of column header (in the supplemental file) which contains the probe IDs.
- Value Header – Name of column header (in the supplemental file) which holds the level 2 data.
- Sample Header – Name of column header (in the supplemental file) which holds the level 2 data.
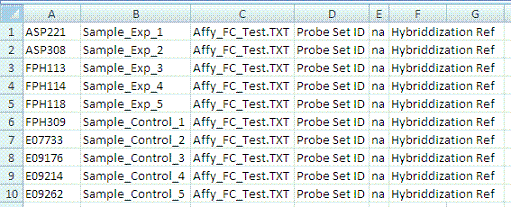
Info title Note Only one of the last 2 columns is used: a single sample per file uses the Value Header column; multiple samples per file used Sample Header column. Unused columns are blank.
The following figure shows an example multiple sample mapping file in CSV format.
- When you use the mapping file, make sure you use the subject ID for mapping. If the file is human data, the subject ID is the patient ID.
- Determine whether your data in caArray is "imported and parsed" or "supplemental". These are the 'Loading Types' referred to in Step 4 of #Steps for Mapping Genomic Data. Fill in the 6-column mapping file according to the following standard:
- Imported and parsed – Complete only the first two columns of the 6-column mapping file as described above. You can ignore the remaining columns.
- Supplemental – Supplemental data comes in two types: "single sample per file" and "multiple samples per file". In either case, only one of the last two columns is used. If the supplemental data format is, single sample per file, the column named "Sample_Header" can be left empty. If the supplemental data format is multiple samples per file, the column named "Value_Header" can be left empty.
The following steps use data of either type.Info title Note Supplemental files from caArray for mapping data must be configured appropriately. For information, see Supplemental Files Configuration.
...