Page History
...
- On the Edit Study page, click the Map Samples button. This opens the Edit Sample Mappings page, shown in the following figure.
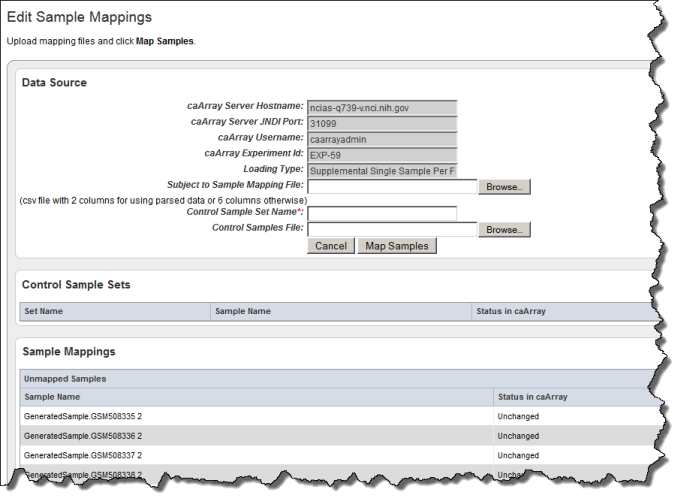
- The first two caArray fields may be populated with the information for the instance of caArray to which you have access. You can, however, enter the caArray information described in the following table, if you prefer.
Field
Description
caArray Host Name
Enter the hostname for your local installation or for the CBIIT installation of caArray. If you misspell it, you will receive an error message.
caArray JNDI Port
Enter the appropriate server port. See your administrator for more information. Example: For the CBIIT installation of caArray, enter 8080.
caArray Username
Enter your caArray account user name and password; you must have permissions in caArray for the experiment if it is private. If the data is public, you can leave this field blank.
caArray Experiment ID
Enter the caArray Experiment ID which you know corresponds with the subject annotation data you uploaded. Example: Public experiment "beer-00196" on the CBIIT installation of caArray (array.nci.nih.gov). If you misspell your entry, you will receive an error message.
- Enter the Loading Type of the data file you plan to map. (File types are described in #Creating a Mapping File).
- In the Subject to Sample Mapping File section, click Browse to navigate for the Sample Mapping CSV file that you created (described in #Creating a Mapping File). This provides caIntegrator with the information for mapping patients to caArray samples.
- Click the Map Samples button.
If the caArray data you have identified is imported and parsed, when you click the Map Samples button, the mapping takes place as the data is uploaded into caIntegrator. If the caArray data is supplemental, the mapping does not occur until the study is deployed. - Mapped samples will be are listed in the Samples Mapped to Subjects section; scroll down the page to view them (see the following figure). caIntegrator refreshes caArray data hourly; once samples are mapped, a column on this page displays the status of the data in caArray (noted in the figure). Unmapped samples show at the top of the caIntegrator page. They were loaded from caArray, but they are not in the mapping file. These are not used for integration.
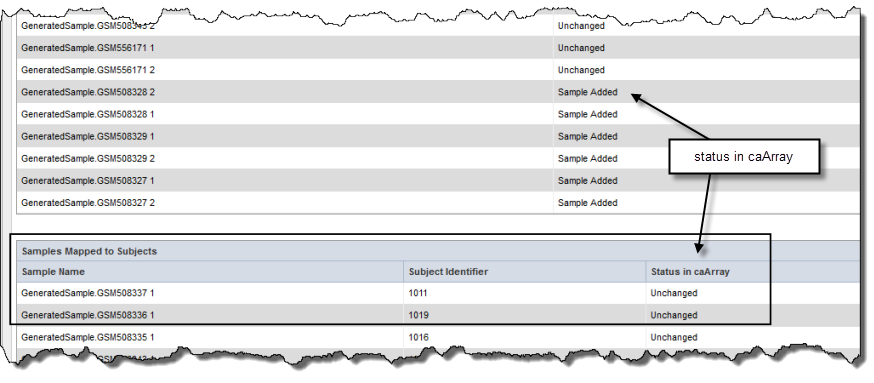
Info title Note If you have already mapped samples, when you first open this page they are listed in the Samples Mapped to Subjects section. If you have not already mapped samples, all of the samples in the caArray experiment you selected are listed as unmapped, because caIntegrator does not know how these sample names correlate to the patient data in the subject annotation file until you upload the subject to sample mapping file.
...