Search this chapter:
This chapter describes how to search the local and any selected remote image databases for images.
Topics in this chapter include:
Performing Searches
NBIA enables you to search for images in the local NBIA in vivo image repository. If available, you can also search remote imaging archives.
NBIA is designed to perform the following tasks:
- Search for images in simple or advanced search mode
- Combine search criteria defined in those searches with keyword searches of curated annotation data
- Save the search queries to be used repeatedly
- Review query histories
As subjects, studies, series or images are located, save them to your data basket for download.
Downloading series with annotation files
When you download a series that has annotation files (indicated by Yes in the Contains Annotations column), they are automatically downloaded as well.
NBIA submissions are organized in the following hierarchy, which is important to remember in creating your search query and reviewing search results:
Collection > Patient (Subject) > Study > Series > Images |
|---|
NBIA provides three search modes:
Performing a Simple Search
Performing a Text Search
Performing an Advanced Search
Working with Saved Queries
While performing a Simple Search, you can save your choice of Collection(s), Image Modality(ies), and Anatomical Site as a named query. You can then run that query in the future or edit it if you want to change any of the search criteria. That edited query can either update your original query or become a new query with a new name.
The following procedures are associated with saved search queries.
Creating Saved Queries
- Select search criteria.
In the box above the Save Query link, enter a name for your query.
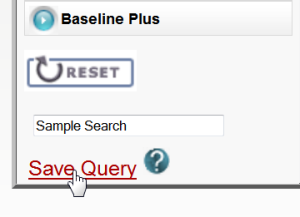
Click Save Query.
The query is saved. You can see it by selecting Tools > View Saved Queries.
Viewing and Editing Saved Queries
Disallowed Collections and Saved Queries
If you save a query when you have access to a collection then subsequently lose that access, you do not lose the saved query. However, records from a disallowed collection are not included in the search results.
To view, edit, and resubmit saved queries
- Select Tools > View Saved Queries.
The Saved Queries page appears.
The query table is sorted in descending order by Last Executed date by default. You can also sort by Query Name by clicking on the down arrow next to the column title.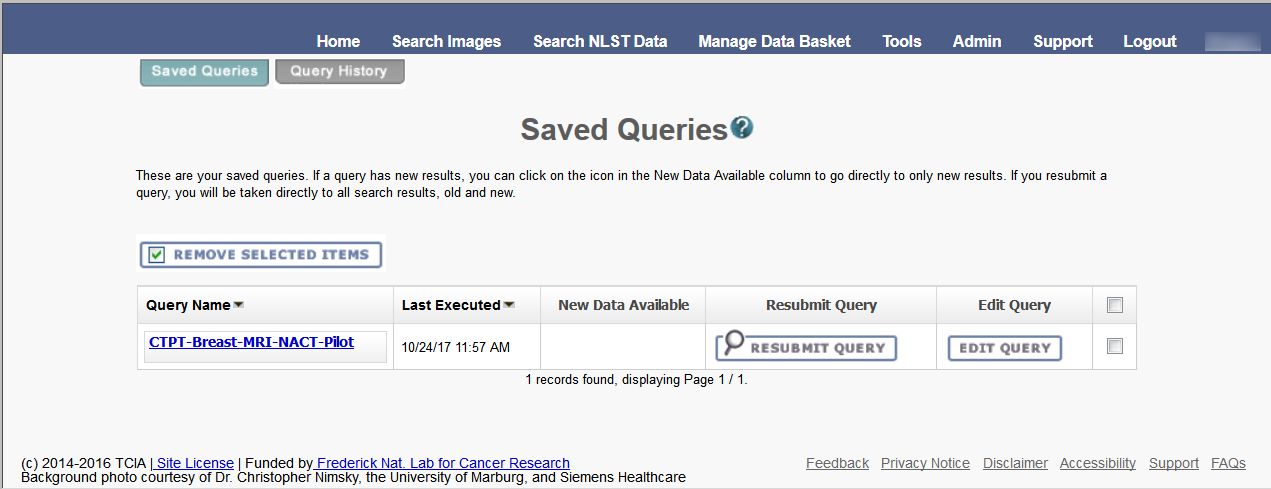
The following table describes the information about your saved queries on this page.
Saved Query | Description |
|---|---|
Query Name | The name of the query displays as a link. The default is that the criteria themselves do not display. The link toggles whether the criteria for the saved query displays. Click the link to display/not display the criteria selected for the query. |
Last Executed | The most recent date and time you executed the query displays. The time is displayed for the Eastern Time (US and Canada) time zone. |
New Data Available | An icon ( |
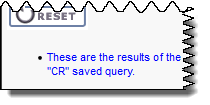
Resubmit Query | Click this button to open the Simple Search page showing all available results of the currently saved search criteria. A message appears in the lower left corner identifying the source of the search results.
|
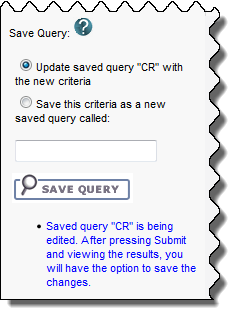
Edit Query | Click this button to open the Simple Search page with the currently saved search criteria selected. In the lower left corner of the page, the Save Query section provides the options to update the saved query with new criteria or to save these criteria as a new saved query, with a box for the new query name. Select an option and click Save Query.
|
Check Box | Click the check box to mark the query for deletion. You can click the checkbox in the header to select all queries or you can select queries individually. Click Remove Selected Items. The Manage Saved Queries page displays a message indicating success or failure and any additional actions that are required. |
You can also perform the following action on the Saved Queries page.
| Action | Description |
|---|---|
| View Query History | Click the Query History tab. The View Query History page appears. For more information, see Viewing Query History. |
Viewing Query History
- Select Tools > View Query History link
or
Click the Query History tab from the Saved Queries page.
The Query History page appears. The Query History page displays a table of the last twenty queries that you executed. These include saved queries that you resubmitted as well as queries you have not saved.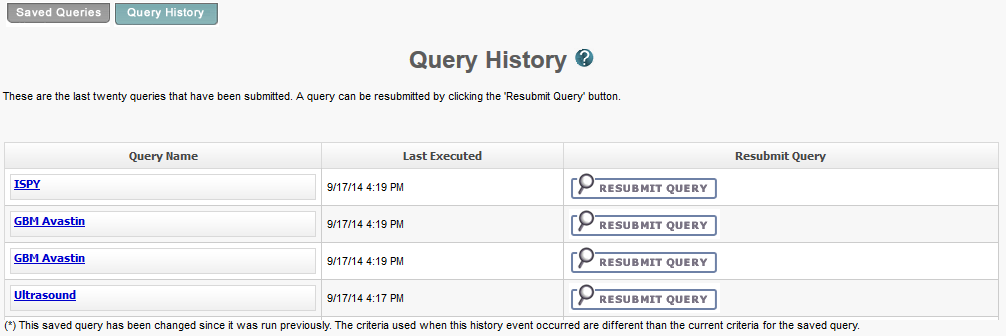
The Query History page contains the following information:
Field Name | Description |
|---|---|
Query Name | The name of the query displays as a link. The link toggles whether the criteria for the executed query is displayed. The text of the link can appear in three different ways depending on the situation.
|
Last Executed | The date and time that you executed the query. The time is displayed for the Eastern Time (US & Canada) time zone. |
Resubmit Query | Click the Resubmit Query button to submit the query using the saved criteria. The results display on the Search Results page. |
Click the Saved Queries tab to view, edit, or resubmit saved queries (see Managing Saved Queries).