This page describes how to register multiple files. For prerequisites, refer to Preparing to Use Globus with DME. If you want to provide metadata for each object (data file) or collection, also refer to Preparing a Metadata File for Bulk Upload.
For a video of this procedure, refer to Video of Uploading Data in Bulk via the GUI.
To register data files:
- Log in as described in Logging In via the GUI. The Dashboard appears.
- Select a method:
- If you are not familiar with the data destination, browse for it, as described in Browsing for Data via the GUI. Navigate to and right-click the location where you want to register your data files. Click Add Bulk (Globus).
- If you are familiar with the data destination, select this method: In the left panel, click Register > Bulk (Globus).
Specify the data source:
Field Instructions Select File(s)/Folder(s) from Globus endpoint Click the selection link. A Globus page appears. In Globus: - Select an endpoint.
- Select the files or folders that you want to upload to DME.
- Click Submit. The Register Bulk Data page re-appears, with information about your Globus selection at the bottom of the Data Source section.
Include Criteria Use patterns to specify the source files to include. If you specify more than one pattern, the system considers a union of all patterns. For details, refer to Specifying Criteria for Bulk Upload. Exclude Criteria Use patterns to specify the source files to exclude. If you specify more than one pattern, the system considers a union of all patterns. For details, refer to Specifying Criteria for Bulk Upload. Criteria Type Specify the type of patterns in your criteria:
- Simple: For details, refer to Specifying Criteria for Bulk Upload.
- RegEx: For details, refer to the following page: https://docs.oracle.com/javase/8/docs/api/java/util/regex/Pattern.html

Dry Run If you want to preview a list of the source file(s)/folder(s) that the system would register based on what you specified in the other Data Source fields, select this option. (This option tests only the Data Source entries. It does not test the Data Destination entries.) Bulk metadata file If you want to provide required metadata for each object or collection, click Choose File. Navigate to and select the prepared metadata file. (For details, refer to Preparing a Metadata File for Bulk Upload.) Scroll down. The remaining portions of the Register Bulk Data page appear. If you browsed to the data destination, that portion of the page has only the Collection Path field, with the path already specified.
If the Base Path and Collection Type fields are available, specify the data destination:
- Select the base path specified by your group administrator. The system begins to populate values in the Collection Type field and the Collection Path field. (If you are a group administrator and want the Collection Type field to list more collection types, contact NCIDataVault@mail.nih.gov.)
- Unable to render {include} The included page could not be found.
- Unable to render {include} The included page could not be found.
- Specify the collection metadata. The system applies this metadata to the entire collection, not to individual files:
- To add a metadata attribute:
- Click Add Metadata, visible on the right or left side of the page. A blank attribute row appears.
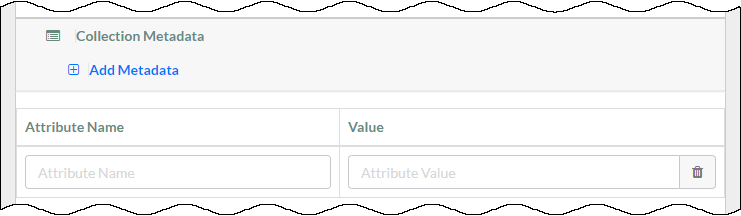
- Specify a unique attribute name.
- Click Add Metadata, visible on the right or left side of the page. A blank attribute row appears.
- In each attribute row, specify a unique value that describes the content you are registering. The character limit for each metadata value is 2700.
Example Attribute Example Value data_owner Jane Doe project_id 1234567890 sample_name L1 project_start_date 2020-12-31 For some date attributes, such as project_start_date, the system expects the "yyyy-MM-dd" format, as in the above example.
Click Register. The system checks whether it can access the objects and collections you have specified, using the data you have entered:
- If not, the system displays an error message.
- If so, the system responds based on your selections and displays a message at the top of the Register Bulk Data page:
- If you selected the Dry Run option, the system displays a list of the source file(s)/folder(s) that it would have registered based on what you specified in the other Data Source fields. If necessary, revise your entries and click Register again until you are satisfied with the dry run list. When you are ready to perform the registration, click Register again.
- Otherwise, the system displays a message with the task ID of the registration request.
- When the system displays the task ID, consider visiting the Upload Task Details page to view the progress of the upload. If you provided a metadata file, this page indicates any difficulty processing that metadata. For instructions, refer to Viewing Globus Upload Status.