Problem: When uploading experiment data from large microarrays, the size of your data archive may exceed the individual file size limit of 2 GB.
Topic: caArray Usage
Release: caArray 2.0 and above
Date entered: 10/17/2011
Solution
This article presents a simple workaround which allows you to break down your data into smaller, more manageable chunks that can be individually uploaded without violating the 2 GB limit.
Overview
Your experiment data consists of an IDF metadata file and its corresponding SDRF metadata file, which, in turn, is associated with one or more raw and derived array data files. In this tutorial, the array files we use are in the Agilent TXT (raw) and TSV (derived) formats; the file formats for your data may differ.
We can break down this collection of files into more manageable chunks, each of which consists of an individual IDF file and all its associated SDRF, TXT, and TSV files. Each of these chunks can be packaged into a separate ZIP archive, then uploaded, validated, and imported individually.
Prerequisites
This tutorial assumes that you have past experience and basic familiarity with uploading data into caArray. Specifically, it assumes that you have already created an experiment for your data, uploaded the corresponding array design, and associated the experiment with that design. In case you lack a basic background on uploading caArray data, please refer to the official caArray User's Guide on the NCI wiki at https://wiki.nci.nih.gov/x/LBo9Ag.
You must have all your experiment data readily accessible on your computer (i.e., not archived or compressed). The data should preferably be consolidated into a single location (i.e., a folder containing every single IDF, SDRF, TXT, and TSV file from the experiment). You will also need an archive creation utility installed on your computer. In this tutorial, we will use WinZip (www.winzip.com), but any comparable utility with support for the ZIP format will do.
Reference Information
The experiment data used in this tutorial was not generated de novo; it came from an existing experiment whose data is publicly available on the official NCI instance of caArray at https://array.nci.nih.gov/caarray/home.action (you must have an official NCI user account to access this site). The experiment, entitled "TCGA Ovarian: Comparative Genome Hybridization Analysis Using the Agilent Human Genome CGH 244A Platform", was conducted at Harvard Medical School in Boston, MA. It can be accessed via the URL https://array.nci.nih.gov/caarray/project/EXP-498 or by searching for the experiment ID 'EXP-498' on the NCI caArray instance. The array design used was TCGA-Agilent_HG-CGH-244A; the ADF array design files can be downloaded from the experiment, as can all the experiment data, including the IDF and SDRF metadata files, the Agilent TXT raw array data files, and the TSV derived array data files.
Getting Started – Preparing Data for Upload
In preparing your data for upload, the first step is to find all the files associated with a given IDF file. To so, open any of the IDF files from your experiment in Microsoft Excel or another application suited for viewing tab-limited data. The partial screenshot below shows the first of twelve IDF files from our example experiment as viewed in Excel.

The field 'SDRF files' towards the bottom of your IDF file displays the name of the SDRF file that is associated with the IDF.
Most of the content of this file is irrelevant to our goal here and beyond the scope of this tutorial. Of interest is the bottom row with the field 'SDRF Files' and its corresponding value, the name of the SDRF file that is associated with this IDF file.
The IDF file in this example references a single SDRF file, but your IDF file may reference many, with each SDRF filename listed in its own row. Whether your IDF references one SDRF or many, make a note of all the SDRF filenames, as we will need to open each of them individually. The two partial screenshots below show the SDRF file that was referenced in our IDF file, as viewed in Excel.

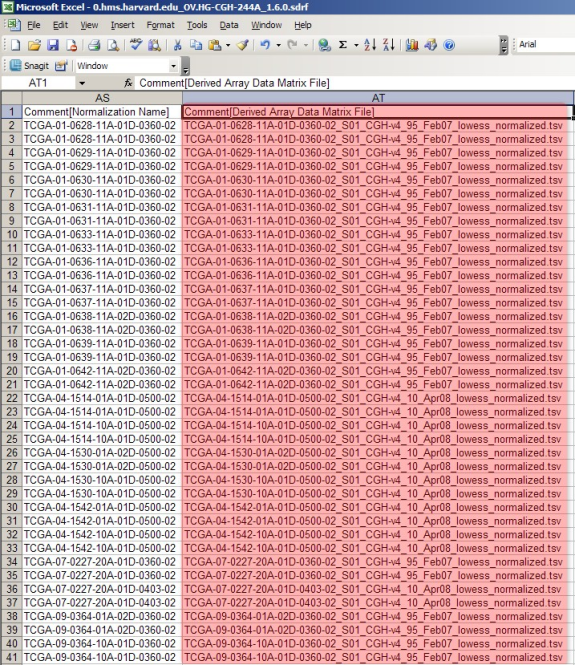
The SDRF file lists all the raw and derived array data files associated with the experiment. The raw files are listed under the column headed 'Array Data File' and the derived files are listed under the column headed 'Derived Array Data Matrix File'.
As with the IDF, most of the SDRF content is irrelevant to our goal here and beyond the scope of this tutorial. Of interest are the two columns headed 'Array Data File' (upper screenshot) and 'Derived Array Data Matrix File' (lower screenshot). These columns list the filenames of all the associated TXT and TSV files, respectively, from the example experiment. (Note that both of these columns are from the same file – they are shown in different screenshots only because the file is too large to be displayed in a single screenshot.)
Make a note of all the TXT and TSV filenames, as we will need to include each of them in the data archive that we upload to caArray. The easiest way to note these filenames is to copy them from the SDRF file and paste them into a plain text file, which you can print for reference.
Creating the Archive
Now that we've identified all the files associated with our IDF, our next step is to creative an archive of them. Launch WinZip, click the 'New' toolbar button, and enter a name for your archive in the 'New Archive' dialog. We'll call ours 'upload.zip', as shown below.
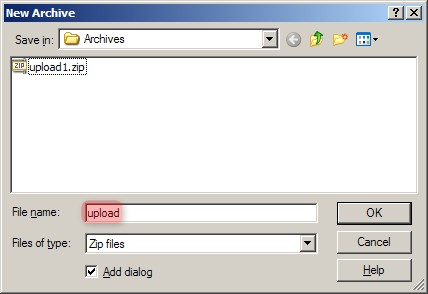
In WinZip's 'New Archive' dialog, specify a filename for the data archive to be created ('upload.zip in our example').
Once we've created the archive, we can now add files to it. We can refer to our previous notes of all the filenames associated with our IDF file. In our example, the archive will consist of a total of 42 files: one IDF, one SDRF, 20 TXT, and 20 TSV files. We can select these files in the 'Add' dialog as shown below, then click the 'Add' button at the bottom to begin creating the archive. (Hint: Hold down the CTRL key to select multiple files).
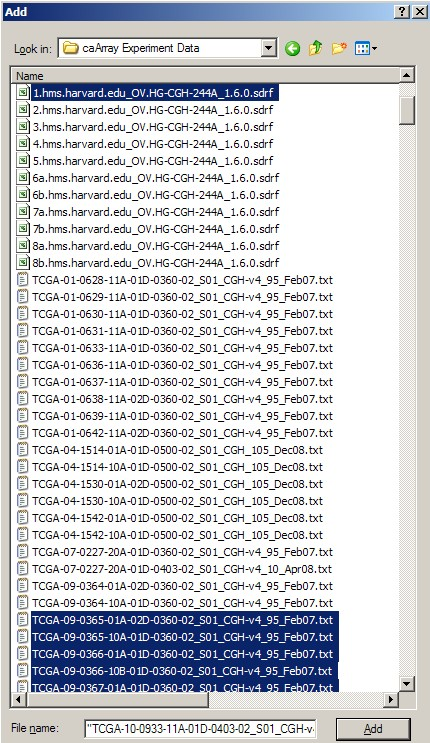
In WinZip's 'Add' dialog, select all the related IDF, SDRF, raw data, and derived data files (a total of 42 files in our example), then click the 'Add' button below to begin creating the archive.
(WARNING: After you've created the archive, ensure that the resulting file size is less than 2 GB. If it isn't, you will have to re-create the archive with a higher compression ratio. In our example, the size of the 'upload.zip' archive came out to approximately 900 MB, as shown below, so the file is ready to upload as is.)

In our example, the 'upload.zip' data archive we created is approximately 900 MB in size, which is below the 2 GB upload limit. If your data archive turns out to be larger than 2 GB, you will not be able to upload it until you re-create it with a higher compression ratio.
Uploading the Archive
To upload the archive, first log in to caArray and navigate to the experiment you will be upload your data into, then select the 'Data' tab, followed by the 'Manage Data' tab beneath it. Now click on the 'Upload New Files' button as shown below.
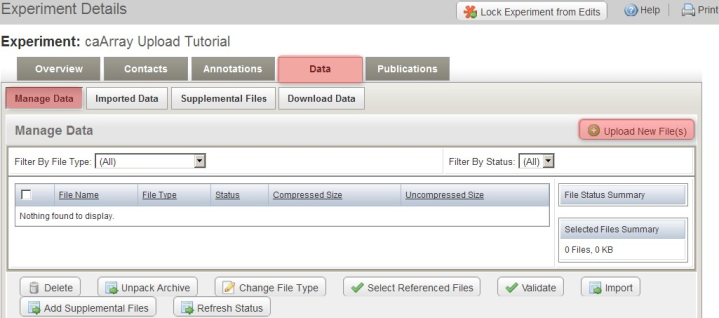
Click the 'Upload New Files' button under the 'Manage Data' tab to specify the location of your data archive.
A new pop-up window entitled 'Experiment Data Upload' will appear in your Web browser, prompting you to upload files. Click on the 'Browse' button, then select the 'upload.zip' archive we created previously from the Open dialog as shown below.
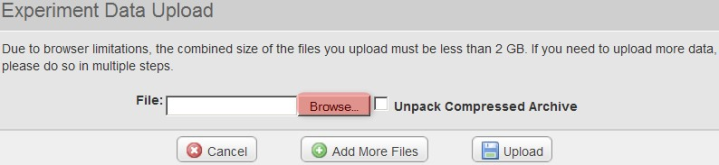
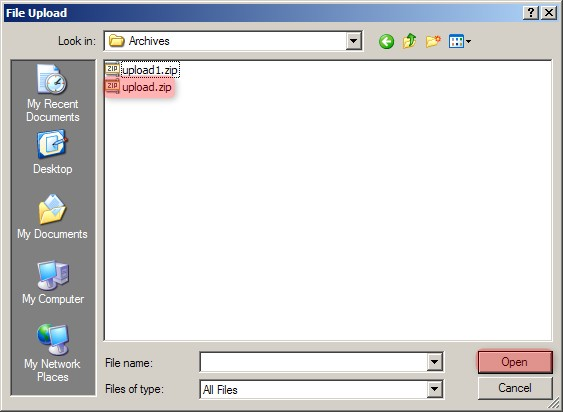
In the 'Experiment Data Upload' pop-up window, click the 'Browse' button, then in the 'File Upload' dialog, navigate to the 'upload.zip' archive we created previously and click on the 'Open' button.
Back in the 'Experiment Data Upload' window, make sure that the box labeled 'Unpack Compressed Archive' is checked, then click on the 'Upload' button to begin uploading the file.
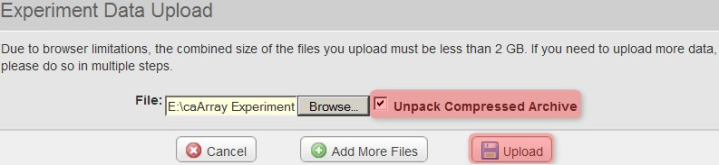
Back in the 'Experiment Data Upload' window, make sure that the box labeled 'Unpack Compressed Archive' is checked, then click on the 'Upload' button to begin uploading the file.
Depending on the size of the archive and the performance of your caArray server, it may take anywhere from five to 20 minutes for the archive to upload. Remember to keep the upload window open throughout the entire upload process, even after the blue progress bar has reached 100%. (For reference, on a dedicated caArray server running a quad-core Intel(R) Xeon(R) 5148 CPU at 2.33GHz with 16 GB of memory, the total time required to extract and process a 1.1 GB upload after the progress bar had reached 100% was about 13 minutes and 30 seconds.)
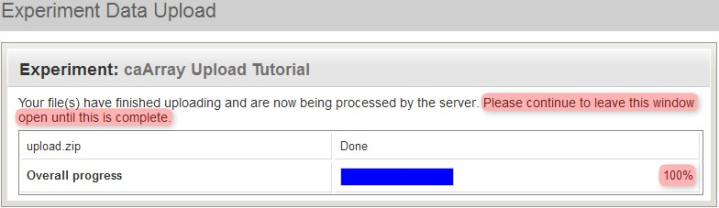
Even when the blue upload progress bar reaches 100%, do not close the 'Experiment Data Upload' window. You will be notified when the upload is complete.
You'll know when the upload is complete when you see a new window overlaid over the upload window with the message 'Your file upload is complete', as shown below. Click the 'OK' button below this message, then click on the 'Close Window' button behind it to return to the main experiment window.
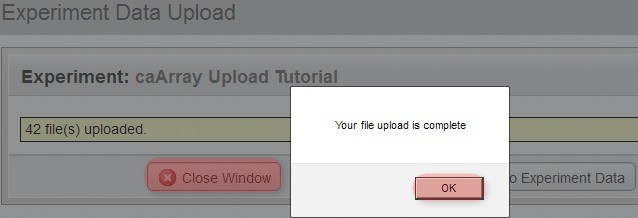
You'll know when the upload is complete when you see a new window overlaid over the upload window with the message, 'Your file upload is complete'.
Verifying the Archive
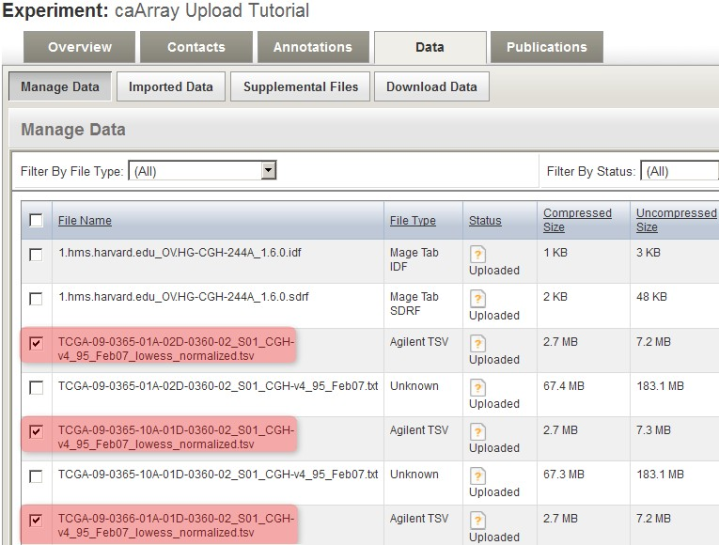
Back in the main experiment window, the contents of the archive we just uploaded are now listed under the 'Manage Data' tab. The TSV matrix files are considered supplemental, so we will move them to the 'Supplemental Files' tab by checking off all the TSV files in the list, then clicking on the 'Add Supplemental Files' button below.
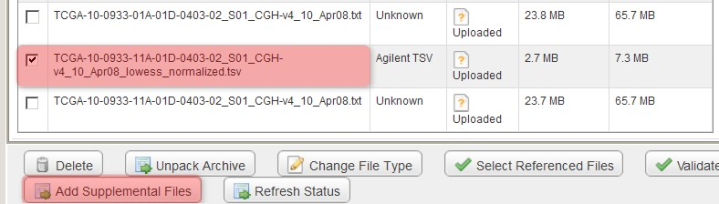
You can mark the derived array data files as supplemental by checking them off under the 'Manage Data' tab, then clicking the 'Add Supplemental Files' button.
These TSV files now appear under the 'Supplemental Files' tab, alongside other TSV files from a previous upload to the same experiment.
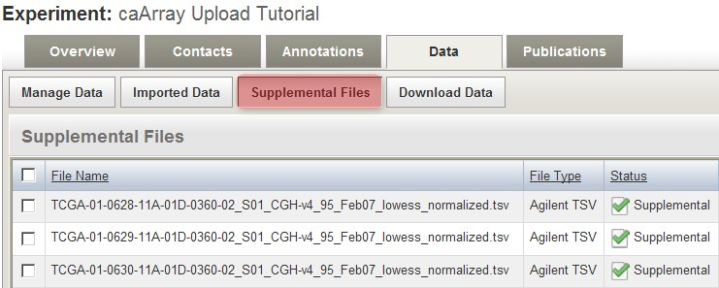
The derived array data files we checked off under the 'Manage Data' tab now appear under the 'Supplemental Files' tab, alongside other such files from a previous upload to the same experiment.
Back on the 'Manage Data' tab, the remaining files from our upload are one IDF, one SDRF, and 20 TXTs (only the first three of these files is shown below due to space constraints). Note that the status of the TXT file from the screenshot (and of all other TXT files in the list) shows as 'Unknown', which means that caArray did not automatically recognize the file type in this particular case. As a result, we will have to manually specify the file type ourselves by selecting all the TXT files in the list, then clicking the 'Change File Type' button below.
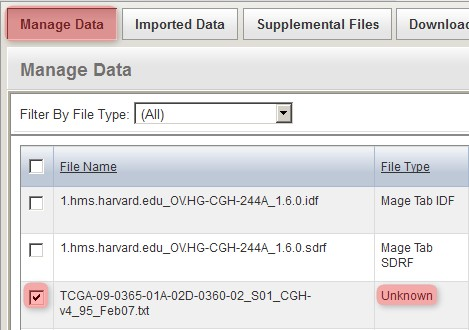

Since caArray didn't automatically recognize the format of the array data files we uploaded, we must manually specify the format ourselves by selecting the files under the 'Manage Data' tab, then clicking the 'Change File Type' button.
For the particular data in this example, the array data files are in the Agilent Raw TXT format. To specify this, in the 'Manage Files' window shown below, select 'Agilent Raw TXT' from the 'Select New File Type' drop-down list, then click on the 'Save' button above it. (NOTE: Depending on the assay type and array design used in your own experiment, your data may be in a different format, in which you will have to select the appropriate type from the drop-down list, or the file type may be automatically recognized by caArray, in which case you won't have to manually specify the file type yourself.)
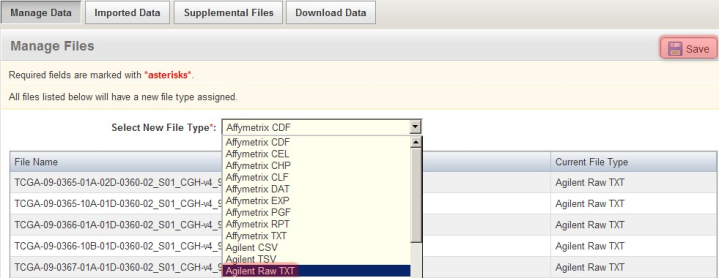
Manually specify the format of the uploaded array data files by selecting the appropriate format (Agilent Raw TXT in this example) from the 'Select New File Type' drop-down list.
Back on the 'Manage Data' window, the status of all the TXT files now shows as 'Agilent Raw TXT', indicating that caArray now correctly recognizes the file type.
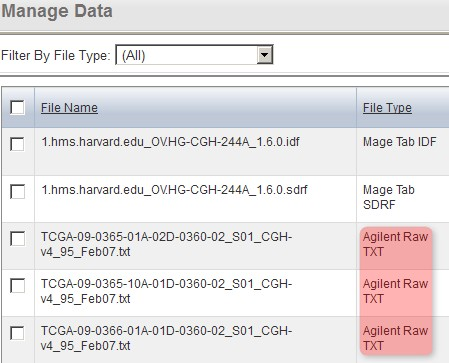
Back on the 'Manage Data' window, the format of all the originally unrecognized array data files now shows under the 'File Type' column (as Agilent Raw TXT in our example), indicating that caArray now correctly recognizes the file type.
Our next step is to validate all the files, which we will do in two passes: the first pass, validating only the TXT files (but not the IDF and SDRF), and the second pass, validating all the files (IDF, SDRF, and TXT). For the first pass, check off all the TXT files in the list, then click the 'Validate' button below.
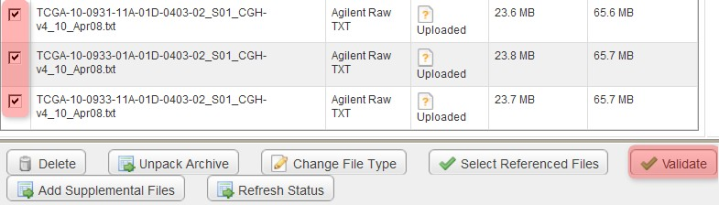
To begin verifying the uploaded data, check off all the array data files under the 'Manage Data' tab, then click the 'Validate' button.
The page will now refresh with the updated status of the files showing as 'In Queue'. Depending on the size of your array and the performance of your server, the TXT files may take several minutes to validate, so be patient. To further complicate matters, the page will not automatically refresh once the files have finished validating, so you will have to manually refresh the page periodically yourself using your browser's 'Refresh button' until the file status updates again.
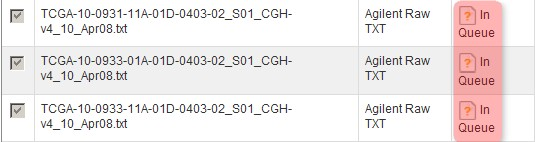
The 'Manage Data' tab now refreshes with the status of the array data files showing as 'In Queue'.
You'll know when the first pass validation is successful when the status for TXT files shows as 'Validated, Not Parsed'. (NOTE: The 'Not Parsed' status doesn't indicate any problem with your array data; caArray still has not implemented a parser for the Agilent TXT format and is thus unable to parse these files. The files can still be imported into your experiment without being parsed.)
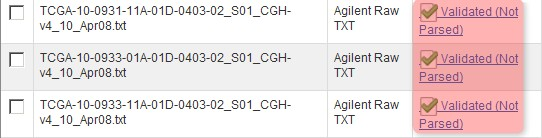
Once the data finishes validating, the 'Manage Data' tab will appear with the status of the array data files showing as 'Validated (Not Parsed)'.
For the second pass, check off every single file on the 'Manage Data' page (IDF, SDRF, and TXT), then again click the 'Validate' button below.


To finish verifying the uploaded data, check off all the files under the 'Manage Data' tab (IDF, SDRF, and array data files), then click the 'Validate' button again.
The page will again refresh with the files' status showing as 'In Queue'. After a few minutes, click the browser's 'Refresh button' until the file status updates again.
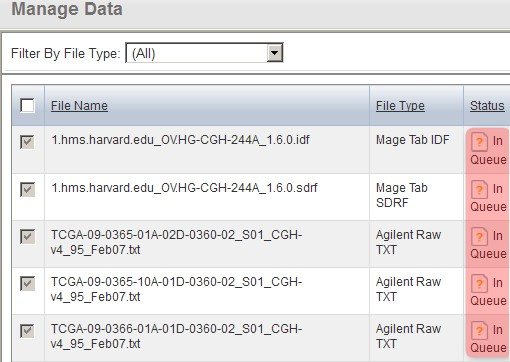
The 'Manage Data' tab now refreshes with the status of all the files showing as 'In Queue'.
You'll know when the second pass validation is successful when the status of the IDF and SDRF files shows as 'Validated' and the status of the TXT files shows as 'Validated, Not Parsed'. Once you've reached this stage, you can import the validated files into the study by checking all the files in the list, then clicking on the 'Import' button below.
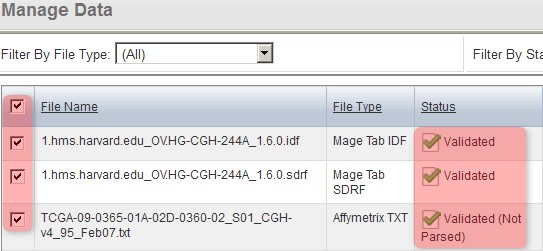

Once the data finishes validating, the 'Manage Data' tab will appear with the status of all the files showing as 'Validated' or 'Validated (Not Parsed)'. To import the files, select them all, then click the 'Import' button.
The page will again refresh with the files' status showing as 'Importing'. After a few minutes, click the browser's 'Refresh button' until the file status updates again.
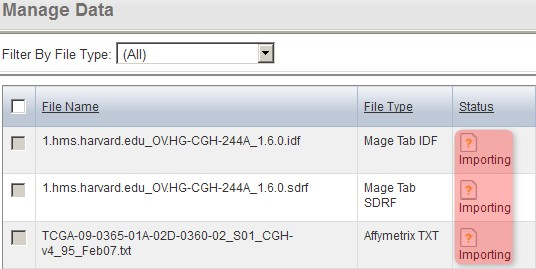
The 'Manage Data' tab now refreshes with the status of all the files we selected for importing showing as 'Importing'.
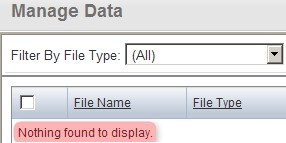
You'll know when the importing is successful when the uploaded files no longer appear under the 'Manage Data' tab, with a message stating, 'Nothing Found To Display' in their place, as shown below.
The files now appear under the 'Imported Data' tab, as shown below, with a status of 'Imported'. Note that other, previously uploaded files from the same experiment appear under this tab as well alongside the files we just imported.
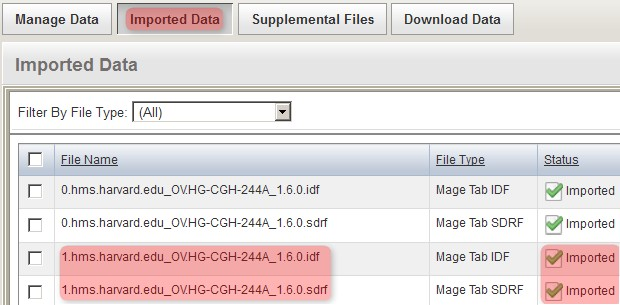
The imported files now appear under the 'Imported Data' tab with a status of 'Imported' alongside other files from a previous upload to the same experiment.
Reproducing the Procedure
So far, only one-sixth of the data has been uploaded. You can reproduce the procedure we followed so far to upload the data from your experiment. The procedure, summarized below, is as follows:
- Identify an IDF file from your experiment data that hasn't yet been uploaded and examine it to see which SDRF file it references
- Examine the SDRF file to see which raw TXT files it references
- Create a ZIP archive containing the IDF, SDRF, and all the associated TXT files, ensuring that the size of the archive is less than 2 GB.
- Upload the ZIP archive to your caArray instance
- Depending on the format of your raw array data, manually specify the file type for the array data files, as they may not automatically recognized by caArray
- Validate the uploaded files in two passes: the first, only the TXT files, and the second, all the files
- Import the validated files into the experiment
Have a comment?
Please leave your comment in the caArray End User Forum.