Question: How do I upload MicroArray Gene Expression Data into caArray?
Topic: caArray Usage
Release: caArray 2.0 and above
Date entered: 01/06/2009
I want to load data related to a microarray gene expression experiment into caArray. Where should each piece of data go in caArray?
Answer
A microarray gene expression experiment is typically associated with the following types of files: array design files, sample annotation files, and raw and/or processed data files. In addition, a user might also want to associate with a particular experiment, files that describe the experiment, files that describe the samples, and other miscellaneous files.
caArray allows a user to load all types of files into the system. Furthermore, caArray will perform data parsing for some of those files if it has the corresponding data parsing modules installed. The caArray User Guide has detailed descriptions of the types of files supported by caArray and steps taken to upload, validate, and import those files. Given that in most cases the user uploads data generated from one particular array platform at a time, this document provides step-wise description of the data upload/validate/import process in caArray for each supported array platform.
Step 1. (for all array platforms): Check the availability of Array Design File(s)
Before an experiment is created in caArray, the user should first check whether the corresponding Array Design File(s) already exist in caArray by clicking the "Manage Array Designs" link under the "Curation" section of the caArray left navigation panel, as shown in the image below.
Manage Array Designs Screen Listing the Design Files
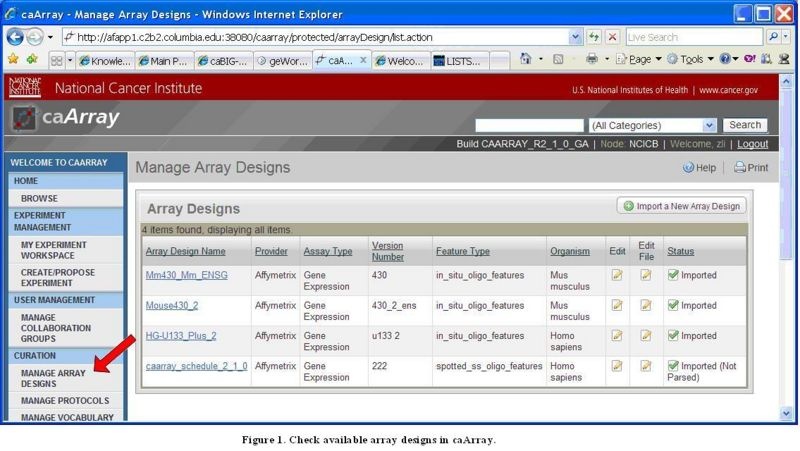
If the corresponding Array Design File(s) for the array platform used in the experiment are found, the user can proceed to Step 2.
Manage Array Designs Screen with Import a New Array Design Link
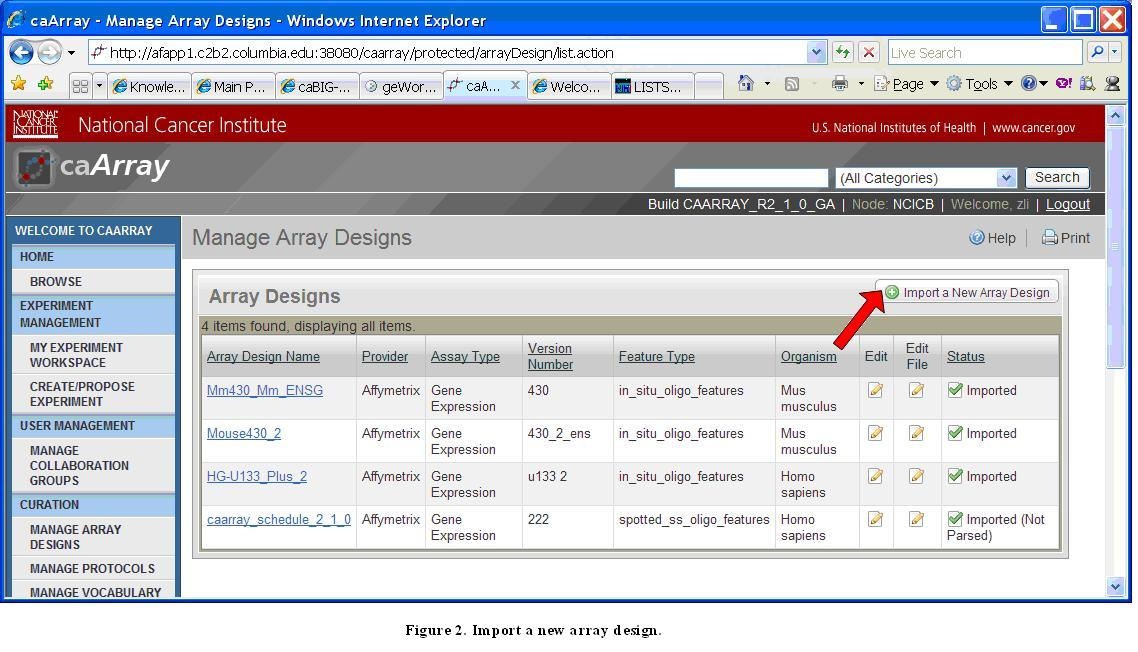
Otherwise, the user should click the "Import a New Array Design" link as shown in the preceding image, and follow the process described in the diagram below to import an Array Design File (only a registered user can import an Array Design File).
Diagram of Process Flow to Import an Array Design File
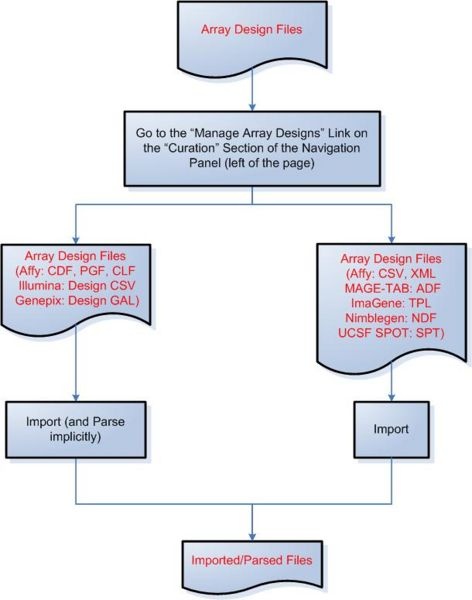
According to the figure above, to begin importing a file an array design file into caArray, first click on the ‘Manage Array Designs’ link under the ‘Curation’ heading in the navigation panel on the left of the page, then click on the ‘Import a New Array Design’ button at the top right of the ‘Manage Array Designs’ page. The following file formats can be both imported and parsed by caArray: Affymetrix CDF, PGF, and CLF; Illumina Design CSV; and Genepix Design GAL. The following file formats can be imported, but not parsed: Affymetrix CSV, XML MAGE-TAB, and ADF; ImaGene TPL; Nimblegen NDF; and UCSF SPOT SPT.
Please note that any array design format not mentioned in the flow diagram is not supported by caArray up to version 2.1.1.
Step 2 (for all array platforms): Create an experiment
The caArray User Guide provides detailed information for this step.
Step 3: Upload, validate, and import files into caArray
In this step, slightly different processes are used to load data into caArray for different array platforms.
- Step 3A: Import data under the MAGE-TAB format
- Step 3B: Import experimental data using the Affymetrix platform
- Step 3C: Import experimental data using the Illumina platform
- Step 3D: Import experimental data using the Genepix platform
- Step 3E: Import experimental data using the Agilent platform
- Step 3F: Import experimental data using the ImaGene platform
- Step 3G: Import experimental data using the Nimblegen platform
Step 3A: Import data under the MAGE-TAB format
Only file types listed in the flow diagram below can be imported.
Diagram of Process Flow to Import a MAGE-TAB File
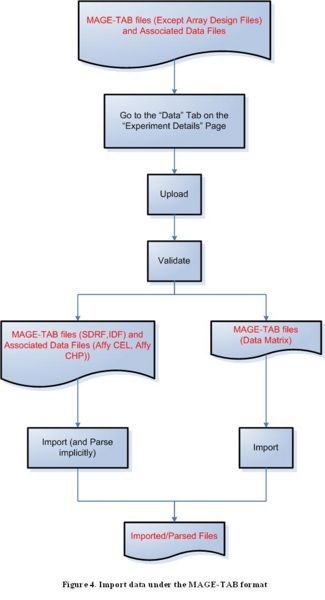
According to the figure above, to import a MAGE-TAB file, first click on the ‘Data’ tab on the ‘Experiment Details’ page, then proceed to upload and validate the file you wish to import. The following MAGE-TAB file formats can be both imported and parsed by caArray: SDRF and IDF, along with their associated data files (Affymetrix CEL and CHP). MAGE-TAB data matrix file formats can be imported, but not parsed.
Step 3B: Import experimental data using the Affymetrix platform
Because of a known issue concerning importing Affymetrix DAT files, uploaded Affymetrix DAT files should be kept in the "Manage Data" tab under the "Data" tab for a selected experiment for caArray versions up to version 2.1.1. Once the issue is resolved, Affymetrix DAT files will be able to be imported the same way as EXP, RPT, and TXT files.
Diagram of Process Flow to Import an Affymetrix DAT File
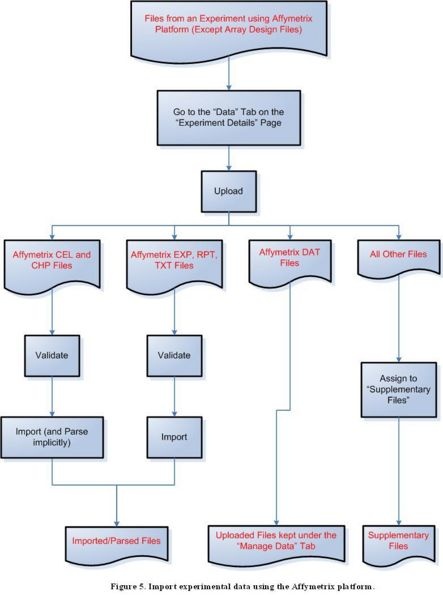
According to the figure above, to import files containing experimental data from the Affymetrix platform, first click on the ‘Data’ tab on the ‘Experiment Details’ page, then proceed to upload the file. For a CEL or CHP file, the next step is to validate the file, then to import and implicitly parse it. For an EXP, RPT, or TXT file, the next step is to validate the file, then to import it. DAT files should not be validated or imported, and should instead be kept under the ‘Manage Data’ tab; all other file formats should be assigned to the ‘Supplementary Files’ category.
Step 3C: Import experimental data using the Illumina platform
Diagram of Process Flow to Import an Illumina Data File
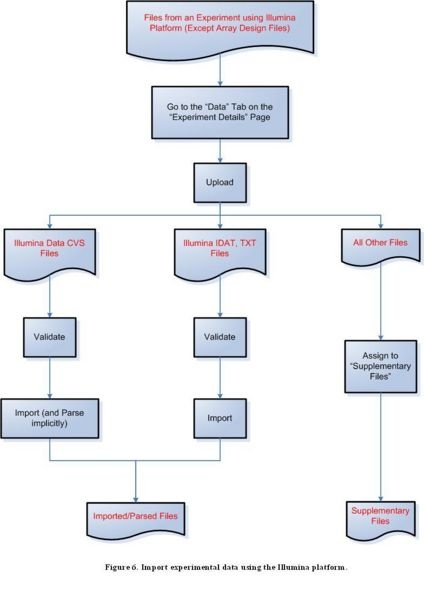
According to the figure above, to import files containing experimental data from the Illumina platform, first click on the ‘Data’ tab on the ‘Experiment Details’ page, then proceed to upload the file. For a Data CVS file, the next step is to validate the file, then to import and implicitly parse it. For an IDAT or TXT file, the next step is to validate the file, then to import it. All other file formats should be assigned to the ‘Supplementary Files’ category.
Step 3D: Import experimental data using the Genepix platform
Diagram of Process Flow to Import a Genepix Data File 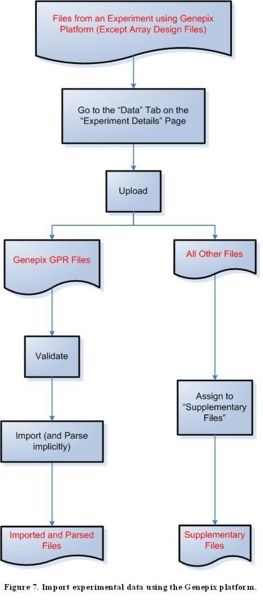
According to the figure above, to import files containing experimental data from the Genepix platform, first click on the ‘Data’ tab on the ‘Experiment Details’ page, then proceed to upload the file. For a GPR file, the next step is to validate the file, then to import and implicitly parse it. All other file formats should be assigned to the ‘Supplementary Files’ category.
Step 3E: Import experimental data using the Agilent platform
Because of a known issue concerning importing Agilent TSV files, uploaded Agilent TSV files should remain in the "Manage Data" tab under the "Data" tab for a selected experiment for caArray versions up to version 2.1.1. Once the issue is resolved, Agilent TSV files will be able to be imported the same way as TXT files.
Diagram of Process Flow to Import an Agilent Data File
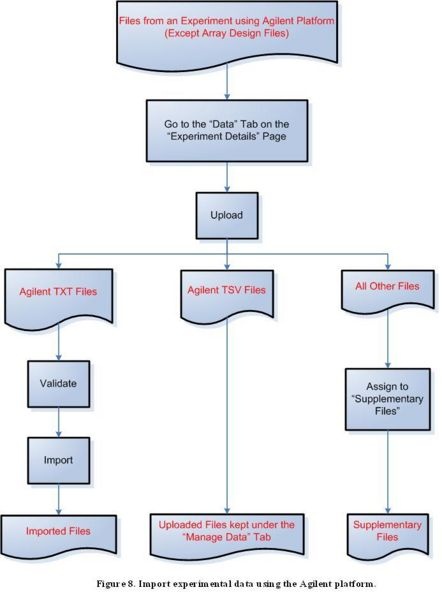
According to the figure above, to import files containing experimental data from the Agilent platform, first click on the ‘Data’ tab on the ‘Experiment Details’ page, then proceed to upload the file. For a TXT file, the next step is to validate the file, then to import it. TSV files should not be validated or imported, and should instead be kept under the ‘Manage Data’ tab. All other file formats should be assigned to the ‘Supplementary Files’ category.
Step 3F: Import experimental data using the ImaGene platform
Because of a known issue concerning importing ImaGene TIF files, uploaded ImaGene TIF files should remain in the "Manage Data" tab under the "Data" tab for a selected experiment for caArray versions up to version 2.1.1. Once the issue is resolved, ImaGene TIF files will be able to be imported the same way as TXT files.
Diagram of Process Flow to Import an ImaGene Data File
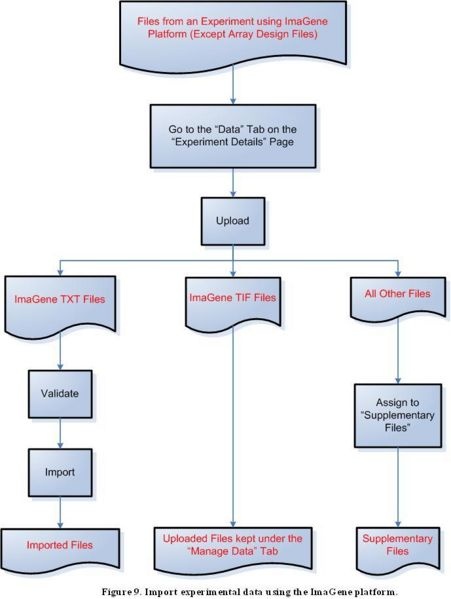
According to the figure above, to import files containing experimental data from the ImaGene platform, first click on the ‘Data’ tab on the ‘Experiment Details’ page, then proceed to upload the file. For a TXT file, the next step is to validate the file, then to import it. TIF files should not be validated or imported, and should instead be kept under the ‘Manage Data’ tab. All other file formats should be assigned to the ‘Supplementary Files’ category.
Step 3G: Import experimental data using the Nimblegen platform
Diagram of Process Flow to Import a Nimblegen Data File
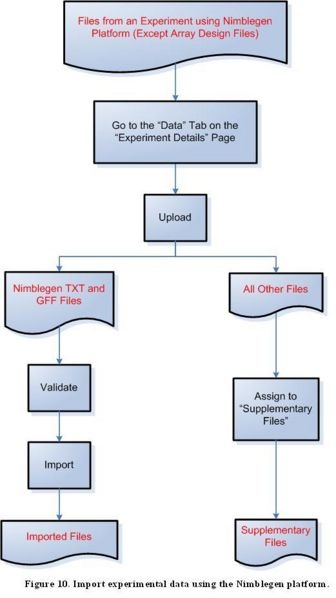
According to the figure above, to import files containing experimental data from the Nimblegen platform, first click on the ‘Data’ tab on the ‘Experiment Details’ page, then proceed to upload the file. For a TXT or GFF file, the next step is to validate the file, then to import it. All other file formats should be assigned to the ‘Supplementary Files’ category.
Have a comment?
Please leave your comment in the caArray End User Forum.