You can add purification data findings to a sample.
To add each finding:
On the Add or Edit page for synthesis purification of a sample, expand the Finding panel, as described in Adding or Editing Synthesis Purification in a Sample - 2021-07-19.
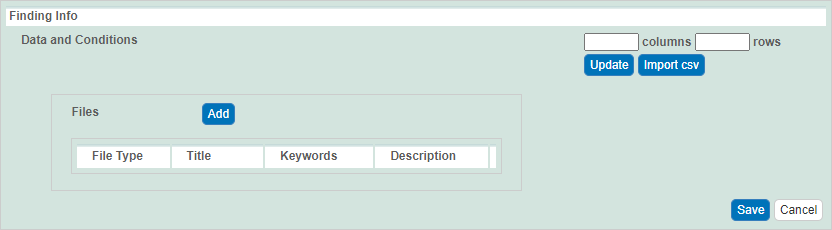
Under Data and Conditions, add findings such as laboratory conditions, pH, or temperature.
You can add data manually or you can import as many .csv files as needed. (TBD: May I have a sample CSV file to import, to test these instructions?)
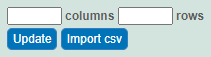
To import a file of data values
Save a spreadsheet of data values to a csv (comma-separated value) file.
Click Import csv. Select the data file and follow the prompts to add it. The system adds columns and data under Data and Conditions.
To add the data values manually
Specify the number of columns and rows for the matrix, and click Update.
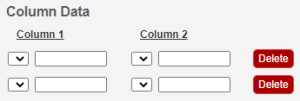
Add the data values to the rows.
Whether you imported values or added values manually, you can preface each data value with one of the following: Maintain the default, equal to (=), or select greater than (>), less than (<), or infinity (approximate). (TBD: On the Dev tier, these drop-down lists are empty.)
To define each column, perform the following steps:
Click an underlined column heading. The Column Definition panel appears.

Select a Column Type, Datum or Condition.
Select a Column Name or select other and add a new one. You can add up to three cell viability Column Names, including cell viability, cell viability B, and cell viability C.
For Column Type Datum, (Column Name options TBD: What column types are available for each column name?).
For Column Type Condition, (Column Name options TBD: Same table as for Characterization?).
(TBD: On the Dev tier, the following drop-down lists are empty.)
For a condition, select a Condition Property.
To further identify a column, select a Column Value Type. Once the column information is saved, the Column Type is shown in parentheses after the Column Name, such as cell viability (mean). (TBD: In Dev tier, for condition, no values show up in this drop-down list for me.)
Select a Column Value Unit, or select other and add one.
If you want the same value to fill all rows in a column, add a Constant Value. For Column Value Type, boolean, enter a Constant Value of 1 for true and 0 for false.
In the Column Definition panel, click Save. The system updates the columns. If needed, click Set Column Order to change the order of the column headings in the matrix.
In the Finding panel, click Save.