This chapter describes the processes for managing studies or platforms within caIntegrator.
Topics in this chapter include:
Managing a Study
Note
A user without management privileges has no access to this section of caIntegrator.
Once you have started to create a study or have deployed it, you can view metadata for the study on the Manage Studies page. For example, the metadata reveals the deployment start and finish dates and times, and whether or not caArray genomic data imported into the study has been updated since deployment. (caIntegrator refreshes caArray data hourly.) If you see that the caArray data has been updated, you could go to the study itself and ascertain the changes. You may decide to keep it as it is or redeploy the study.
Additionally, on this page you can update the study in the following ways:
- Add new attributes (annotations) and upload relevant data to the existing study.
- Disable or re-enable a study
- Delete the study
- Modify existing annotation definitions
- Reload a subset of a study data and re-deploy the study and perform new analyses
- Re-deploy the entire study with new set of data and mappings.
Editing or Updating a Study
To update, edit or delete a study, follow these steps:
- On the left sidebar, click Manage Studies. The Manage Studies page appears, shown in the following figure.
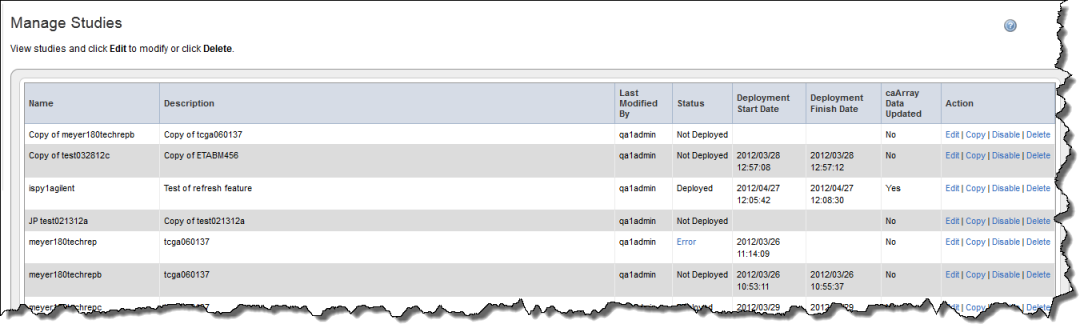
All of the "in process" or "completed" studies display on this page with associated metadata. Note that whoever edited or updated the study last is shown in the Last Modified Column, indicated as the Study Manager. - Click the Edit link corresponding to your study of choice to open the Edit Studies page, shown in the following figure.
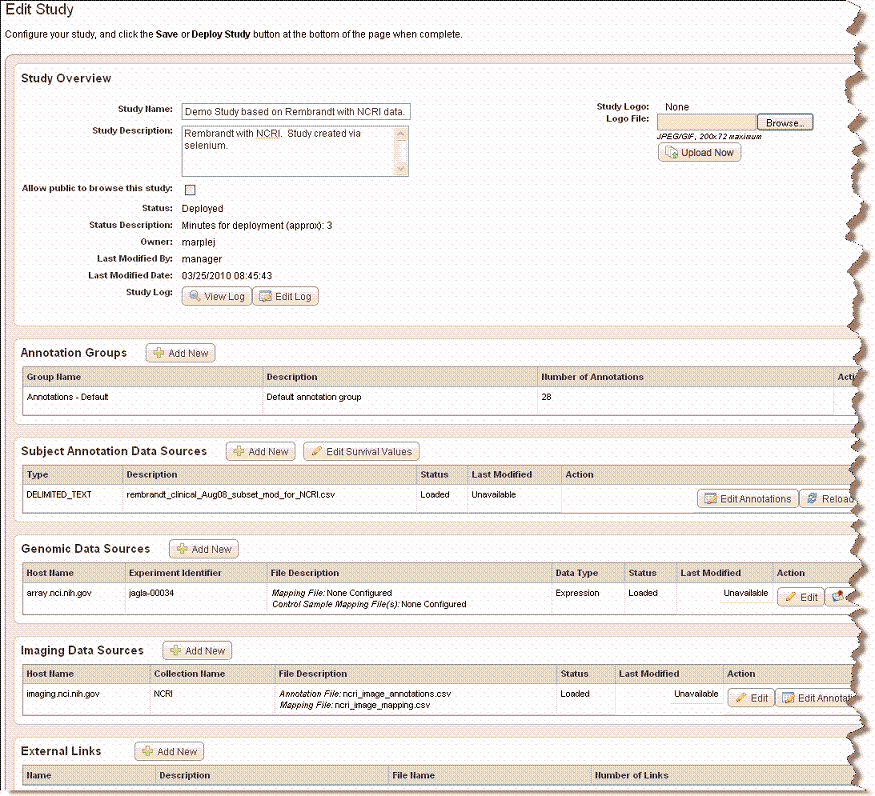
On this page you can edit any details such as adding or deleting files, survival values, and so forth. For information about working with the Edit Study feature, see Creating or Editing a Study. - Click the Delete link to delete the corresponding study.
Copying a Study
On the Manage Studies page, you can copy an existing study. To do so, follow these steps:
- On the left sidebar, click Manage Studies. The Manage Studies page appears, displaying the studies for which you have permissions.
- In the Action column, click the Copy link corresponding to your study of choice. This opens the Edit Study page with enough data from the original study pre-filled that you can deploy the copied study immediately if you wish.
- You can add or edit any of the fields on the page, including the name of the study. Click Save to save the copied study.
- If you later decide to delete the copied study, you can do so from the Manage Studies page.
caIntegrator conventions regarding copying studies are described in the following points:
- The copied study is assigned the name of "Copy of <existing study name>".
- Data that are pre-filled from the existing study are the name, descriptions, logo, annotation groups, subject annotation data sources and external links.
- Genomic and imaging data sources are pre-filled, but no mappings are duplicated.
- The study log from the original study is not copied. The log for the copied study indicates that the study was "copied from <existing study> with <deployment date of original study>".
Disabling or Re-enabling a Study
Only the study manager of a study can disable or re-enable a study. To perform either of these tasks, follow these steps:
- On the left sidebar, click Manage Studies. The Manage Studies page appears, displaying the studies for which you have permissions.
- In the Action column, click the Disable link corresponding to your study of choice.
- To re-enable a study, click the Enable link corresponding to the selected study.
The Manage Studies page refreshes after clicking either of these links. The page now shows that the changed status of the study.
- Disabling a study is recorded in the study log.
- A disabled study is not searchable nor available to any user.
- A disabled study cannot be edited nor copied; the Edit and Copy links become unavailable when the study is disabled.
- When a study is re-enabled, there is no data change to the study from the original.
- A disabled study being re-enabled must not duplicate the name of a currently enabled study.
Managing Study Access
caIntegrator provides role based security which can be used to limit access to studies based on user-assigned roles.
User groups are created in UPT by a UPT Admin. For more information, see Creating a New User Group.
Study access is managed on the Edit Study page. When you click Manage Studies on the left sidebar, caIntegrator lists the studies that have been created and/or deployed on the Manage Studies page. Click a study to open the Edit Studies page.
At the bottom of the study page, the Authorize User Groups feature displays. This section is empty when the study is first configured. The following figure displays an two example users groups.

To configure access to a study, follow these steps.
- Click Activate Group Authorization. The Authorize Additional User Groups page opens, listing all user groups that have been created by name and description.
- Select one group you want to have access to the study and click *Authorize This Group". caIntegrator returns to the Edit Study page, showing the user group authorized with access to this study.
- You can authorize additional groups, edit the authorization or delete it by selecting either of the buttons under Authorized User Groups on the Edit Study page.
- Select Save at the bottom of the Edit Study page to confirm the group you have authorized for study access.
Once the authorization is assigned, study investigators in the user group can query and analyze clinical and genomic data or annotation data for the subjects/patients (studies) to which they have been granted access.
Editing User Group Authorization
Timing of user group authorization
Some users report that the functionality of managing user group authorization works best if done POST-DEPLOYMENT of the study. If done prior to deployment, there were issues with the consistency of performance.
To edit authorized user groups, follow these steps:
- Go to any study > Authorized User Groups > Activate Group Authorization.
- On the Authorize Additional User Groups page, authorize one or more groups.When you finish, caIntegrator returns you to the Edit Study page and a new Edit Authorization button becomes available.
- If you select the Edit Authorization button, you are redirected to the Edit User Group Authorization page (example shown below) where you can manage the authorization group permissions to see or not see a particular part of the study. You can specify the data the group named in the dialog can see, or you can specify other restrictions the screen displays by checking or unchecking corresponding boxes.

Managing Platforms
caIntegrator supports a limited number of array platforms, all of which originate from Agilent or Affymetrix. While they do not represent all of the platforms supported by caArray, caIntegrator must have array definitions loaded for the platforms it supports, and be able to properly load the data from caArray and parse it. For more information, see B - Platforms Supported by caIntegrator.
You can create a study without genomic data, but you cannot add genomic data to a caIntegrator study without a corresponding supported array platform. If you add more than one set of genomic data to the study, you can specify more than one platform for the study.
On the Manage Platforms page, you can identify, add or remove supported platforms.
To manage platforms in caIntegrator, follow these steps:
- Click Manage Platforms on the left sidebar.
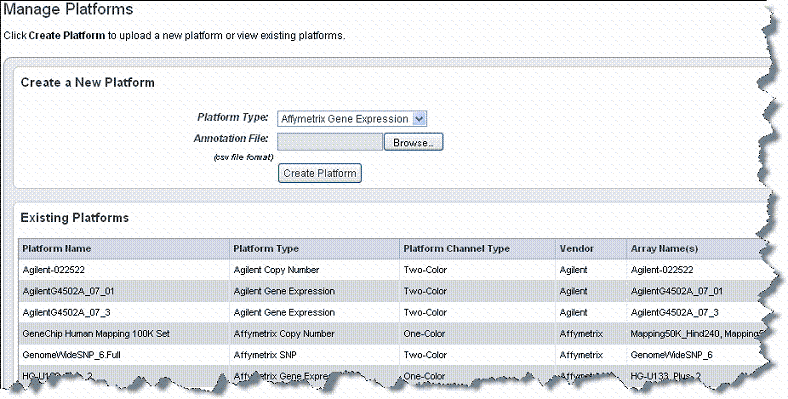
The Manage Platforms page that opens lists in the Existing Platforms section the platforms caIntegrator currently supports, those that the system can pull from caArray. See the following figure. You can also add a new platform by entering information in the fields in the Create a New Platform section.
- To add a platform, in the Platform Type field, select the appropriate platform type from the drop down list.
Click Browseto navigate for the Affymetrix or Agilent file you want to add.
Note
Tab-delimited .txt or .tsv Agilent platform annotation files must contain the following column headers: ProbeId, GeneSymbol, GeneName and Accessions.
- Enter a Platform Name if the file is a NON-GEML.xml file.
Depending on the Platform Type you select, there may be other parameters to provide here as well, such as Platform Channel Type for an Agilent platform. - Click the Browse button to browse for the appropriate annotation file.
- When you have located it, click Open in the Upload File dialog box. The system displays the annotation file you select in the Annotation File box.
- Once all parameters have been entered, click Create Platform.
The platform deployment can be time-consuming. If the platform takes more than 12 hours to deploy, caIntegrator displays a "timed out" message. At that point, you can delete the platform, even if it has not loaded to the system.
Note
Platform loading can fail if the manufacturer's platform annotation file is missing data.