This page is simply a wiki shortcut.
This page displays subject matter that is included, in context, in many of the web pages that constitute the CTRP application user's guides.
Getting Help
This page contains select topics that help you to understand and use the NCI CTRP Registration application. You can find more comprehensive documentation in the NCI CTRP Registration User's Guide.
Adding Sites
Amending Trials
- You can create a new NIH grant record only if you can provide all of the following details:
- Funding Mechanism
- NIH Institution Code
- Serial Number
- NCI Division/Program
- You can not change the following existing information:
- NCI trial identifier number
- NIH grant number
- IND/IDE serial number
- The following list is the minimum set of required documents that must be submitted with each amendment:
- Protocol document.
- IRB approval document.
A change memo document or protocol highlighted document:
A change memo is a document that contains a summary of changes as compared to the original, or last amended, trial submission.
A protocol highlighted document is a document that has been marked up, with or without using a Track Changes feature.
List of participating sites and contact information (for multi-site trials, if not included in the protocol document).
Informed consent (if not included in the protocol document) and only when there are documented changes to the consent.
When you are submitting an amendment, we recommended that you provide any additional documents that you think will be useful to the CTRO for reviewing and processing the amendment document.
A trial may have more than one owner. Review the recorded information carefully to see if another owner has modified the trial.
- Dose Escalation Amendment (change in the number of patients treated at a given dose level)
- Change in Sites Open to Patient Accrual
- Change in Principal Investigators
- Change in Risk to Participants (new risk identified [new CAEPR], changes made as a result of an updated Severe Adverse Event)
- Scientific Change (opening an arm, adding a new arm, closing an arm, changing objectives, changing statistical analysis, adding correlative studies, increase or decrease in the accrual goal, changing from Phase I to Phase II, additional data points)
- Correction of Typographical Errors which Change Scientific Meaning (mg vs. mcg)
- Eligibility Change (change to the inclusion or exclusion criteria)
- Therapy Change (change in dose, adding another agent, change in administration, change in route)
To open the trial record for amending, refer to Amending Trials.
- On the toolbar, click Search > Clinical Trials. The Search Trials page appears.
- Click Search > My Trials. The Search Results page displays the results of your search and actions available (if any) for each record.
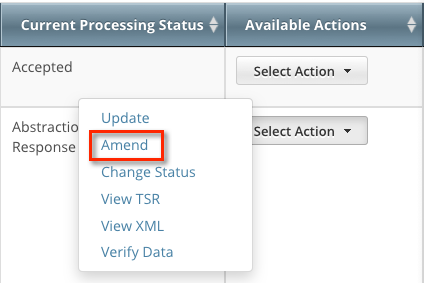
In the Available Actions column, click Select Action > Amend. The Amendment Trial page displays the data currently registered with the CTRP.
Make changes to the fields as necessary. The system requires you to provide information for all fields marked with an asterisk (*). The instructions are the same for trial registration and trial amendment, with some exceptions:
In the Amendment Details section, specify the appropriate information in the various fields. The following table describes the fields.
Field Label Description/Instructions Amendment Number
Enter an appropriate number.
Amendment Date* Select or enter an appropriate date. A trial can accumulate program codes from different organization families. For example, a participating site might belong to a different organization family than the lead organization. When you amend a trial, the Program Code field displays all codes from the master list for the organization family of the lead organization.
Primary Completion Dates are optional for non-interventional trials and for DCP trials. In both cases, the system excludes such trials when submitting XML documents to ClinicalTrials.gov. Otherwise, Primary Completion Dates are required.
For instructions on recording each field otherwise, refer to Registering New Trials.
- Review the amendment. Refer to Reviewing and Submitting Trial Amendments.
- Submit the amended trial to the CTRP. The system sends you an email notification — with the details of what has changed — whenever you amend accepted trials.
Converting Documents to PDF
Trial-related documents uploaded as Microsoft Word (.doc), Microsoft Excel (.xls, .xlsx, .xlsm, or .xlsb), and WordPerfect files contain text that abstractors can copy and paste directly. PDFs (portable document format) contain text that abstractors can copy only if the content was created from other text-based applications such as Word or Excel.
Abstractors can not copy and paste text from scanned documents
Avoid uploading PDFs of scanned documents. They can not be edited, copied, or read with OCR (optical character recognition) applications.
 .
.Microsoft provides instructions for converting files to PDFs both on their website and in the Help documentation in each of its applications.
When searching for help, use "save file as pdf" as the search term.
You do not need a document converter in Mac OSX. Instead, print your documents to a PDF file.
How to Convert Text-Based Files to PDFs in Mac OSX
- Open your text file in its original format (such as .doc or .xls).
- Click File > Print.
- In the Print window, click the PDF button at the bottom-left and select the Save as PDF option.
- Choose the file location, rename your PDF file, and then click Save.
Displaying Trial Ownership
- View trial details
- Update trials
- Amend Complete trials
- Access TSR and XML documents
As a Site Administrator, you can display trial ownership for any trial for which your organization or its family member organization is the lead organization. Additionally, you can indicate whether a user would like to receive system notifications, including TSRs and XML files, on a trial-by-trial basis.
How to Display Trial Ownership
- On the toolbar, click Administration > Trial Ownership > View. The Display Trial Ownership page displays the current owner(s) of the trials for which your organization is the lead organization. It also indicates which of the owners, for each of the trials, receive system-generated email notifications.
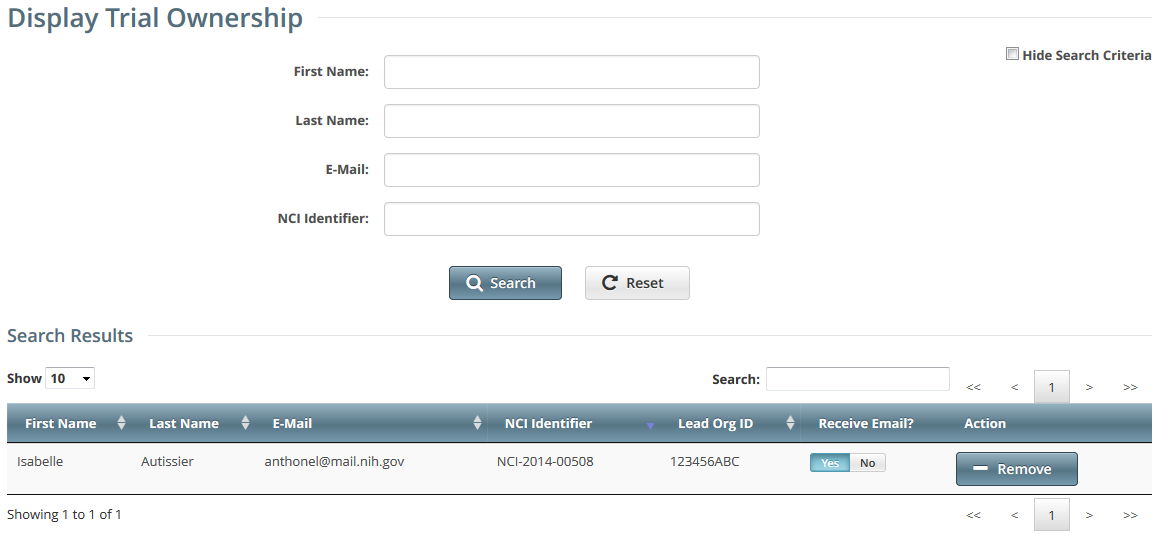
- You have the following search options:
- To display all the trials owned by a given user, search for the user by first name, last name, or email address, and then click Search. The system lists all trials owned by the user in the Search Results list.
To display all owners of a given trial, enter the NCI Identifier in the field provided, and then click Search. The system lists all owners of the selected trial in the Search Results list.
- You have the following options to manage trial ownership:
Indicate whether or not an owner of a trial should receive system-generated email messages. To do so, in the Receive Email? column, select Yes or No.
Selecting Yes indicates that you want the owner to receive all notifications regarding the specified trial.
Selecting No indicates that you do not want the owner to receive any notifications regarding the specified trial.
- To revoke ownership of a trial, locate the user/trial in the Search Results list, and then click Remove.
- You have the following additional options:
To filter the search results, in the Search field, type one or more characters contained in any of the fields. The system filters the list as you type each character. For details, refer to Working with Tables and Search Results.
To create more space on the page, on the upper right corner of the page, select the Hide Search Criteria check box.
Editing Trial Details
How to Edit Updated Details
Scroll to the bottom of the Review Trial Details page, and click Edit. The Update Trial page displays all information you have provided, in editable form.
Make changes as necessary and then review the trial again. For instructions, refer to Reviewing and Submitting Trial Updates.
Granting and Revoking Administrative Authority
- The CTRO or another Site Administrator has granted the user profile the administrative rights.
- The user profile is affiliated with that site (an organization family or a single organization that does not belong to an organization family).
The relationships between Site Administrators and trials in a single site are as follows:
- An organization:
- Can have one original Site Administrator.
- Can have many Site Administrators appointed by the original Site Administrator.
- Can be the lead organization for many trials.
- Can be the affiliated organization for many users who can submit and own trials.
- A trial:
- Can have one submitter.
- Can have one organization affiliation, defined by the lead organization.
Can have many trial owners.
- Trial ownership:
- Can be implicit. By default, if a Site Administrator's affiliated organization is the lead organization for a trial, that Site Administrator is an implicit owner of that trial.
- Can be explicit. By default, the trial submitter is the only explicit trial owner. A Site Administrator can grant ownership of a trial to more users and can remove trial ownership from the original submitter and other users. (Refer to Managing Trial Ownership.) If you add a Site Administrator as an owner of a trial, that Site Administrator has explicit ownership of that trial, rather than just implicit ownership.
- A Site Administrator can do the following:
- Display trial ownership
- Manage trial ownership
- Manage site record ownership
- Manage accrual access
- Manage the administrative rights of other users in the organization
Revoke own administrative rights
Site administrators do not receive system-generated emails automatically
The system sends generated emails (including TSRs) to a Site Administrator only if the Site Administrator's affiliated organization is the trial's lead organization, or if the Site Administrator is the trial submitter and/or trial owner. The Site Administrator can also manage email notification globally. For instructions, refer to Managing Registration Email Notifications.
As a Site Administrator, you can grant and revoke administrative rights to other users in your organization. (You can grant/revoke administrative rights to users who have a CTRP account and whose organizational affiliation is the same as your own.) Site Administrators are the only Registration users who can access the Site Administration menu.
How to Grant and Revoke Site Administrative Rights
- On the toolbar, click Administration > Site Administration. The Site Administration page appears, listing Registration users and indicating which ones have previously been granted administrative rights.
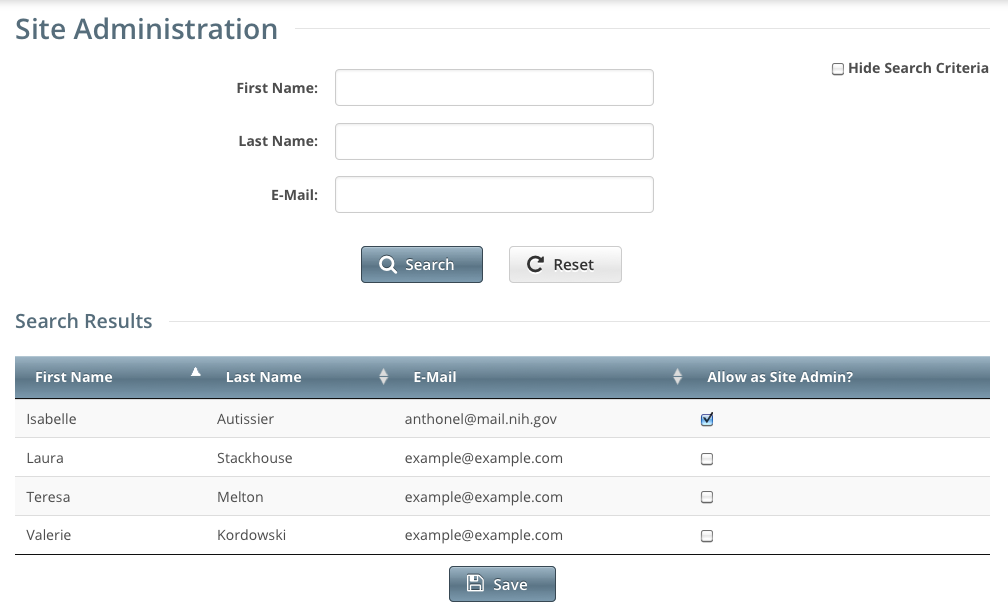
- Search for the Registration user for whom you want to adjust administrative rights: Specify the user by first name, last name, or email address, and then click Search. The user's name appears in the Search Results list.
To promote the user to Site Administrator, select the check box in the Allow as Site Admin? column.
As a Site Administrator, you can revoke your own administrative rights. Use caution if you do so because you can not promote yourself thereafter.
To revoke administrative access, clear the check box in the Allow as Site Admin? column.
- Click Save.
Managing Access to the Subject Accrual Application
Assignment at the organization level pertains to trials that the organization has registered in CTRP and extends to those that it will register in the future. Similarly, assignment at the organization family level pertains to trials that any member organization has registered in CTRP and extends to those that it will register in the future.
Only the CTRO has access to CTEP and DCP trial accruals.
The table below outlines the access and trial assignment rules for Complete and Abbreviated trials.
| Access/Assignment | Complete Trial | Abbreviated Trial |
|---|---|---|
| Who can assign access? |
|
|
| To whom can you assign access? | Any registered user affiliated with the Site Administrator's organization, or family member organization (including the Site Administrator) | Any registered user affiliated with the assigner's organization (including the Site Administrator) |
| What types of trials can you assign? | Complete trials for which the assigner's organization is the lead organization | Abbreviated trials for which the assigner's organization is the lead organization or participating site |
| How can you assign access? |
The system automatically assigns the organization family Accrual Submitter access to any trial registered by new organizations added to an organization family in the future. It withdraws access if anyone removes the organization family Accrual Submitter's organization from the organization family in the future. |
|
| Who can submit accrual data? | Any assigned user affiliated with the lead organization, or with a lead organization that is a member of the user's affiliated organization family | Any assigned user affiliated with the participating site |
| To which trials can the organization family Accrual Submitter submit accrual data? |
|
|
For instructions, refer to the following pages:
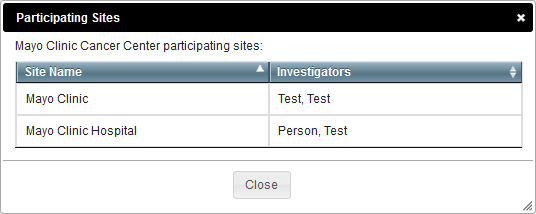
Managing Participating Site Record Ownership
On the toolbar, click Administration > Trial Ownership > Manage. The Manage Trial Ownership page displays the following lists:
At the top of the page: The names of users affiliated with your affiliated organization or its family member organization(s).
Below the list of names: Trials on which your organization is a lead organization or participating site.
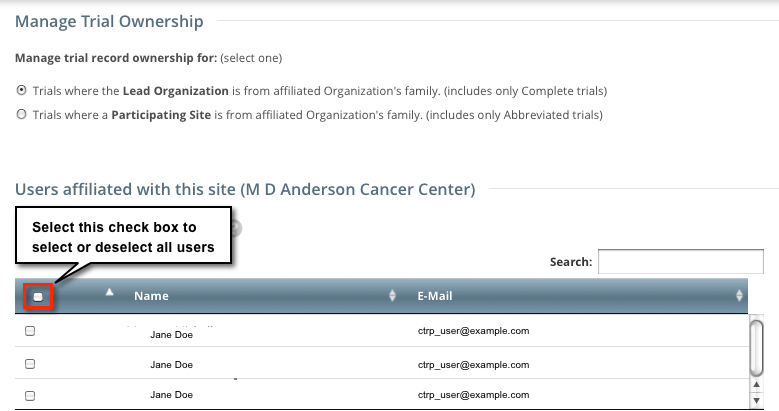
- Under Manage trial record ownership for, select which role your affiliated organization or its family member organization(s) play(s).
- For Complete trials, select Lead Organization.
- For Abbreviated trials, select Participating Site.
Indicate which users you want to give the ability to update and amend selected Complete trials; or update Abbreviated trials. To do so, select one or more user names on the list.
You can select or deselect all names, or filter the list of names
To select all names, select the check box on the left side of the column heading. Click it again to deselect all names.
To filter the list of names, in the Search field, type one or more characters contained in a user's name or email address. The system filters the list as you type each character.
In the list of trials at the bottom of the page, under All Available Trials, or All Available Abbreviated Trials, select the trials to assign to the user(s), and then click the Assign icon ( > ).
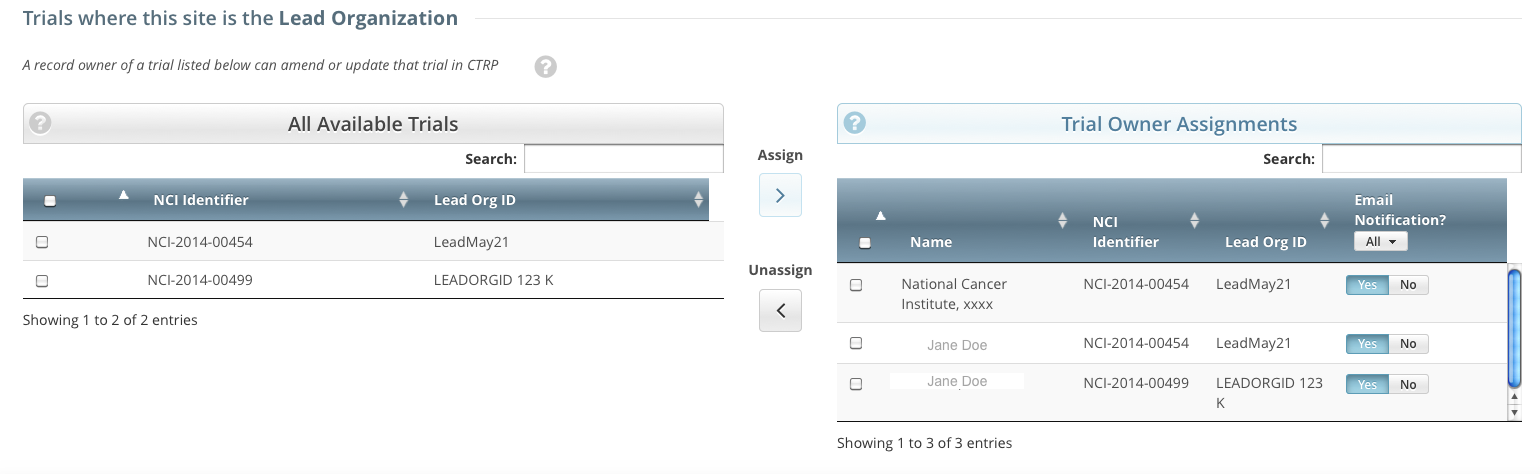
To unassign trials, under Trial Ownership Assignments, or Site Owner Assignments, select the user(s) you want to unassign, and click the Unassign icon ( < ).
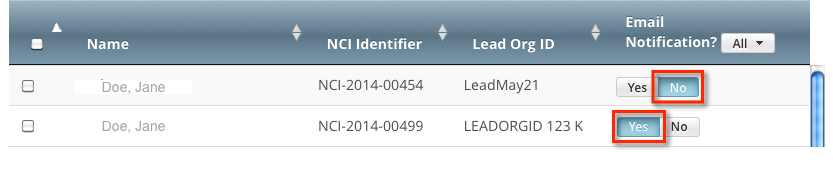
For Complete trials, indicate which trial owners should receive email notifications about the trial(s):
To indicate that a specific user should or should not receive email, in the Email Notification? column, in the row for that user, click Yes or No.
To indicate that all owners should or should not receive email, in the Email Notification? column header, click All > Select Yes/No for all.
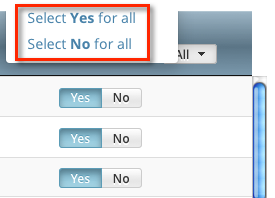
The Select No for All and Select Yes for All options apply globally to all trial owners, not just the ones currently visible in the list.
Managing Program Codes and Targeted Accrual
This section describes how to:
Manage the set of program codes and program code assignments for the organization family. Most of this section provides instructions for that task.
- Manage targeted accrual, the total number of participants expected to accrue at all of the sites within your organization family participating on a study. For instructions, refer to Managing Targeted Accrual.
For instructions, refer to the following pages:
Using the Manage Program Codes Master List Page
Viewing Program Codes
- On the toolbar, click Administration > Manage DT4 Information > Manage Program Code Master List. The Manage Program Codes Master List appears.
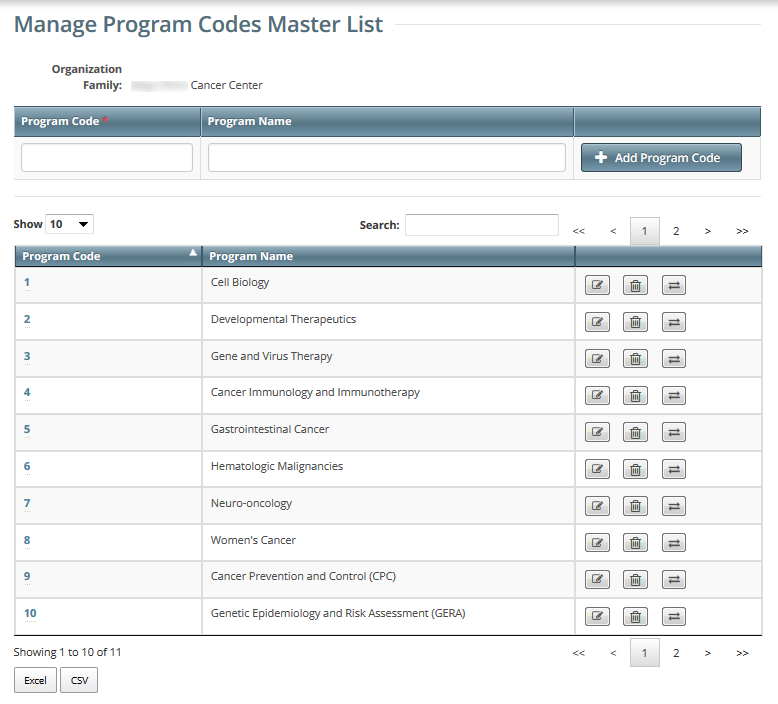
Notice that this page displays information specific to your organization family.
You can navigate through the list of program codes just like any other list of search results in the CTRP Registration application. For instructions, refer to Working with Tables and Search Results.
Adding Program Codes
For each organization family, active program codes must be unique. The list may contain two entries with the same program code, if one is active and the other is inactive.

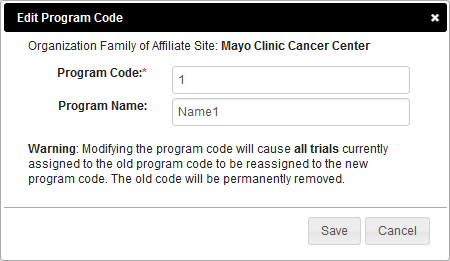
Editing Program Codes
![]() ). The Edit Program Code dialog box appears.
). The Edit Program Code dialog box appears.
Deleting or Inactivating Program Codes
Viewing the Assignments for a Program Code
On the Manage Program Codes Master List page, in the row for the program code of interest, click the View icon ( In Review Approved Active Enrolling by Invitation Temporarily Closed to Accrual Temporarily Closed to Accrual and Interventions You can navigate through the list of trials just like any other list of search results in the CTRP Registration application. For instructions, refer to Working with Tables and Search Results. On the Manage Program Code Assignments page, in the Search box, if you include the search term in double quote marks (for example "cancer"), the search results include trials that have an exact match in any of the first five columns.![]() ). The Manage DT4 Information for Your Center page appears.
). The Manage DT4 Information for Your Center page appears.![]() ). The Select Program Code(s) button appears. Click Select Program Code(s). The list includes all program codes for the organization family and other options.
). The Select Program Code(s) button appears. Click Select Program Code(s). The list includes all program codes for the organization family and other options.
Using the Manage Program Code Assignment & Targeted Accrual for Your Center Page
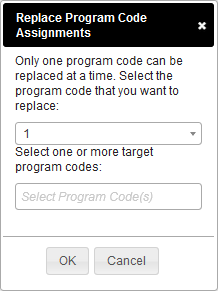
Replacing a Program Code
Assigning Program Codes to Multiple Trials
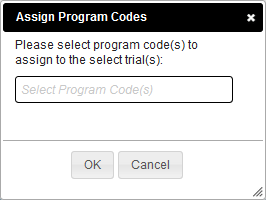
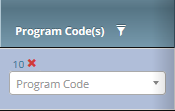
Assigning a Program Code to a Single Trial
You can also assign a program code to a trial while performing the following tasks:

The Program Code field appears.
Unassigning Program Codes from Multiple Trials
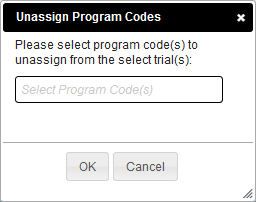
Unassigning a Program Code from a Single Trial
You can also unassign a program code from a trial while performing the following tasks:
Viewing Your Participation
Managing Targeted Accrual
On the toolbar, click Administration > Manage DT4 Information > Manage DT4 Information for Your Center. A page by that name appears. This value appears in the Your Center Total column of the Data Table 4 report. For instructions on generating that report, refer to Running CTRP Data Table 4 Reports.

Managing Trial Ownership
On the toolbar, click Administration > Trial Ownership > Manage. The Manage Trial Ownership page displays the following lists:
At the top of the page: The names of users affiliated with your affiliated organization or its family member organization(s).
Below the list of names: Trials on which your organization is a lead organization or participating site.
- Under Manage trial record ownership for, select which role your affiliated organization or its family member organization(s) play(s).
- For Complete trials, select Lead Organization.
- For Abbreviated trials, select Participating Site.
Indicate which users you want to give the ability to update and amend selected Complete trials; or update Abbreviated trials. To do so, select one or more user names on the list.
You can select or deselect all names, or filter the list of names
To select all names, select the check box on the left side of the column heading. Click it again to deselect all names.
To filter the list of names, in the Search field, type one or more characters contained in a user's name or email address. The system filters the list as you type each character.
In the list of trials at the bottom of the page, under All Available Trials, or All Available Abbreviated Trials, select the trials to assign to the user(s), and then click the Assign icon ( > ).
To unassign trials, under Trial Ownership Assignments, or Site Owner Assignments, select the user(s) you want to unassign, and click the Unassign icon ( < ).
For Complete trials, indicate which trial owners should receive email notifications about the trial(s):
To indicate that a specific user should or should not receive email, in the Email Notification? column, in the row for that user, click Yes or No.
To indicate that all owners should or should not receive email, in the Email Notification? column header, click All > Select Yes/No for all.
The Select No for All and Select Yes for All options apply globally to all trial owners, not just the ones currently visible in the list.
Managing Your Account
Changing your Organizational Affiliation results in loss of privileges
If you change your organizational affiliation, the system revokes your existing Site Admin and Accrual Submission privileges.
How to Edit Your Account Information
- Visit the CTRP Registration home page at https://trials.nci.nih.gov/registration.
- Log in.
- On the top right corner of any page, click Your Username > My Account.
The My Account page appears, populated with the information you previously supplied for your account. In the Your Account Profile section, make any changes as necessary, and then click Save.
Registering Industrial and Other Trials
Registering New Complete Trials
How to Register New Complete Trials
Perform a search for the trial. For instructions, refer to Searching for Trial Records. If the trial does not already exist, proceed to the next step. (The system uses the Lead Organization ID, Lead Organization Trial ID, and the ClinicalTrials.gov Identifier to detect duplicates. If the system detects a duplicate, the system does not record your trial.)
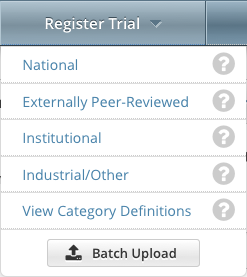
On the toolbar, click Register Trial, and select your trial's Submission Category (funding source) from the drop-down list, either National, Externally Peer-Reviewed, or Institutional. (For information, refer to CTRP Trial Categories, Study Sources.)
To read a definition of each of the trial submission categories (study sources), click View Trial Category Definitions, click the Help icon (
 ) next to each category, or refer to https://cancercenters.cancer.gov/GrantsFunding/eData#dt4.
The Register Trial page appears.
You can expand and collapse sections of the registration page
By default, all sections of the registration form are displayed.
To collapse or expand each section individually, click the Collapse or Expand icon on the right side of the section title as shown in the figures below.
To collapse all sections, click Collapse All.
In the various fields, specify the appropriate information. The following table describes the fields.
Tip
Be sure to provide information for all fields marked with an asterisk (*). If you cannot complete the registration of a trial in one Registration session, you can save a draft of the trial details you have completed. (Refer to "Save as Draft" below.) Later you can return to complete the registration in another session.
Field Label Description/Instructions Various
In the various fields, specify information as appropriate according to the detailed instructions provided for each of the following sections:
- Recording Trial Identification Information
- Recording Trial Details
- Recording Lead Organizations and Principal Investigators
- Recording Sponsors and Responsible Parties
- Recording Data Table 4 Information
- Recording NIH Grants
- Recording Trial Statuses
- Recording Trial Dates
- Recording INDs and IDEs
- Recording Regulatory Information
- Uploading Trial-Related Documents
Save as Draft
Click to save a draft of the record so that you can complete the registration at another time. You must have provided, at the minimum, both the Lead Organization and Lead Organization Trial Identifier to save a draft.
The system saves your draft, assigns it a unique ID (for tracking purposes), and sends you an email message confirming that the information has been saved. You can end your Registration session and retrieve your draft later to complete the registration.Review Trial
Click to initiate the system check for errors and missing information. The system displays the results in a message at the top of the Review Trial Details page. Indicators mark specific fields that you must complete or correct in order to submit the trial.
The Review Trial Details page is read-only. To make changes to the trial data, follow the instructions in Editing Trial Details.Cancel Click to cancel the registration. A pop-up message prompts you to confirm cancellation.
If you choose to cancel the registration, you will lose all data that you may have entered.
To continue with the trial registration, scroll to the bottom of the Review Trial Details page, and then click Submit. To prevent creating a duplicate record, do not click Submit more than once. If you have to make changes after you click Submit, contact the CTRO at ncictro@mail.nih.gov rather than using your browser's Back button to make changes.
The registration notification message system sends you an email message to acknowledge that the trial has been submitted. Later it sends another email message to notify you when your trial has been accepted or rejected.
After submission, most users other than the trial submitter can not see the trial information you provided until the information has been validated. However, an organization administrator (if one exists) and an assigned owner can access the information prior to validation.
Searching for Organization Records
- Organization Identifying Information
- PO ID - Enter the exact PO ID only
- CTEP ID - Enter all or part of the CTEP ID
- Name - Enter all or part of the Organization's name
- Family Name. Enter all or part of the Organization Family's name
- Organization Address
- Country - Select the country from the drop-down list
- City - Enter all or part of the organization's primary location
- State - Select the state from the drop-down list
- Zip Code - Enter all or part of the Zip code
- Organization Type. Select one of the following:
- Lead Organization - Returns organizations that are Lead Organizations
- Participating Site - Returns organizations that are Participating Sites
- Both - Returns organizations that are either Lead Organizations or Participating Sites
How to Search for Registered Organizations
- Click the Search Organizations tab. Or, on the toolbar, click Search > Organizations.
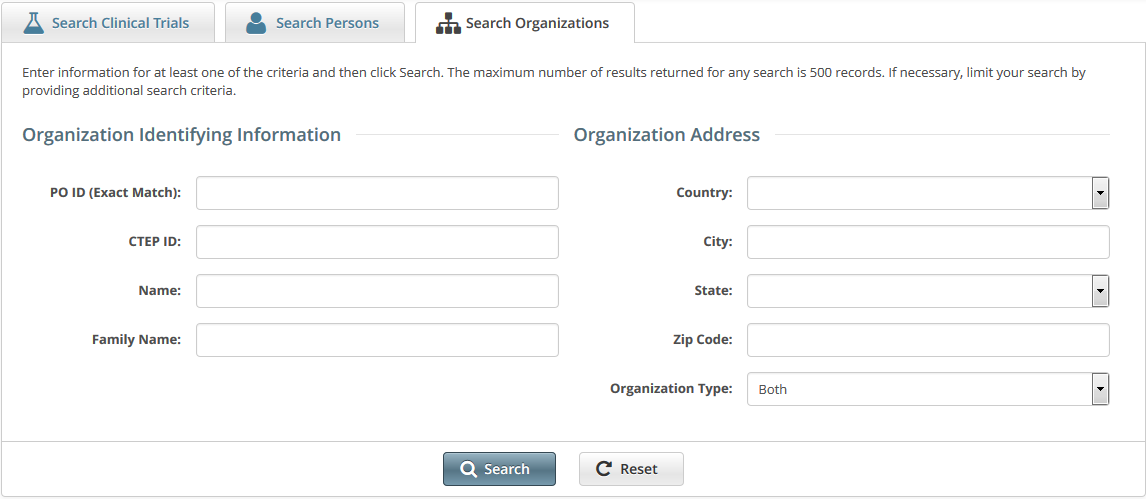
Provide as much information as you can about the organization you are looking for, or, enter the Person/Organization (PO) ID or Cancer Therapy Evaluation Program (CTEP) Identifier. You must enter search criteria in at least one field.
Searching by PO ID
The PO ID you enter for your search criterion must be exact and complete. That is, do not use partial IDs or wildcards.
Using wildcard characters ( % )
You can enter a series of characters in any of the search fields (except the PO ID, which must be an exact match) to narrow the search results.The system adds wildcards on both sides of the search string (the series of letters you type) for you implicitly. You can type wildcard symbols (% or *) between characters of the string as necessary.
Click Search.
The organizations that meet your search criteria are listed in the Search Results table. To navigate the search results table, see Working with Tables and Search Results.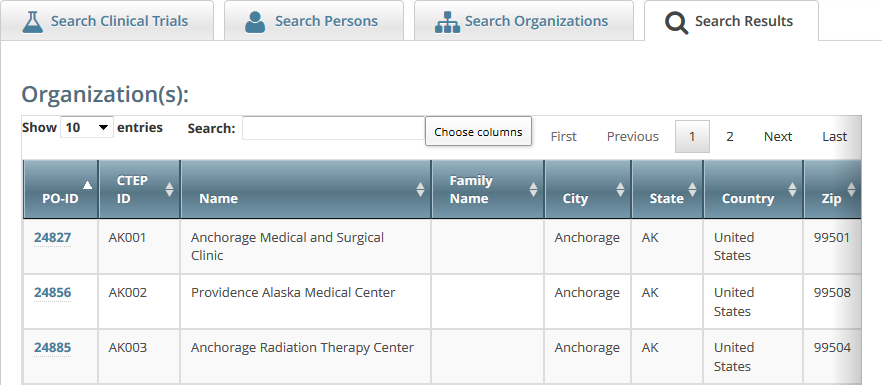
Tip
If the organization you are searching for is not listed, you may have searched too narrowly (that is, you may have provided too much information about the organization). If the list of results is very long and contains many organizations that are similar to the one you are searching for, you can narrow your search by providing more information.
- If the organization does not appear in the results table, do one of the following to modify your search:
- To broaden your search so that more organizations are listed in the search results, delete one or more of your criteria. For example, if you searched by part of the organization’s name, city, state, and zip code in your original search, you may want to search by state alone.
- or - - To narrow your search so that fewer organizations are listed in the search results, provide more about your organization. For example, if you searched by state in your original search, you may want to search by city in addition to the state.
- To broaden your search so that more organizations are listed in the search results, delete one or more of your criteria. For example, if you searched by part of the organization’s name, city, state, and zip code in your original search, you may want to search by state alone.
- To view the details of any organization in the search results list, click its PO-ID.
The Organization Details window displays current information about the organization, including a live web and/or email link that you can use to contact the organization.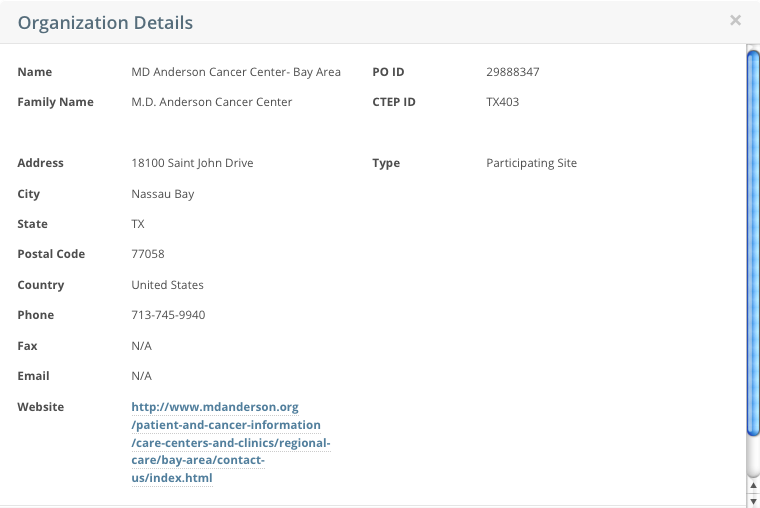
Searching for Person Records
How to Search for Registered Persons
- Click the Search Persons tab. Or, on the toolbar, click Search > Persons.
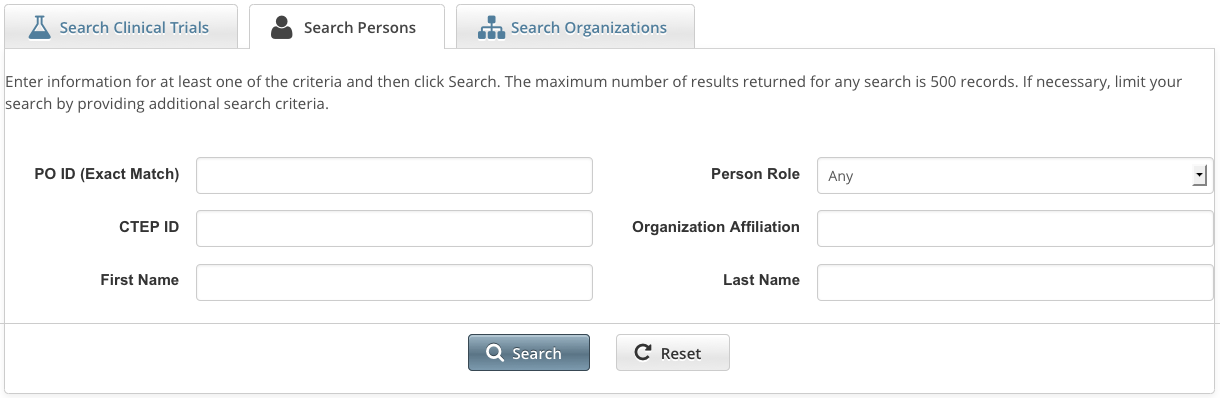
Provide as much information as you can about the person you are looking for, or, enter the Person/Organization (PO) ID or Cancer Therapy Evaluation Program (CTEP) Identifier. To search by person role, select a role from the Person Role drop-down list. You must enter search criteria in at least one field.
Searching by PO ID
The PO ID you enter for your search criterion must be exact and complete. That is, do not use partial IDs or wildcards.
Using wildcard characters ( % )
You can enter a series of characters in any of the search fields (except the PO ID, which must be an exact match) to narrow the search results.
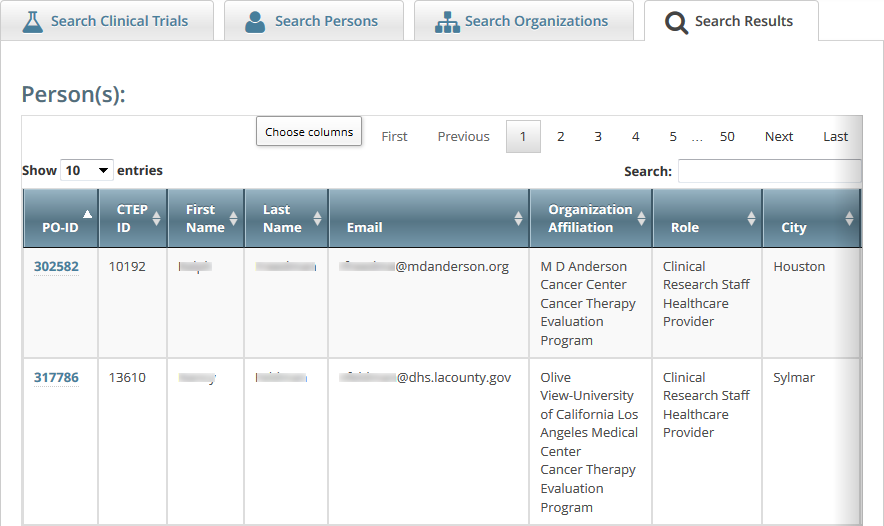
Click Search.
The persons that meet your search criteria are listed in the Search Results table. To navigate the search results table, see Working with Tables and Search Results.
Tip
If the person you are searching for is not listed, you may have searched too narrowly (that is, you may have provided too much information about the person). If the list of results is very long and contains many persons that are similar to the one you are searching for, you can narrow your search by providing more information.
- If the person does not appear in the results table, do one of the following to modify your search:
- To broaden your search so that more persons are listed in the search results, delete one or more of your criteria. For example, if you searched by part of the person’s name, city, state, and zip code in your original search, you may want to search by state alone.
- or - - To narrow your search so that fewer persons are listed in the search results, provide more about your person. For example, if you searched by state in your original search, you may want to search by city in addition to the state.
- To broaden your search so that more persons are listed in the search results, delete one or more of your criteria. For example, if you searched by part of the person’s name, city, state, and zip code in your original search, you may want to search by state alone.
- To view the details of any person in the search results list, click its PO-ID link.
The Person Details window displays current information about the person.
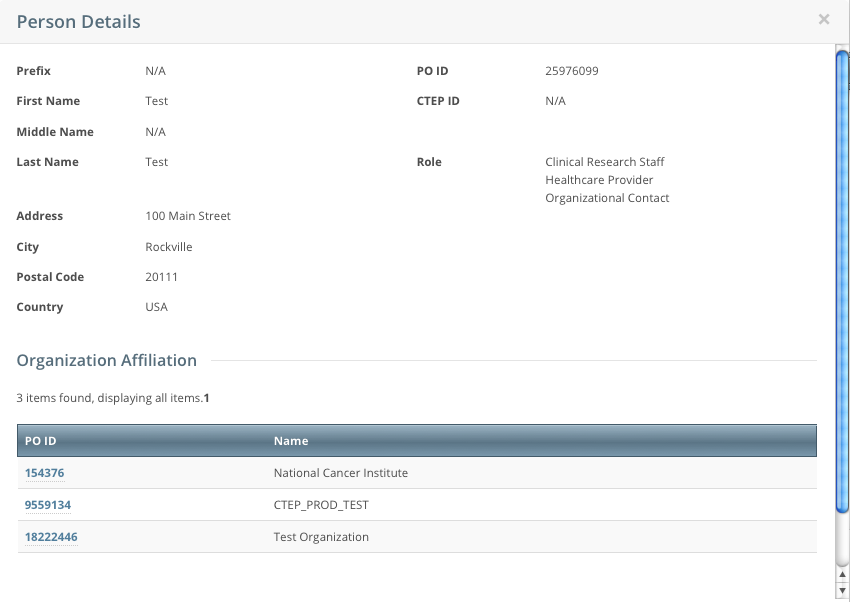
- To view the details of the organization with which the person is affiliated, click its PO-ID link.
Searching for Trial Records
Trial Status Rules for Start and Completion Dates
| Status | Start Date Type | Primary Completion Date Type | Completion Date Type |
|---|---|---|---|
| Can be Actual or Anticipated. | Can be Actual or Anticipated. | Must be Anticipated. |
| Must be Actual. | Can be Actual or Anticipated. | Can be Actual or Anticipated. |
| Must be Actual. | Must be Actual. | Can be Actual or Anticipated. |
The general rules for Study Date types are as follows:
- If the date is in the past, the type must be Actual.
- If the date is today, the type could be Actual or Anticipated.
- If the date is in the future, the type must always be Anticipated.
The general rules for Study Date values are as follows:
- The Trial Start Date can be in the past, present, or future.
The Primary Completion Date is always the same as, or later than, the Trial Start Date.
If the Primary Completion Date is Actual, it can be earlier than the Current Trial Status Dates Complete or Administratively Complete.
The Completion Date is always the same as, or later than, the Primary Completion Date.
Updating Trials
Protocol Document Updates
Verifying Trial Data
This requirement applies to Interventional trials that have the following attributes: CTRO staffs are responsible for verifying the types of trials below. Trial owners and submitters are responsible for verifying all others. Each time you verify a trial, the CTRP system records your name and date of verification. This is true for original as well as updated trials. You can view these records at any time, but cannot change them. For additional instructions, refer to the following pages:
The system sends trial owners, trial submitters, and site administrators a verification reminder 30 and 15 days before their trial data verification due dates. It sends reminders to CTRO staffs 7 days before the due date.
Viewing Accrual Assignment History by Trial
- On the toolbar, click Administration > Accrual Access > View. The Accrual Access Assignment by Trial page lists all current access assignments by trial, grouped by trial category.
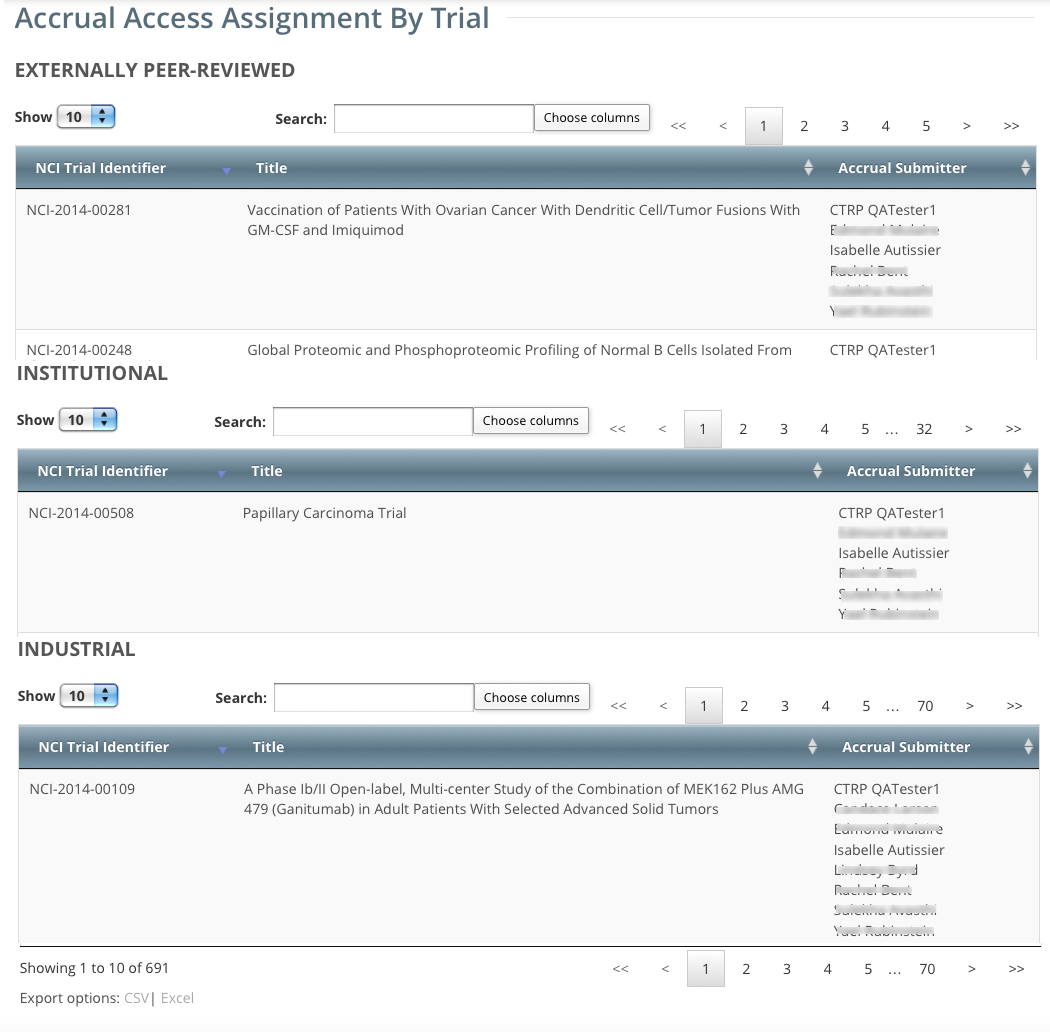
- To navigate the table, refer to Working with Tables and Search Results.
- To export the assignment history to a file, click CSV (comma-separated values) or Excel in the bottom left corner. Your browser prompts you to open or save the file.
Viewing Accrual Assignment History in Registration
- On the toolbar, click Administration > Accrual Access > Assignment History. The Accrual Assignment History page lists all access assignments.
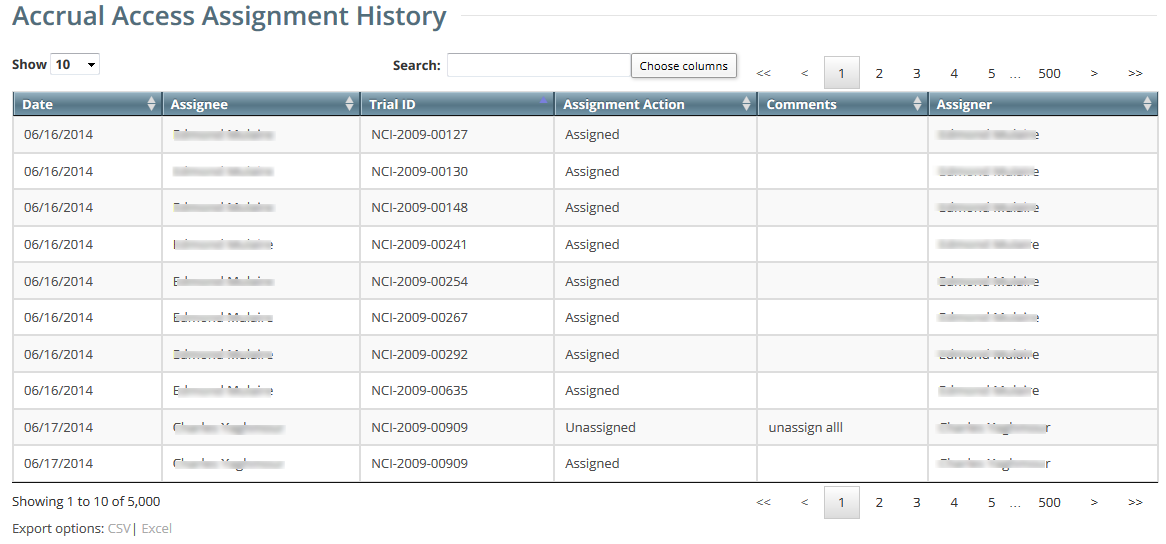
- To navigate the table, refer to Working with Tables and Search Results.
- To export the assignment history to a file, click CSV (comma-separated values) or Excel in the bottom left corner. Your browser prompts you to open or save the file.
Viewing Trial Details
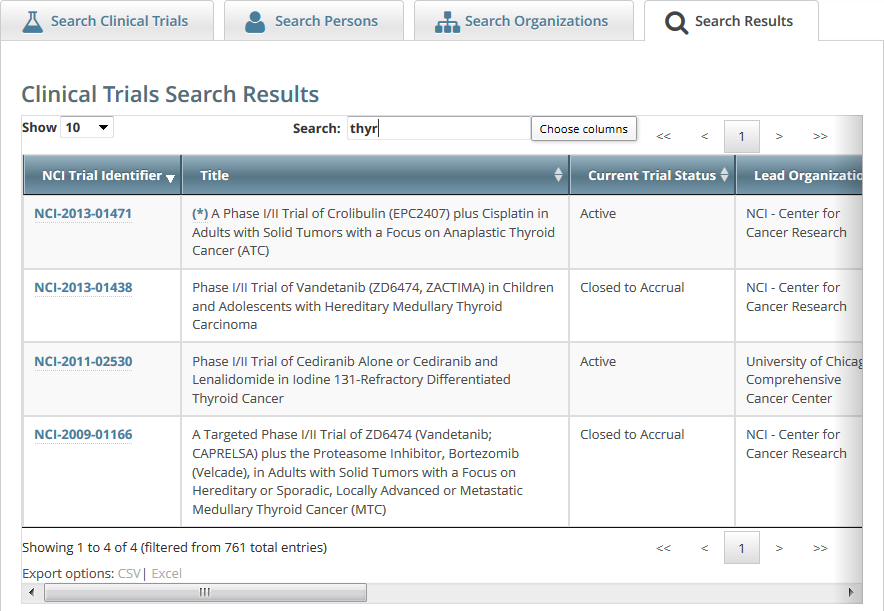
To view details for a given clinical trial listed on a search results page, click its associated NCI Trial Identifier hypertext link. The details provided for a given trial depend on the following criteria:
- Trial trial ownership types, as follows:
- Private trials - Trials submitted or owned by the user who is currently logged in to Registration
- Public trials - Trials submitted by other registered users
- Data Table 4 Category (Complete or Abbreviated), as described in CTRP Trial Categories, Study Sources.
The Trial Details page displays the metadata as entered by a trial submitter. The following image shows the upper part of the Trial Details page.
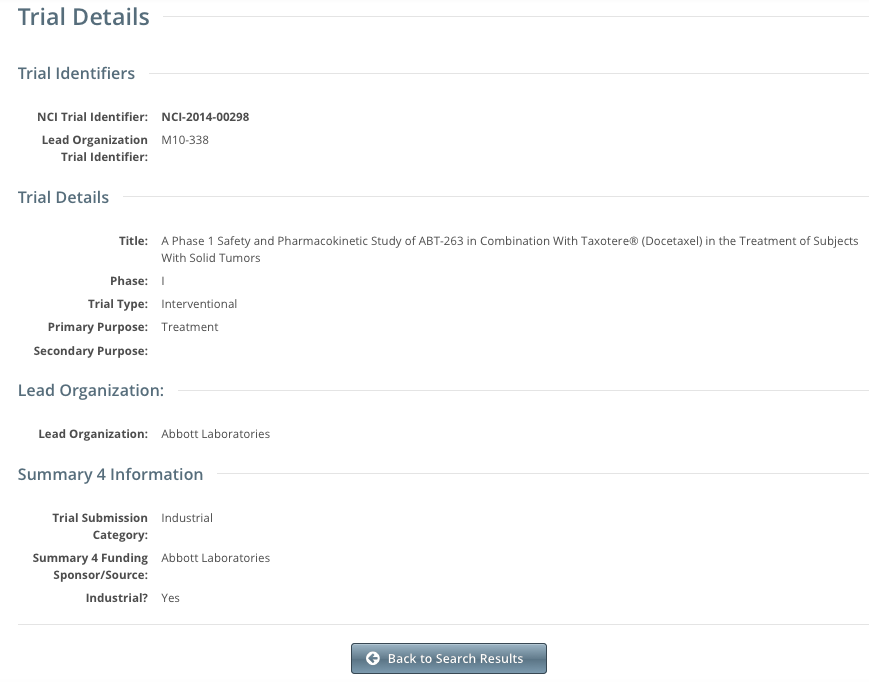
The system displays responsible party, IND/IDE, NIH grant information and trial-related documents for Private trials only.
To return to the Search Trials page, scroll to the bottom of the Trial Details page, and click Back to Search Results.